The amount of force exerted on wheel bearings is astounding. Each bearing is required to smoothly control the rotation of the wheel to the tune of about a thousand revolutions per mile, support the transfer of power to the wheels for rapid starts and sudden stops, and handle the powerful lateral twisting force of the tires changing direction against the pavement — all while supporting a vertical load of hundreds of pounds. And, we expect them to perform flawlessly just about forever? Not realistic.
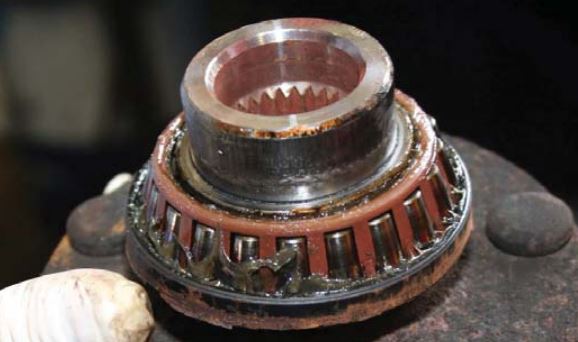
Wheel Bearing Guide Subaru: This tapered roller bearing was damaged by faulty seals that allowed water and dirt to enter the bearing.
The “Achilles Heel” of a wheel bearing is the seal. Although wheel bearings can fail due to damage, improper installation or material imperfection, the most common cause of failure is the seal losing its ability to hold the lubricating grease in and/or dirt and water out.
However, the best seal, applied to the best wheel bearing, cannot be expected to last if not correctly installed. This primer can help you properly service Subaru wheel bearings.
One of the most common concerns that any vehicle owner perceives as a problem is brake noise when stopping the vehicle. The question pops up: “What is considered to be an ‘acceptable’ level of brake noise?”
Brake Noise Is It Normal? One of the most common concerns that any vehicle owner perceives as a problem is brake noise when stopping the vehicle.
The disc brake systems used on vehicles today are designed and developed to meet many different, but very strict requirements. This must be accomplished while providing an optimum level of performance under a wide range of vehicle and environmental operating conditions.
The brake pads selected must be a balanced choice. There is a fine line between a quiet brake pad and one that will provide optimum performance under extreme braking conditions. Consequently, when a change is made in the brake pad formulation (whether it is meant to provide longer pad life, shorter stopping distances, noise reduction or a change in pedal effort), a trade-off must be made in one area or another.
An example of pad formulation change would be the industry’s switch from asbestos to semi-metallic brake linings.
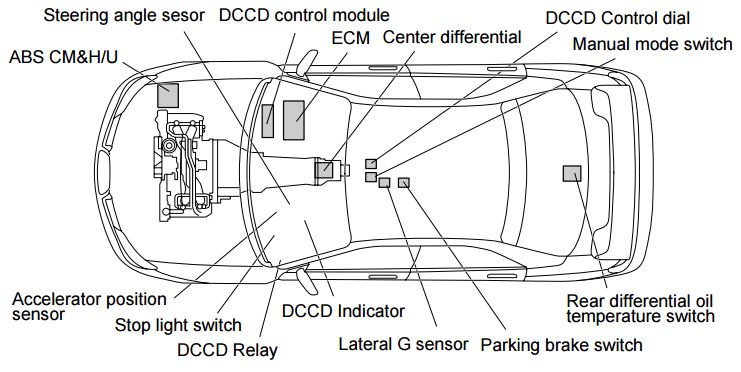
The Driver’s Control Center Differential system is system that appropriately controls the differential limiting force of center differential LSD depending on running conditions of a vehicle. The DCCD system evolved provides controls that follow operations of the driver, while conventional DCCD system provides those based on conditions of the vehicle.
The system consists of a center differential of planetary gear type provided with LSD function, a steering angle sensor, a yaw rate sensor, a lateral G sensor, a DCCD control module and other components.
DCCD: The DCCD system evolved provides controls that follow operations of the driver, while conventional DCCD system provides those based on conditions of the vehicle.
Hybrid LSD mechanism using conventional electromagnetic clutch LSD mechanism added with torque-sensitive mechanical LSD mechanism allows approximate coincidence between the vehicle acceleration/deceleration and LSD clutch differential limiting timings, resulting in linear LSD characteristics acquired through driver’s accelerator operation. Thus, the driver can more freely control the vehicle by easily grasping behavior of the vehicle.
In addition, the steering angle sensor let the DCCD control module know the driver’s intension of turning. In combination with the yaw rate and lateral G sensors, it adjusts the electromagnetic clutch LSD differential limiting force based on the running path imaged by the driver and the actual behavior of the vehicle. Thus, cornering in better accordance with the driver’s image is enabled, preventing occurrence of understeer and oversteer.
For balancing between the vehicle turning performance and traction during turning in a high order, the center differential driving torque is set to have distribution ratio 41:59.
DCCD: For balancing between the vehicle turning performance and traction during turning in a high order, the center differential driving torque is set to have distribution ratio 41:59.
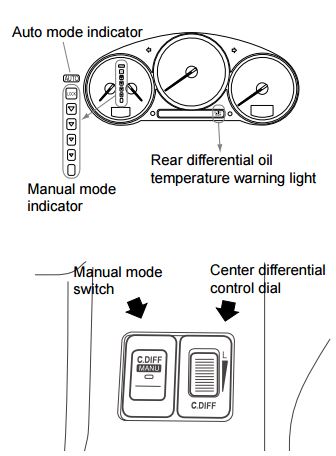
Manual mode switch/DCCD control dial
In manual mode, the DCCD control can be used to adjust the differential limiting force of the electromagnetic clutch LSD mechanism in the range from free to lock. Current settings of the control dial are displayed on the indicator in the meter.
DCCD: In manual mode, the DCCD control can be used to adjust the differential limiting force of the electromagnetic clutch LSD mechanism in the range from free to lock.
The 2008 Subaru Impreza WRX STI has a heritage of power and control. Previous models have been the foundations for countless racing victories and championships. The new WRX STI promises the same with it’s 305- horsepower, turbocharged, intercooled Boxer engine and a six-speed manual transmission.
SI-Drive: he new WRX STI promises the same with it’s 305- horsepower, turbocharged, intercooled Boxer engine and a six-speed manual transmission.
Power and control incorporate enhanced technology. As suggested by new switchgear on the dashboard and center console and my markings within the instrument cluster’s center-mounted tachometer, a driver has some things to learn before wringing out the most from the car.
Today’s electronics now allow the driver to tinker with engine response characteristics, the manner in which All-Wheel-Drive system fights for traction, and the degree to which braking and engine management help maintain vehicle stability. These capabilities are made possible by standard Vehicle Dynamics Control (VDC), Driver Controlled Center Differential (DCCD), and Subaru Intelligent Drive (SI-Drive).
Subaru vehicles are more reliable than ever before. To assure their continued reliability, a schedule of inspection and maintenance (I & M) services is prescribed by Subaru of America for every Subaru vehicle sold. A copy of this schedule can be found in the Warranty and Maintenance Booklet located in the vehicle glove compartment.
Maintenance Inspections for Subaru: Subaru vehicles are more reliable than ever before. To assure their continued reliability, a schedule of inspection and maintenance (I & M) services is prescribed by Subaru of America for every Subaru vehicle sold.
Subaru vehicle maintenance inspections services are divided into recommended intervals beginning with three months or 3000 miles (whichever comes first). Each additional level in the maintenance schedule (7,500/15,000/ 30,000 miles) adds more maintenance and inspection steps to the process. The 15,000 (15 month) and 30,000 mile (30 month) services are ‘major’ services, and include the most comprehensive range of component checks, part replacements and adjustments.
If you are already familiar with Subaru vehicles, you may have developed a routine when performing a vehicle safety maintenance inspections. Following a set routine allows you to start at one end of the vehicle and end up at the other end, having performed all of the necessary safety inspection steps along the way.
Repetition of the safety inspection may also allow you to commit the steps to memory, but a checklist can be a helpful addition that leaves nothing to chance (or memory). Checking items off the checklist provides a written record that can be shared with the customer and retained for your service records as well.
Recommended steps in a Subaru Safety Maintenance Inspections are also spelled out in the owner’s Warranty and Maintenance Booklet. Some of the steps overlap services performed during the scheduled maintenance program. It could be argued that any scheduled maintenance should always include a Safety Inspection. Most of the Safety Maintenance Inspection steps are based on common sense, but it’s surprising how frequently these simple suggestions are ignored.
Wheel arch height (vehicle ride height) as well as front and rear wheel alignment should be inspected at 30 month/30,000 mile intervals. Winter driving and its attendant chuckholes may shorten that maintenance interval for some drivers
While inspecting wheel alignment, also check for obvious signs of damage to suspension components, tightness of bolts and nuts and the condition of other under car components.
Check, adjust and/or measure wheel alignment in accordance with the following procedures:
1.) Wheel arch height (front and rear)
2.) Camber (front and rear)
3.) Caster (front)
4.) Front toe-in
5.) Rear toe-in
6.) Thrust angle (rear)
7.) Wheel steering angle
1. Wheel Arch Height
1.) Adjust the tire pressures to specifications.
2.) Set the vehicle under “curb weight” conditions (empty luggage compartment, install spare tire, jack, service tools, and top off fuel tank).
3.) Set steering wheel in a wheel-forward position.
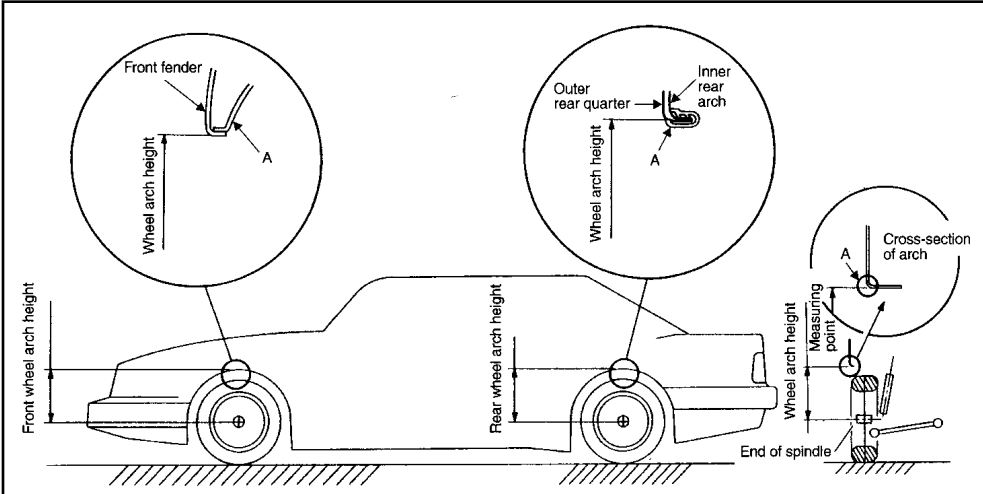
4.) Suspend a thread from the wheel arch (point “A” in figure above) to determine a point directly above the center of the spindle.
Subaru Wheel Alignment: Measure the distance between the measuring point and the center of the spindle.
5.) Measure the distance between the measuring point and the center of the spindle.
6.) Consult the service manual for Wheel Arch Height specifications.
This is a step by step guide on installing steering rack bushings (whiteline) on a 08+ WRX/STi. This needs to be done the right way and all the bolts NEED to be torqued with a torque wrench to factory spec for the car to be in a safe operating state.
1.) Remove the under tray. There are 2 12mm bolts towards the front, 1 12mm bolt on the rear, 2 clips on the rear. and 2 plastic pop-out clips on the sides near each wheel well.
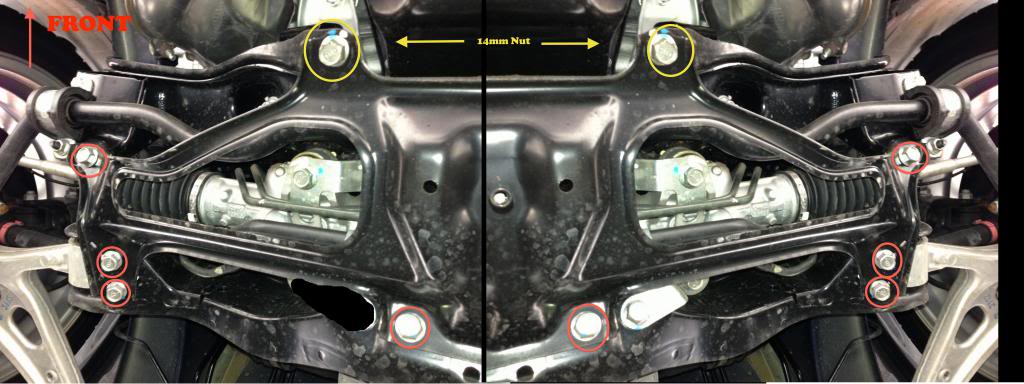
2.) After removing the under tray you will need to remove 10 14mm bolts holding the cross member support brace (otherwise known as the jack plate) in place. The bolts that are to be removed are circled in red and yellow.
Note: The bolts circled in yellow are secured by nuts on the topside so you will need the 14mm wench as well. These bolts are torqued down pretty tight if they have never been removed before.
Steering Rack Bushings Install on a 08+ STi: The bolts circled in yellow are secured by nuts on the topside so you will need the 14mm wench as well.
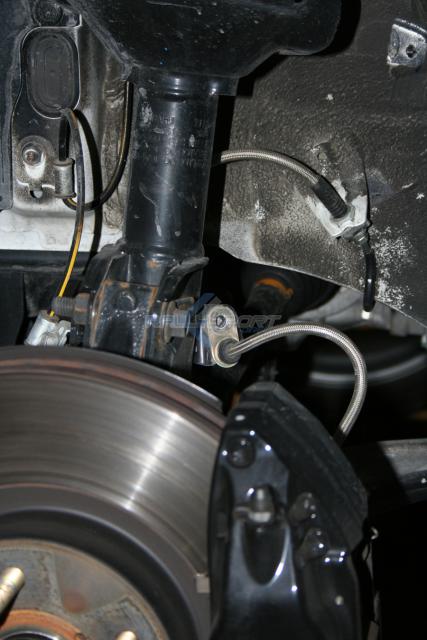
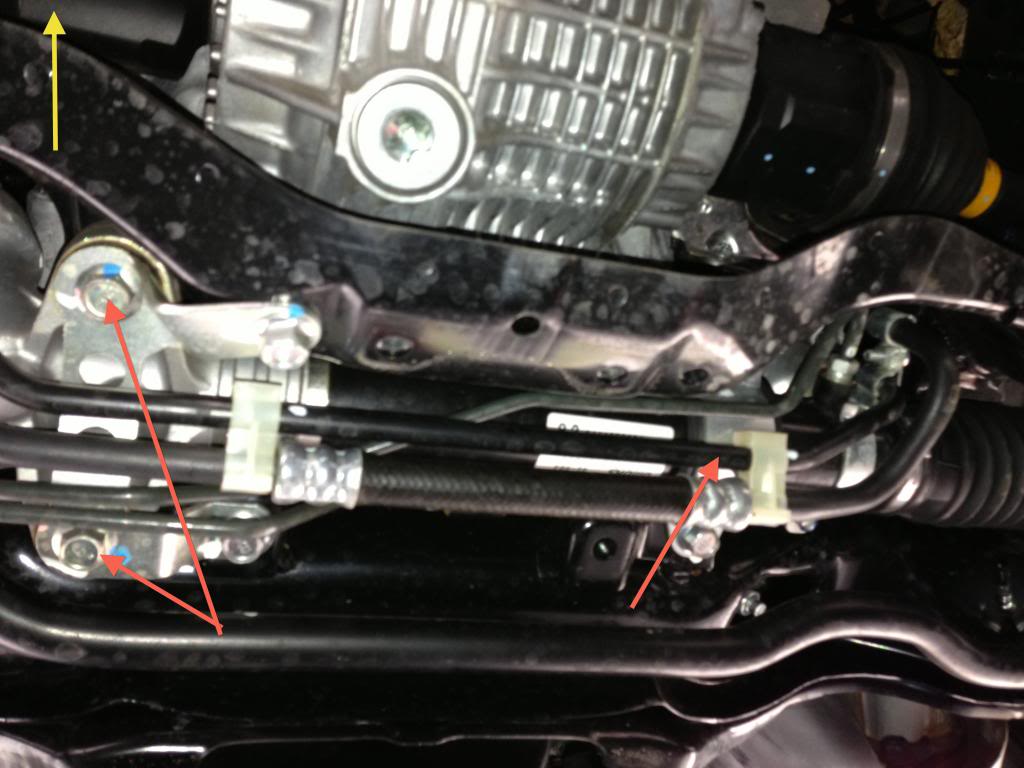
3.) Once the cross member support is removed the steering rack will be exposed as pictured below. Note the location of the 3 bushings denoted by the red arrows.
Steering Rack Bushings Install on a 08+ STi: Note the location of the 3 bushings denoted by the red arrows.
Front stub axle seal replacements require special precautions. The seals are pressed into a side bearing retainer, which must be removed to replace a leaking seal. The side bearing retainers also control front differential side bearing preload, as well as ring and pinion backlash.
When replacing a stub axle seal, mark the position of the side bearing retainer before un-threading the retainer. Remove only one side bearing retainer at a time, or you’ll risk disturbing the differential adjustments. If you’ve marked the position before removal, the correctly installed position of the side bearing retainer will be obvious, as you will be unable to turn the retainer another complete turn.
Axle general maintenance: A driveaxle for a 2008 Subaru Impreza WRX.
The driveaxles on some Subaru vehicles are pressed into the wheel hub with a light press fit. Blasting the axle out of the hub with an air chisel, center punch or other implement of destruction invites damage to the wheel bearings. All of the force brought to bear by these methods finds its way to the wheel bearings, possibly damaging their races or balls. Special tools are available for removing and installing press-fit driveaxles. Ignoring these cautions invites a comeback for noisy wheel bearings shortly after your CV axle repair work.
We use cookies on our website to give you the most relevant experience by remembering your preferences and repeat visits. By clicking “Accept”, you consent to the use of ALL the cookies.
This website uses cookies to improve your experience while you navigate through the website. Out of these, the cookies that are categorized as necessary are stored on your browser as they are essential for the working of basic functionalities of the website. We also use third-party cookies that help us analyze and understand how you use this website. These cookies will be stored in your browser only with your consent. You also have the option to opt-out of these cookies. But opting out of some of these cookies may affect your browsing experience.
Necessary cookies are absolutely essential for the website to function properly. These cookies ensure basic functionalities and security features of the website, anonymously.
Cookie
Duration
Description
cookielawinfo-checkbox-analytics
11 months
This cookie is set by GDPR Cookie Consent plugin. The cookie is used to store the user consent for the cookies in the category "Analytics".
cookielawinfo-checkbox-functional
11 months
The cookie is set by GDPR cookie consent to record the user consent for the cookies in the category "Functional".
cookielawinfo-checkbox-necessary
11 months
This cookie is set by GDPR Cookie Consent plugin. The cookies is used to store the user consent for the cookies in the category "Necessary".
cookielawinfo-checkbox-others
11 months
This cookie is set by GDPR Cookie Consent plugin. The cookie is used to store the user consent for the cookies in the category "Other.
cookielawinfo-checkbox-performance
11 months
This cookie is set by GDPR Cookie Consent plugin. The cookie is used to store the user consent for the cookies in the category "Performance".
viewed_cookie_policy
11 months
The cookie is set by the GDPR Cookie Consent plugin and is used to store whether or not user has consented to the use of cookies. It does not store any personal data.
Functional cookies help to perform certain functionalities like sharing the content of the website on social media platforms, collect feedbacks, and other third-party features.
Performance cookies are used to understand and analyze the key performance indexes of the website which helps in delivering a better user experience for the visitors.
Analytical cookies are used to understand how visitors interact with the website. These cookies help provide information on metrics the number of visitors, bounce rate, traffic source, etc.
Advertisement cookies are used to provide visitors with relevant ads and marketing campaigns. These cookies track visitors across websites and collect information to provide customized ads.