Tag Archives: 2.5RS

Brake Fluid Flush Subaru:

Brake Fluid Flush Subaru:

This is a step by step guide on how to do a brake fluid flush on most Subaru cars. It’s often a good idea to do a brake fluid flush at least once a year to keep your Subaru’s braking system in good condition. This is even more important if you autocross or do track days with your car. Use a good performance brake fluid and not whatever is cheapest at Autozone. I have a strong preference towards ATE and Motul brake fluid. Good fluid combined with good brake pads like a Hawks or Carbotechs will give your Subaru great stopping power.

1.) Either jack-up the vehicle and place a rigid rack under it, or lift-up the vehicle.

2.) Remove all the wheels.

3.) Drain the brake fluid from master cylinder.

4.) Refill the reservoir tank with recommended brake fluid.

NOTE:

• Avoid mixing different brands of brake fluid to prevent degrading the quality of fluid.
• Be careful not to allow dirt or dust to get into the reservoir tank.
Air bleeding sequence (1) → (2) → (3) → (4)
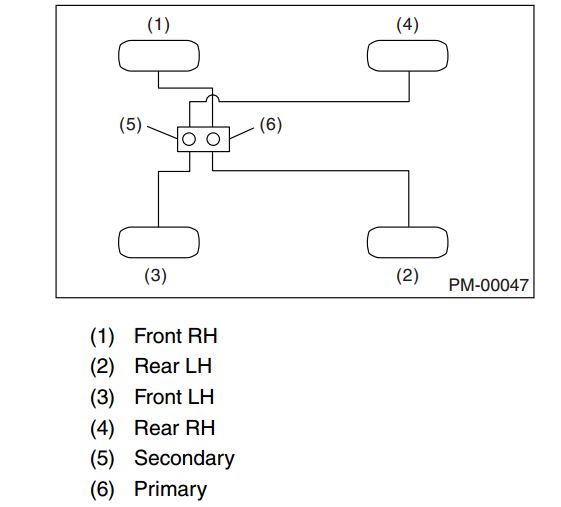
Brake Fluid Flush Subaru: Air bleeding sequence (1) → (2) → (3) → (4)

5.) Install one end of a vinyl tube onto the air bleeder and insert the other end of the tube into a container to collect the brake fluid.
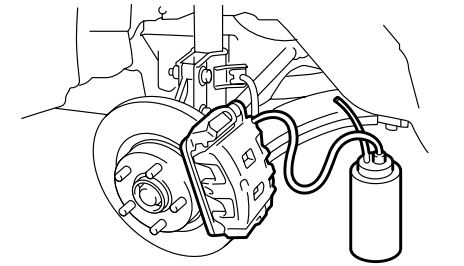
Brake Fluid Flush Subaru: Install one end of a vinyl tube onto the air bleeder and insert the other end of the tube into a container to collect the brake fluid.


NOTE: 
• Cover the bleeder with cloth, when loosening it, to prevent brake fluid from being splashed over surrounding parts.
• During the bleeding operation, keep the brake reservoir tank filled with brake fluid to eliminate entry of air.
• The brake pedal operation must be very slow.
• For convenience and safety, two people should do the work.
• The amount of brake fluid required is approx. 500
m2 (16.9 US fl oz, 17.6 Imp fl oz) for total brake
system.

6.) Have a friend depress the brake pedal slowly two or three times and then hold it depressed.

Maintenance Inspections for Subaru:

Maintenance Inspections for Subaru:

Subaru vehicles are more reliable than ever before. To assure their continued reliability, a schedule of inspection and maintenance (I & M) services is prescribed by Subaru of America for every Subaru vehicle sold. A copy of this schedule can be found in the Warranty and Maintenance Booklet located in the vehicle glove compartment.

Maintenance Inspections for Subaru: Subaru vehicles are more reliable than ever before. To assure their continued reliability, a schedule of inspection and maintenance (I & M) services is prescribed by Subaru of America for every Subaru vehicle sold.
Maintenance Inspections for Subaru:
Subaru vehicles are more reliable than ever before. To assure their continued reliability, a schedule of inspection and maintenance (I & M) services is prescribed by Subaru of America for every Subaru vehicle sold.

Subaru vehicle maintenance inspections services are divided into recommended intervals beginning with three months or 3000 miles (whichever comes first). Each additional level in the maintenance schedule (7,500/15,000/ 30,000 miles) adds more maintenance and inspection steps to the process. The 15,000 (15 month) and 30,000 mile (30 month) services are ‘major’ services, and include the most comprehensive range of component checks, part replacements and adjustments.

If you are already familiar with Subaru vehicles, you may have developed a routine when performing a vehicle safety maintenance inspections. Following a set routine allows you to start at one end of the vehicle and end up at the other end, having performed all of the necessary safety inspection steps along the way.

Repetition of the safety inspection may also allow you to commit the steps to memory, but a checklist can be a helpful addition that leaves nothing to chance (or memory). Checking items off the checklist provides a written record that can be shared with the customer and retained for your service records as well.

Recommended steps in a Subaru Safety Maintenance Inspections  are also spelled out in the owner’s Warranty and Maintenance Booklet. Some of the steps overlap services performed during the scheduled maintenance program. It could be argued that any scheduled maintenance should always include a Safety Inspection. Most of the Safety Maintenance Inspection steps are based on common sense, but it’s surprising how frequently these simple suggestions are ignored.

Valve Adjustment DOHC Engine Part 2

Valve Adjustment Tool and
Adjustment Procedures:

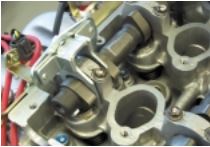
As we mentioned, it takes a special tool to work within the limited clearance area between the cylinder heads and the frame rails. The ST 498187 is a three part tool. One part wraps around the cam lobes, a second touches the outer edges of two shim buckets, and a third eccentric bolt exerts the necessary pressure to push a pair of shim buckets away from the cam lobe to make shim removal and replacement possible.

The tool installed in the three steps:

• Wrap the first half of the tool (part A) around the lobes.
• Attach the second half (part B) to part A by sliding its pins through the slotted holes in part A.
• Install the eccentric bolt (part C) into the hole in part A.

Valve Adjustment Tool and Adjustment Procedures: As we mentioned, it takes a special tool to work within the limited clearance area between the cylinder heads and the frame rails.

The eccentric bolt forces parts A and B away from one another. Because part A can’t move (it’s wedged against the cam lobes), the only thing that can move is part B. Part B moves by forcing the shim buckets downward, away from the camshaft.

Maintenance: Subaru Periodic Maintenance Part 4:

Maintenance: Subaru Periodic Maintenance Part 4:

Steering and Suspension:

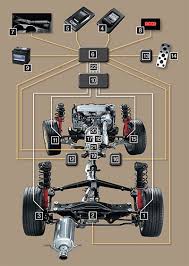
Steering and suspension parts are a lot like the brake system components. Their proper operation is vitally important to the safety of the driver and his passengers, but it is very difficult to determine how long it will be before any of these components will require attention. That’s why an inspection of all steering and suspension components is required at 15 month/15,000 mile intervals. Changes to these systems may be too gradual for the driver to even notice, leaving it to you to ferret out and correct any wear or damage that has taken place.

Maintenance:Subaru Periodic Maintenance Part 4: Regular checks of the steering and suspension is important.

We won’t cover all of the steering and suspension checks here. There’s too much variation between different Subaru models to do an adequate job. What you’re looking for is anything that reduces the original precision of the steering and suspension systems. Perhaps the steering has a little too much play in it or the shocks and struts don’t handle the bumps in the road as well as they did when new. Specific tests for the Subaru model you’re working on can be found in the service manual.

Check the power steering system for dampness or other signs of fluid leakage. The power steering pump reservoir is a good place to start. If the reservoir is low, the fluid has probably leaked out, as it has no place else to go. Approved fluids for the power steering system include Dexron II, IIE or III.


GENUINE OEM SUBARU ATF-HP P/S FLUID QUART BOTTLE