The amount of force exerted on wheel bearings is astounding. Each bearing is required to smoothly control the rotation of the wheel to the tune of about a thousand revolutions per mile, support the transfer of power to the wheels for rapid starts and sudden stops, and handle the powerful lateral twisting force of the tires changing direction against the pavement — all while supporting a vertical load of hundreds of pounds. And, we expect them to perform flawlessly just about forever? Not realistic.
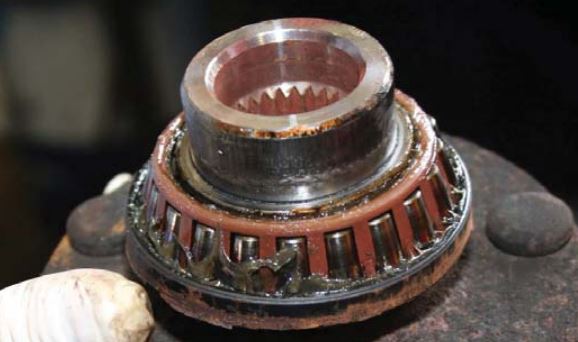
Wheel Bearing Guide Subaru: This tapered roller bearing was damaged by faulty seals that allowed water and dirt to enter the bearing.
The “Achilles Heel” of a wheel bearing is the seal. Although wheel bearings can fail due to damage, improper installation or material imperfection, the most common cause of failure is the seal losing its ability to hold the lubricating grease in and/or dirt and water out.
However, the best seal, applied to the best wheel bearing, cannot be expected to last if not correctly installed. This primer can help you properly service Subaru wheel bearings.
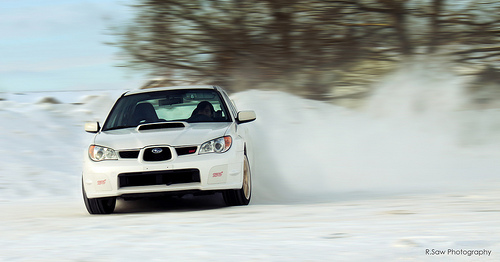
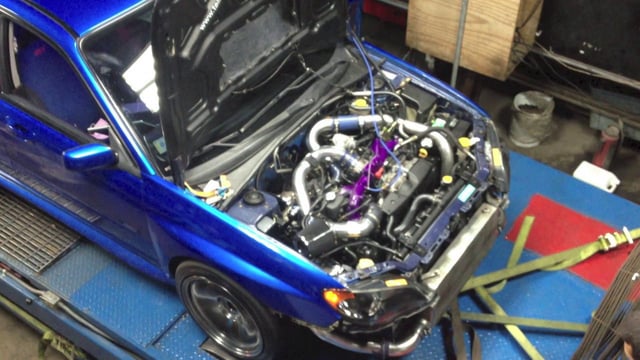
The Winter season brings cold weather to many parts of the country, and with it the traditional driveability problems.
Subaru Cold Weather And Driveability: The Winter season brings cold weather to many parts of the country, and with it the traditional driveability problems.
Before you push the panic button on Subaru cold weather and driveability problems, remember:
• No vehicle runs as well when it is cold as it does when it is at normal operating temperature.
• You have been operating the vehicle in more moderate temperatures and has gotten accustomed to the way it has been running. Now it is colder and things are not working the same.
• Some areas of the country may be using gasoline blended for warmer temperatures. These fuels normally do not atomize as well in cooler temperatures.
• Oxygenated and reformulated fuels that are in use in many parts of the country are normally harder to ignite in cold cylinders.
• Many drivers get their gas at one station because it may be close to home or work. Question them about this and if this is true, suggest they try a different brand of gas. It may take a couple tanks before any improvement is noticed. Different manufacturers blend their fuels differently.
• The 4EAT has a temperature sensor in the ATF and the Transmission Control Unit (TCU) will not allow an up-shift into 4th gear until the ATF has reached a specific temperature. This 4EAT design characteristic may be interpreted as a driveability problem by a driver who is not familiar with 4EAT operation.
There are many reasons for Subaru cold weather and driveability issues during cooler weather. Spending a few minutes with your Subaru and look over the points listed above should eliminate misconceptions about the Subaru cold weather performance and driveability characteristics of Subaru vehicles.
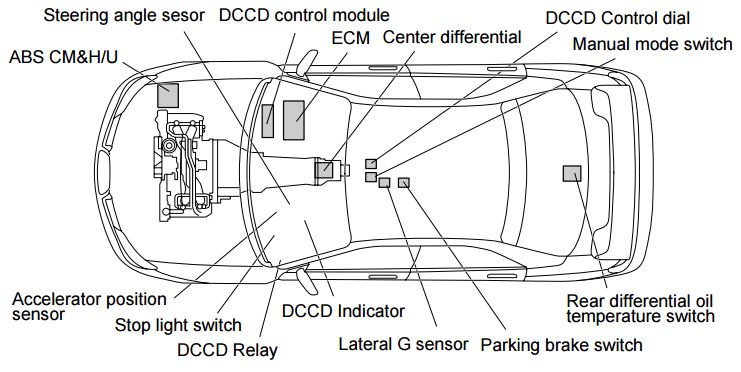
The Driver’s Control Center Differential system is system that appropriately controls the differential limiting force of center differential LSD depending on running conditions of a vehicle. The DCCD system evolved provides controls that follow operations of the driver, while conventional DCCD system provides those based on conditions of the vehicle.
The system consists of a center differential of planetary gear type provided with LSD function, a steering angle sensor, a yaw rate sensor, a lateral G sensor, a DCCD control module and other components.
DCCD: The DCCD system evolved provides controls that follow operations of the driver, while conventional DCCD system provides those based on conditions of the vehicle.
Hybrid LSD mechanism using conventional electromagnetic clutch LSD mechanism added with torque-sensitive mechanical LSD mechanism allows approximate coincidence between the vehicle acceleration/deceleration and LSD clutch differential limiting timings, resulting in linear LSD characteristics acquired through driver’s accelerator operation. Thus, the driver can more freely control the vehicle by easily grasping behavior of the vehicle.
In addition, the steering angle sensor let the DCCD control module know the driver’s intension of turning. In combination with the yaw rate and lateral G sensors, it adjusts the electromagnetic clutch LSD differential limiting force based on the running path imaged by the driver and the actual behavior of the vehicle. Thus, cornering in better accordance with the driver’s image is enabled, preventing occurrence of understeer and oversteer.
For balancing between the vehicle turning performance and traction during turning in a high order, the center differential driving torque is set to have distribution ratio 41:59.
DCCD: For balancing between the vehicle turning performance and traction during turning in a high order, the center differential driving torque is set to have distribution ratio 41:59.
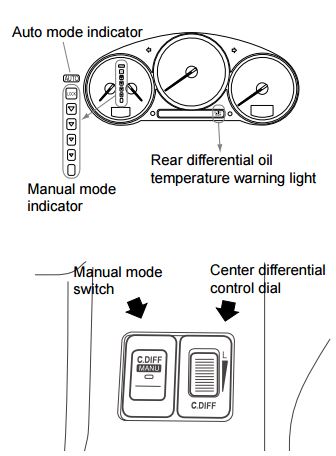
Manual mode switch/DCCD control dial
In manual mode, the DCCD control can be used to adjust the differential limiting force of the electromagnetic clutch LSD mechanism in the range from free to lock. Current settings of the control dial are displayed on the indicator in the meter.
DCCD: In manual mode, the DCCD control can be used to adjust the differential limiting force of the electromagnetic clutch LSD mechanism in the range from free to lock.
Batteries low in voltage (below 11.6 volts) need to be specially charged. A battery at this voltage is heavily sulfated and needs either a very long, slow charge, or a very high initial charge voltage.
Battery Charging Subaru: Batteries low in voltage (below 11.6 volts) need to be specially charged. A battery at this voltage is heavily sulfated and needs either a very long, slow charge, or a very high initial charge voltage.
The battery should be left on the battery charger for at least two days. Since the acid in the battery will mostly be stratified, it needs sufficient overcharge to mix. Even after a two day charge, the battery still may only come to 60-80 percent of capacity and may need to be cycled to come to full charge. If possible, once the battery is fully charged by this method, it’s advisable to finish with a constant 1 amp for an additional 24 hours.
A battery that is below 11.6 volts can also be hydrated. This means there is lead sulfate in the separator that will form lead shorts once the battery charges. Because of these shorts, the battery may self discharge once the battery has been recharged.
Emission testing of a Full-Time 4WD or all-wheel-drive vehicle must never be performed on a single two-wheel dynamometer, nor should a state I/M program inspector or its contractors install the FWD fuse in the engine compartment. Attempting to do so will result in uncontrolled vehicle movement and may cause an accident or injuries to persons nearby.
State Emission Testing Subaru: Emission testing of a Full-Time 4WD or all-wheel-drive vehicle must never be performed on a single two-wheel dynamometer.
Resultant vehicle damage due to improper testing is not covered under the SUBARU Limited Warranty and is the responsibility of the state I/M Program or its contractors or licensees.
The 1990 Clean Air Act Amendments require the Environmental Protection Agency (EPA) to implement programs to reduce air pollution from motor vehicles. Certain states are required to adopt either a “basic” or “enhanced” vehicle Inspection/Maintenance (l/M) Program, depending on the severity of their air pollution problem.
The ‘enhanced’ I/M emission testing simulates actual driving conditions on a dynamometer and permits more accurate measurement of tailpipe emissions than the ‘basic’ I/M test, which measures emissions only during engine operating conditions at idle and 2500 RPM. The ‘enhanced’ l/M test also includes a pressure check to identify evaporative emissions leaks in the fuel system.
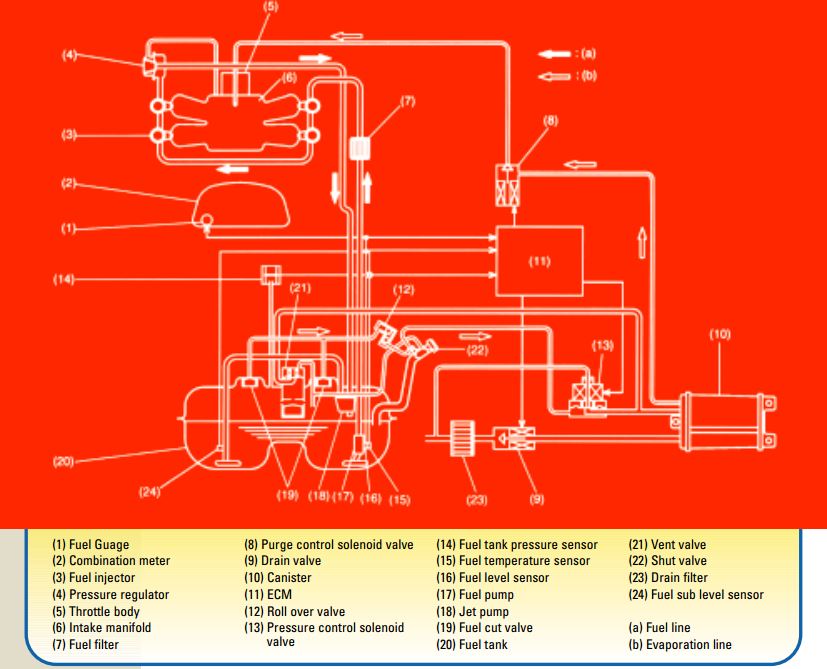
A major component of the Subaru OBD-II system is the system’s ability to monitor the evaporative emissions system. Today’s vehicles are producing very low emissions from the tailpipe, so it has become increasingly important to monitor and contain emissions from other vehicle sources.
Evaporative Emissions Testing Subaru: A major component of the Subaru OBD-II system is the system’s ability to monitor the evaporative emissions system.
A potentially large source of emissions is the vehicle’s fuel system. If not properly contained, vapors escaping from the fuel tank could produce a larger quantity of harmful emissions while the vehicle was standing still than what would be emitted via the tailpipe when the engine was running and the vehicle was driving down the road.
The Subaru OBD-II system monitors the evaporative emissions system by drawing the system to a negative pressure. If the system holds vacuum, it passes the test. If the system fails to hold vacuum for the prescribed period, it fails and a diagnostic trouble code (DTC) P04440 is stored in the ECM memory. The malfunction indicator light (MIL) also comes on in the dash to alert the driver to the problem.
The charts that follow were collected through the data link connector using the New Select Monitor (NSM), during the diagnosis of a DTC P0440 on a 1997 Subaru Legacy 2.5 liter. We’ll begin with a description of system operation under normal operating conditions.
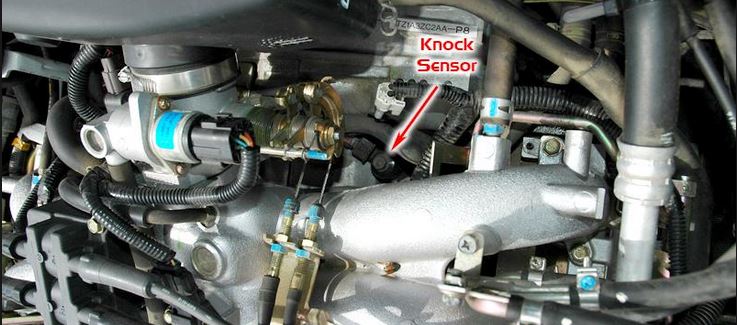
This is a simple overview on diagnosing knock sensor issues with your Subaru Impreza/Forester/Legacy/Etc.
The knock sensor is designed to sense knocking signals from each cylinder. The knock sensor is a piezo-electric type element which converts knocking vibrations into electrical signals.
The knock sensor is designed to sense knocking signals from each cylinder. The knock sensor is a piezo-electric type element which converts knocking vibrations into electrical signals. The electrical signal is sent to the ECM, which changes the ignition timing to reduce the engine knock or ping. For this system to work correctly, the knock sensor must first hear the engine ping. The driver of the vehicle may also hear a small engine ping. A delay of approximately 1-2 seconds is normal, depending on the fuel quality, engine load, air temp, etc. At this time, the ECM will retard the timing.
This function can be viewed on the Select Monitor RTRD mode. When the knock is eliminated, the timing is gradually advanced to the specified setting. If engine ping is heard again this process is repeated. This will continue until the knock sensor no longer hears the engine knock or ping.
Note: This is a normal operation of the knock sensor. Do not try to repair it.
The next page will discuss asking the right questions on diagnosing knock sensor failures.
This is a step by step guide on how to do a brake fluid flush on most Subaru cars. It’s often a good idea to do a brake fluid flush at least once a year to keep your Subaru’s braking system in good condition. This is even more important if you autocross or do track days with your car. Use a good performance brake fluid and not whatever is cheapest at Autozone. I have a strong preference towards ATE and Motul brake fluid. Good fluid combined with good brake pads like a Hawks or Carbotechs will give your Subaru great stopping power.
1.) Either jack-up the vehicle and place a rigid rack under it, or lift-up the vehicle.
2.) Remove all the wheels.
3.) Drain the brake fluid from master cylinder.
4.) Refill the reservoir tank with recommended brake fluid.
NOTE:
• Avoid mixing different brands of brake fluid to prevent degrading the quality of fluid.
• Be careful not to allow dirt or dust to get into the reservoir tank.
Air bleeding sequence (1) → (2) → (3) → (4)
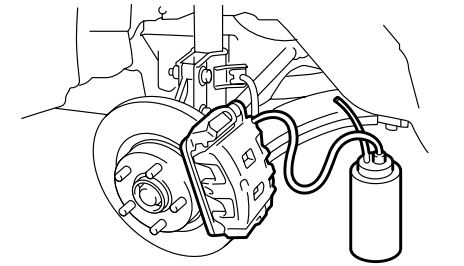
5.) Install one end of a vinyl tube onto the air bleeder and insert the other end of the tube into a container to collect the brake fluid.
Brake Fluid Flush Subaru: Install one end of a vinyl tube onto the air bleeder and insert the other end of the tube into a container to collect the brake fluid.
NOTE:
• Cover the bleeder with cloth, when loosening it, to prevent brake fluid from being splashed over surrounding parts.
• During the bleeding operation, keep the brake reservoir tank filled with brake fluid to eliminate entry of air.
• The brake pedal operation must be very slow.
• For convenience and safety, two people should do the work.
• The amount of brake fluid required is approx. 500
m2 (16.9 US fl oz, 17.6 Imp fl oz) for total brake
system.
6.) Have a friend depress the brake pedal slowly two or three times and then hold it depressed.
We use cookies on our website to give you the most relevant experience by remembering your preferences and repeat visits. By clicking “Accept”, you consent to the use of ALL the cookies.
This website uses cookies to improve your experience while you navigate through the website. Out of these, the cookies that are categorized as necessary are stored on your browser as they are essential for the working of basic functionalities of the website. We also use third-party cookies that help us analyze and understand how you use this website. These cookies will be stored in your browser only with your consent. You also have the option to opt-out of these cookies. But opting out of some of these cookies may affect your browsing experience.
Necessary cookies are absolutely essential for the website to function properly. These cookies ensure basic functionalities and security features of the website, anonymously.
Cookie
Duration
Description
cookielawinfo-checkbox-analytics
11 months
This cookie is set by GDPR Cookie Consent plugin. The cookie is used to store the user consent for the cookies in the category "Analytics".
cookielawinfo-checkbox-functional
11 months
The cookie is set by GDPR cookie consent to record the user consent for the cookies in the category "Functional".
cookielawinfo-checkbox-necessary
11 months
This cookie is set by GDPR Cookie Consent plugin. The cookies is used to store the user consent for the cookies in the category "Necessary".
cookielawinfo-checkbox-others
11 months
This cookie is set by GDPR Cookie Consent plugin. The cookie is used to store the user consent for the cookies in the category "Other.
cookielawinfo-checkbox-performance
11 months
This cookie is set by GDPR Cookie Consent plugin. The cookie is used to store the user consent for the cookies in the category "Performance".
viewed_cookie_policy
11 months
The cookie is set by the GDPR Cookie Consent plugin and is used to store whether or not user has consented to the use of cookies. It does not store any personal data.
Functional cookies help to perform certain functionalities like sharing the content of the website on social media platforms, collect feedbacks, and other third-party features.
Performance cookies are used to understand and analyze the key performance indexes of the website which helps in delivering a better user experience for the visitors.
Analytical cookies are used to understand how visitors interact with the website. These cookies help provide information on metrics the number of visitors, bounce rate, traffic source, etc.
Advertisement cookies are used to provide visitors with relevant ads and marketing campaigns. These cookies track visitors across websites and collect information to provide customized ads.