Tag Archives: Boost

Subaru Picture of the day!

AWD: The Impreza WRX STI uses Driver Controlled Center Differential (DCCD), the most performance-directed type of Symmetrical AWD. A limited-slip, planetary gear-type center differential provides a performanceoriented 35:65 front/rear power split.

AWD: The Impreza WRX STI uses Driver Controlled Center Differential (DCCD), the most performance-directed type of Symmetrical AWD. A limited-slip, planetary gear-type center differential provides a performanceoriented 35:65 front/rear power split.

AWD: The Impreza WRX STI uses Driver Controlled Center Differential (DCCD), the most performance-directed type of Symmetrical AWD. A limited-slip, planetary gear-type center differential provides a performanceoriented 35:65 front/rear power split.

Overboost and Underboost Subaru common causes:

Overboost and Underboost Subaru common causes:

The common causes for overboost or underboost: This is a basic guide on the possible causes and some solutions to those causes of a overboost or a underboost situation in a turbocharged subaru.

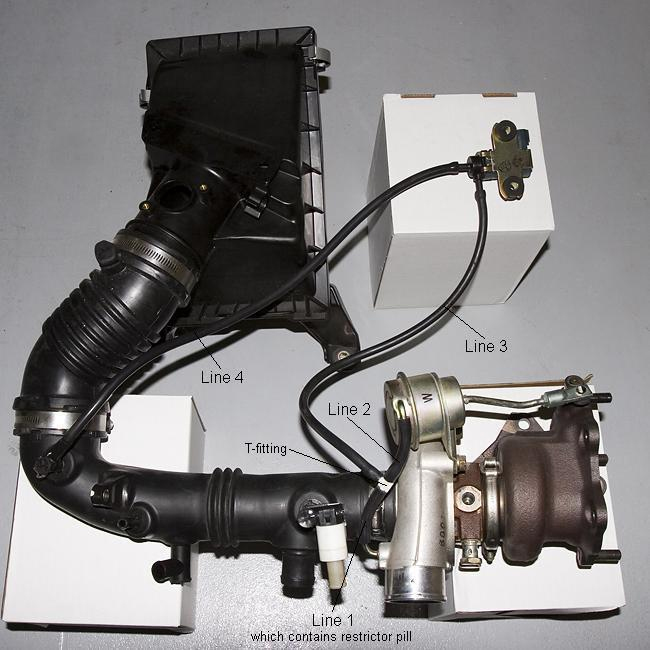
Overboost and Underboost Subaru common causes: This is the layout of the stock turbo subaru boost control system.
Overboost and Underboost Subaru common causes: Turbo Subarus: Common Overboost and Underboost issues with Turbo Subarus.

Overboost:

1.) Decat + High flow induction –  Cure: Reduction of the solenoid duty cycle or alteration of restrictor size will help return boost output to its normal level.

2.) Split, poor fitting, or disconnected pipes – Cure: Replace or refit pipes, the pipes that will cause this issue are between the wastegate actuator, solenoid, and the turbo. Including up to the restrictor on the return pipe of the 3 port solenoid.

3.) Manual Boost Controller – Electronic Boost Controller set too high – Cure: Don’t be so greedy and back the boost duty/adjuster off to a safe level.

4.) Restrictor Pill not fitted / size incorrect – Cure:  Ensure restrictor pill is fitted (3 port) if so on a 3 port reduce the restrictor size and on the 2 port increase the restrictor size to reduce the boost to a safe level.

5.) Clogged 3-port solenoid: It is possible that the flow of air through the 3-port solenoid could be restricted between the turbo outlet port and the wastegate actuator port if the solenoid is very dirty (usually oil vapor from the intake system), this allows the wastegate to remain clamped shut longer than it should be causing a potential overboost situation. Cure: Clean with carb or clutch/brake cleaner.

6.)Loss of solenoid funcation: Although this is not bverboost it shows itself with very simmilar symptoms, its an interesting scenario. It is possible for the solenoid to fail or even stick shut while under boost. This will result in a rapid reduction of boost pressure to wastegate pressure approx 0.5 BAR. So if you were running at full boost 1.0 BAR for example and the solenoid was to fail shut it would feel just like overboost as the wastegate rapidly opens due to the solenoid blocking off the spill from the wastegate. Cure: Either clean the solenoid with carb or clutch+brake cleaner or replace the solenoid.

Wastegate and Boost Creep FAQ

Wastegate and Boost Creep FAQ

What is Boost Creep?

Boost creep is a situation where your wastegate port is not large enough to allow the exhaust gas to bypass the turbo. What happens is the exhaust gas will choke the wastegate port preventing further gas flow through the port. Then, the exhaust gas has to take the path of least resistance which is through the turbine of the turbo. This will spool the turbo ‘uncontrolled’ beyond your normal controlled max boost level.

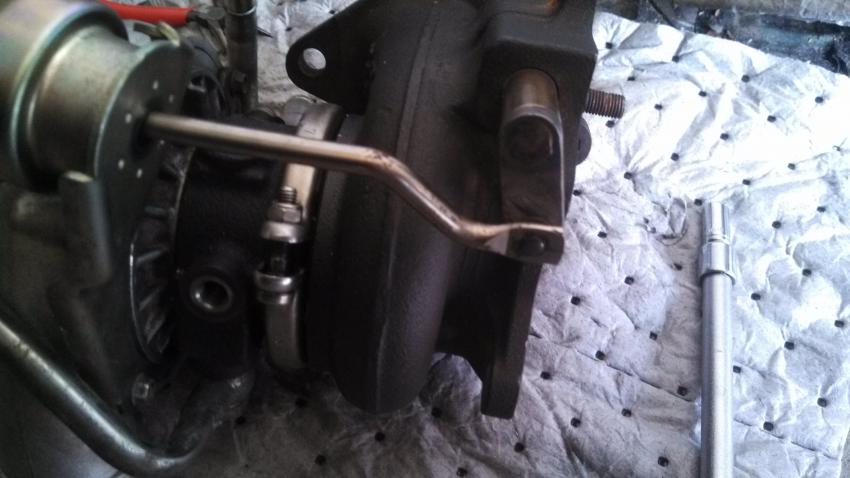
Wastegate and Boost Creep FAQ: A stock Subaru turbo with the internal wastegate and stock actuator.
Wastegate and Boost Creep FAQ: A stock Subaru turbo.

The turbo will be spooling past wastegate spring rate pressure even though the wastegate is fully open thus it is uncontrolled. The best way to check for boost creep is to connect the turbo outlet port directly to the wastegate actuator port and go for a drive. In 4th gear you should normally get a stable boost level of about 0.5 BAR, if you have boost creep the boost will hit 0.5 BAR and will continue to rise with rpm until you either back off or hit overboost fuel cut.

Boost creep should only be present on a turbo that has very little restriction. For example a fully de-catted and high flow induction. It’s been found that the fast spooling IHI VF35 is very prone to boost creep. The cure is to remove the turbo and enlarge the wastegate port. Then, fit a stronger actuator 0.75 BAR the reason for this is because you have made the wastegate port larger. The effective size of the wastegate plate acting against the exhaust gas flow is larger which allows the exhaust gas excert more force on the wastegate plate.

This in effect weakens the effectiveness of the actuator. Before the increase in size of your wastegate port the actuator would open at 0.5 BAR, after the increase the actuator would open earlier at 0.3–0.4 BAR. After these changes are made to the turbo either a boost controller or a remap (to adjust solenoid duty cycle) should be sought to control the boost to a safe level.

Boost control systems on a Turbo Subaru:

Boost control system on a Turbo Subaru:

This guide covers most  boost related issues including a short introduction on how your boost systems work. This information is based on the Classic Impreza’s, but will cover the newer WRX/STi cars to a certain extent.

Safe boost levels:

When modding your car without mapping (full de-cat and high flow induction etc) you increase the efficiency of your turbo which could result in engine damage due to lean running at high rpm / max boost. To prevent damage always try and keep your boost level as close to standard as possible until your car is mapped for the increase in boost pressure.

TLDR: Don’t screw with your boost levels until you get the car tuned by someone who knows what they are doing. Otherwise you’ll probably end up with a blown up Subaru.

Boost Issues:

Is the boost control system connected correctly:

Fuel Pump Walbro 255lph for 2008 STi/WRX/LGT Install:

Walbro Fuel Pump for 2008 -11 STi/WRX/LGT Install:

Install guide for those looking to upgrade the factory WRX, STi, or LGT fuel pump. I recently found the stock pump to be inadequate when running high boost and E85. When ordering the pump, you DO NOT need the filter kit, it WILL NOT fit in the housing. Make sure to run the car down under the 1/4 tank mark before beginning. There will be gas spillage so make sure you have plenty of fresh air and towels around to clean up.

1.) Pop the gas cap off to relieve fuel pressure from the tank. Remove your lower rear seat by pulling upwards on each side and the middle. There are 3 snap in spots. Place your seat somewhere clean and out of the way. Once you do this you can see the fuel pump access cover and harness. Unplug this harness.

2.) Remove the 4 screws holding the access cover in place and place them somewhere safe away from the access cover.

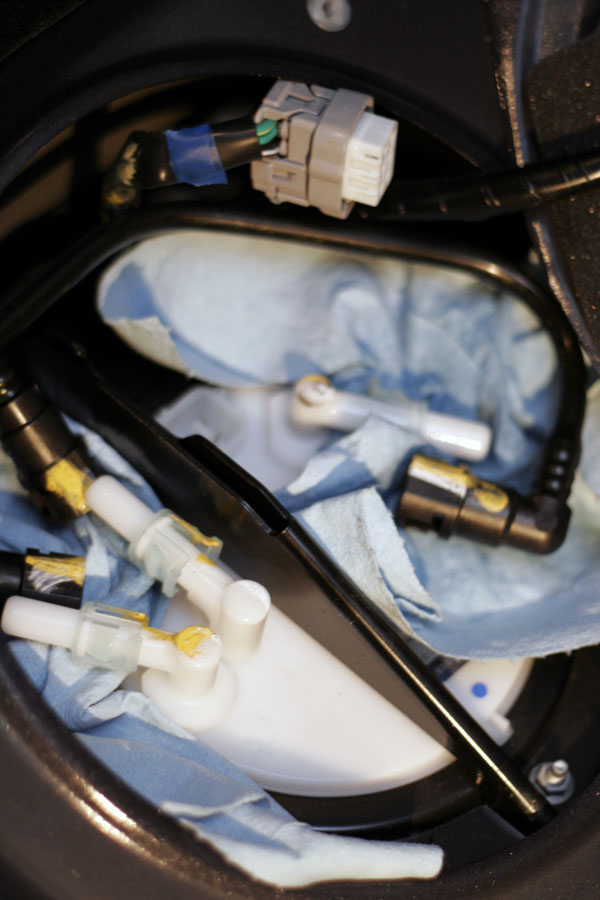
3.) Now you can see the fuel pump access point. There are 3 fuel lines, 8 8mm nuts, and the electrical connector. Disconnect the electrical connector now and stuff it out of the way. Grab some of your handy shop towels and place them under the fuel lines in case of spillage. Once you have removed the fuel lines it should look like this:

Fuel Pump: There are 3 fuel lines, 8 8mm nuts, and the electrical connector. Disconnect the electrical connector now and stuff it out of the way. Grab some of your handy shop towels and place them under the fuel lines in case of spillage.

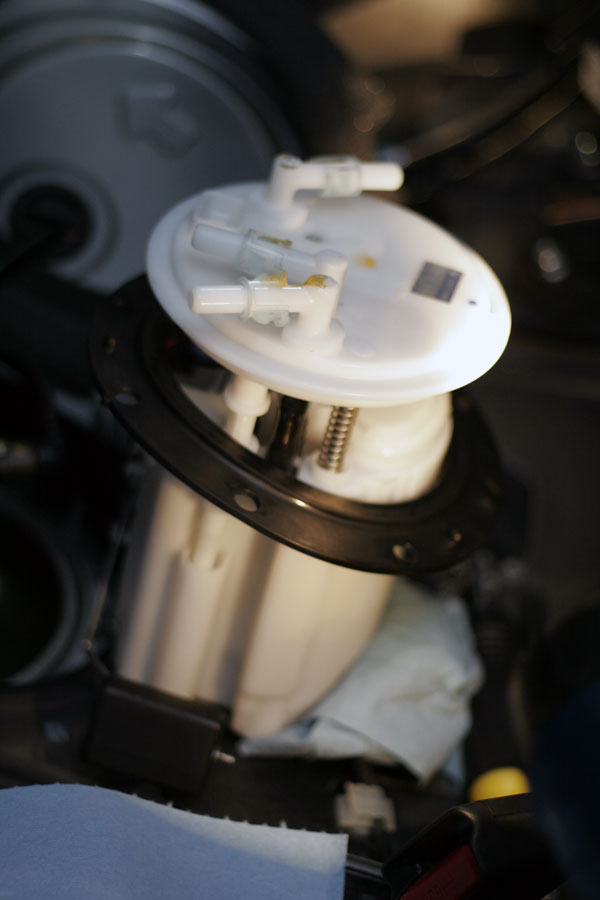
4.) Remove all 8 of the 8mm nuts and place them somewhere safe. Gently remove the metal bracket surrounding the entire assembly to gain access to the housing and place it somewhere safe. Slowly remove the fuel pump assembly by contorting it, be careful not to damage the float or sensor. Once the housing is removed it may spill, make sure you have plenty of towels laid down in your car. If all went well it should look like this:

Fuel Pump: Gently remove the metal bracket surrounding the entire assembly to gain access to the housing and place it somewhere safe. Slowly remove the fuel pump assembly by contorting it, be careful not to damage the float or sensor.

Boost Gauge Install on Subaru STi/WRX 08-13:

Boost Gauge Install on Subaru STi/WRX 08-13:

This is a guide on installing a boost gauge in a 2010 STi.

Boost Gauge: A installed boost gauge in a GR STi.

Boost Gauge: INTERIOR WIRING AND GAUGE INSTALLATION

1.) Pull off the lower dash cover. It just has clips holding it on.

2.) These are the only two screws that hold the lower dash to rest of the dash. Remove these and the rest of the lower dash can be pulled off.

3.) Lower dash pulled away from the upper, left of the steering wheel.

4.) Lower dash pulled away from the upper, right side of the steering wheel.

5.) There are 4 clips holding the instrument hood to the dash. The entire hood pulls off as one whole unit, but the hard part is getting a good grip. To get better finger placement, I pulled the top of the inner part of the hood away, which revealed a little lip that I could use to pull the hood off. Caution: Do not pull heavily on the inner piece because it is bolted to the rest of the hood at the bottom and could break if you pull on it too hard. Just pull on the top part of the instrument hood itself. Also be careful not to lose the 4 yellow clips that hold the hood to the dash. They come out easily and can get lost.

6.) There are two screws for the instrument cluster. One is circled in the pic and the other is to its left.

7.) Pop the plug off the cluster on the right side.

8.) I ran the wires for the boost gauge through the upper middle hole above the gauge cluster.

9.) Tap into the purple wire on the dimmer switch for headlight power. This wire is only powered when the headlights or parking lights are turned on.

10.) Close-up of where I spliced into the purple wire. For the boost gauge, the ORANGE wire splices into this purple wire. The wire is black in my picture because I used black wire to extend the wires coming out of the back of the gauge.

11.) For ACC power, use the brown and white striped wire on the top connector above the fuse box. This wire is powered when the key is in the “ACC” position only. With the boost gauge, you connect BOTH the RED and WHITE wires to this wire.

The green and white striped wire on the same connector is on all the time, meaning it is powered even when the car is off. I found that out the hard way. (Do not use that wire.)

Clutch: Subaru WRX/Sti clutch FAQ

Clutch: Subaru WRX/Sti clutch FAQ

The first impulse when clutch shopping is to get “too much” clutch. This is often a very big mistake, as there will be compromises in the different types and compositions of clutches.

Clutches hold Torque, not Horsepower:
Most performance enthusiasts relate more to horsepower numbers rather than torque, but clutch capacity is measured in terms of torque. Think in terms of a high rpm 250 HP Honda Civic versus a 250 HP Ford Powerstroke turbo diesel. The truck will need about three times the clutch capacity because the engine produces about three times the torque.

Choosing what’s best for you:
It may be difficult to know what clutch is right for a particular application since there are so many different levels of personal tolerance and many variations in design. Some people can tolerate clutch chatter, or noise, or heavy pedal effort, or shorter clutch life, higher cost, or other trade-offs. But why tolerate unnecessary issues if you don’t have to? Get the clutch that suits your needs.

What are the various clutch materials? Other than unique or specialized compositions, clutches are generally comprised of:

1. Organic
2. Kevlar
3. Ceramic
4. Feramic
5. Carbon (initially invented in 1998 by Alcon Components for the Subaru World Rally team )
6. Sintered Iron

Depending on manufacturer specifications, this list also shows the general order of the amount of force the clutch materials can hold.

Organic: Metal-fiber woven into “organic” (actually CF aramid with other materials), original-equipment style. Known for smooth engagement, long life, broad operating temperature, minimal-to-no break in period. Will take hard use, somewhat intolerant of repeated abuse (will overheat). Will return to almost full operational condition if overheated. Material is dark brown or black with visible metal fibers.

Kevlar: High-durability material more resistant to hard use. Engagement is similar to organic, but may glaze slightly in stop and go traffic, resulting in slippage until worn clean when used hard again. Higher temp range in general, but can be ruined from overheating; will not return to original characteristics if “cooked”. Material is uniform yellow/green and may look slightly fuzzy when new.

Ceramic: Very high temperature material. Engagement is more abrupt. Will wear flywheel surface faster, especially in traffic situations. Due to it’s intrinsic properties, ceramic has a very high temperature range. Material is any of several light hues – gray, pink, brown.

Feramic: This unique clutch material is one that incorporates graphite and cindered iron. The result is a friction material that offers good friction coefficient, torque capacity, and smoothness of engagement.

Carbon: Very high temperature material. Engagement is more abrupt. Will wear flywheel surface faster, especially in traffic situations. Slightly more durable and flywheel-friendly compared to other aggressive clutch materials. Material is black.

Sintered Iron: Extremely high temperature material. Engagement is extremely harsh and is generally considered an “on/off switch” both due to it’s characteristics and the clutch types this material is generally associated with. It requires a special flywheel surface. Material is metallic gray in color.


Uppipe WRX upgrade FAQ

Aftermarket Uppipe FAQ for WRX/STi

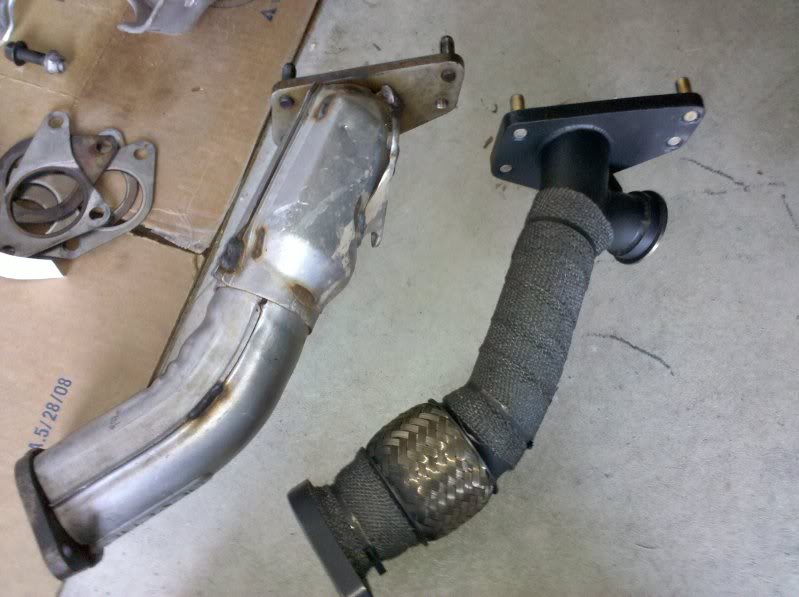
Uppipe: The primary purpose of an aftermarket uppipe is to remove the catalytic converter housed within the stock unit. This serves two purposes: to increase horsepower and decrease turbo spool time.

uppipeaftermarket
Uppipe: The primary purpose of an aftermarket uppipe is to remove the catalytic converter housed within the stock unit.

HP gain is around 10HP. This figure is highly debated as different manufacturers use different dynos with different cars with different levels of mods. Dyno Proof Example. The general consensus for turbo spool time decrease is boost will occur around 500 RPM sooner.

Is an aftermarket uppipe a performance or reliability mod? With regard to swapping over from a catted uppipe to a catless uppipe, it’s both. Need some evidence of the reliability? View this link.

Which manufacturer is best? This topic is highly debated. There have been no reported consistent “bad” uppipes on the market. Obviously, there may have been bad pipes sold, but not enough to report as “bad” overall.

What uppipe metal material is best? Uppipes are made from mild steel, stainless steel (304 & 321), cast iron, and inconel. There is no irrefutable evidence that one material is better than the other. Obviously, corrosion levels are higher with mild steel (coated or otherwise) and cast iron. Corrosion on cast iron, due to it’s thickness and material qualities, is more resistant to corrosion damage than mild steel. In terms of heat retention, the best material is inconel.

Which uppipe construction method is best? Uppipes are either solid or flex. There is no irrefutable evidence that one design is better than the other. The thought process is that a flex pipe will reduce the chances of leaking. Practical application has shown that correct installation plays a bigger role than the uppipe construction.

What is the cheapest uppipe? Gut your stock uppipe. Instructions. Gutting your stock uppipe can have the same benefits as using a more expensive aftermarket uppipe. Dyno Proof.

Which uppipe has the best gains? There is no irrefutable evidence that any uppipe has better gains than another. The consensus, if there is one, is they are all within 1-2 HP, gain wise, of each other.

Where do I buy an uppipe?