Category Archives: gc8

Wheel Alignment For Subarus:

Wheel Alignment For Subaru:

Wheel arch height (vehicle ride height) as well as front and rear wheel alignment should be inspected at 30 month/30,000 mile intervals. Winter driving and its attendant chuckholes may shorten that maintenance interval for some drivers

While inspecting wheel alignment, also check for obvious signs of damage to suspension components, tightness of bolts and nuts and the condition of other under car components.

Check, adjust and/or measure wheel alignment in accordance with the following procedures:

1.) Wheel arch height (front and rear)
2.) Camber (front and rear)
3.) Caster (front)
4.) Front toe-in
5.) Rear toe-in
6.) Thrust angle (rear)
7.) Wheel steering angle

1. Wheel Arch Height

1.) Adjust the tire pressures to specifications.
2.) Set the vehicle under “curb weight” conditions (empty luggage compartment, install spare tire, jack, service tools, and top off fuel tank).
3.) Set steering wheel in a wheel-forward position.
4.) Suspend a thread from the wheel arch (point “A” in figure above) to determine a point directly above the center of the spindle.

Subaru Wheel Alignment: Measure the distance between the measuring point and the center of the spindle.

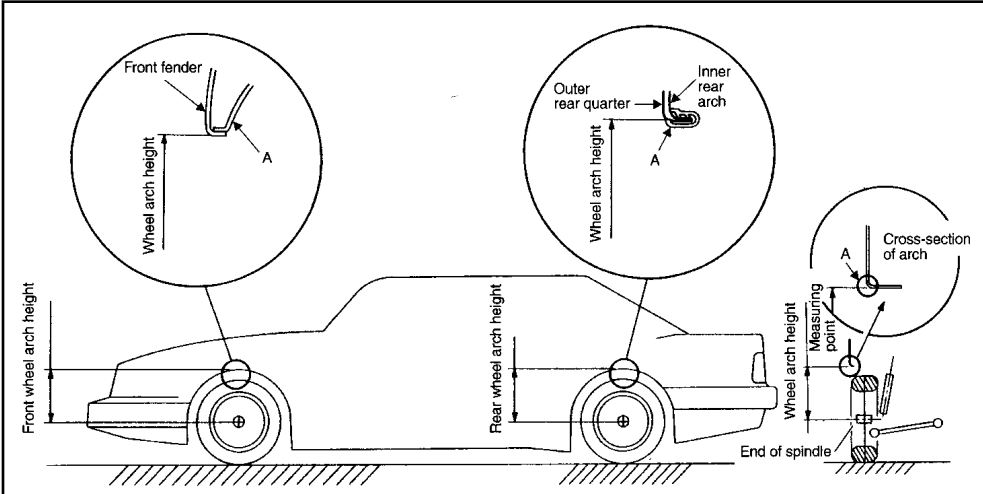
5.) Measure the distance between the measuring point and the center of the spindle.
6.) Consult the service manual for Wheel Arch Height specifications.

Valve Adjustment DOHC Engine Part 2

Valve Adjustment Tool and
Adjustment Procedures:

As we mentioned, it takes a special tool to work within the limited clearance area between the cylinder heads and the frame rails. The ST 498187 is a three part tool. One part wraps around the cam lobes, a second touches the outer edges of two shim buckets, and a third eccentric bolt exerts the necessary pressure to push a pair of shim buckets away from the cam lobe to make shim removal and replacement possible.

The tool installed in the three steps:

• Wrap the first half of the tool (part A) around the lobes.
• Attach the second half (part B) to part A by sliding its pins through the slotted holes in part A.
• Install the eccentric bolt (part C) into the hole in part A.

Valve Adjustment Tool and Adjustment Procedures: As we mentioned, it takes a special tool to work within the limited clearance area between the cylinder heads and the frame rails.

The eccentric bolt forces parts A and B away from one another. Because part A can’t move (it’s wedged against the cam lobes), the only thing that can move is part B. Part B moves by forcing the shim buckets downward, away from the camshaft.

Valve Adjustment DOHC Engine

Valve Adjustment DOHC 2.5 Liter Engine:

The first versions of the 2.5 liter twin cam engines employed non-hydraulic valve actuation. Like the timing belt, the clearance between the engine valves and the shim and bucket valve actuators does not require inspection and/or adjustment until 105,000 miles have elapsed. However, various circumstances may require an adjustment before that milestone is reached.

Valve Adjustment: Unlike some overhead cam engines that require you to rotate the cam until each cam lobe is facing 180 degrees away from the adjustment shim, Subaru has very specific procedures for adjusting four valves at a time (a pair of intakes and a pair of exhausts).

Clearance is tight and there is little room to work between the cylinder heads and the left and right frame rails. A special tool (ST 49818700) is available for depressing the valves and removing the adjusting shims. Without this tool, the job is impossible to accomplish with the engine in the car. Once again, we had the benefit of working on an engine that had already been removed from the car. Before you can adjust the valves, the engine must be cold. Consult the service manual to determine the parts that will need to be moved or removed to make some room to work.

Unlike some overhead cam engines that require you to rotate the cam until each cam lobe is facing 180 degrees away from the adjustment shim, Subaru has very specific procedures for adjusting four valves at a time (a pair of intakes and a pair of exhausts). The pairs of intakes and exhausts are never for the same cylinder, which makes things rather interesting. This system requires you to turn the crankshaft a total of four times to complete the adjustment procedure.

SVX POWER STEERING SYSTEMS PART 4

SVX Power Steering Systems on Early Subarus Part 4:

There are two model-specific systems available on SVX vehicles:

SVX Power Steering Systems on Early Subarus Part 4: The engine speed sensitive, or conventional belt driven hydraulic pump and pinion type steering system is standard equipment on the SVX.

• The engine speed sensitive, or conventional belt driven hydraulic pump and pinion type steering system is standard equipment on the SVX.

• An SVX equipped with the SVX Touring Package uses an optional vehicle speed-sensitive system. This system provides normal power assist at low vehicle speeds for reduced driver steering effort, and reduced steering assist at increased vehicle speeds for increased road feel and improved engine operating efficiency. Both systems have many similarities with the Legacy system.

SVX Power Steering Pump

Both systems share many similarities to existing Subaru steering systems. Both use a belt driven power steering pump, although the pump housings are different in appearance.

Rack

A conventional power assisted rack with the standard Subaru lines and hoses is used by the standard system.

Oil Cooler

An oil cooler pipe has been added to both SVX systems. It is located in front of the radiator on the return side of the system.

Rubber Coupler

A steering shaft rubber coupler is used by both SVX systems to reduce road noise and vibration.

SVX Power Steering Pressure Switch

A power steering pressure switch is located on the outlet side of the pump. The switch monitors increased engine load during idle speed steering. The switch provides an input to the MPFI ECU, which prevents stalling by raising the engine idle speed. There is not an additional trouble code for the MPFI ECU.

POWER STEERING SYSTEMS ON EARLY SUBARUS PART 3

POWER STEERING SYSTEMS ON EARLY SUBARUS PART 3

Cybrid Power Steering

The Cybrid Power Steering System was standard equipment on the XT6. It’s a computer controlled,
electric motor-driven hydraulic steering system, using a power-assisted rack and pinion assembly similar to the XT. This system provides improved steering feel and more precise power assist over a wider operating range. Fuel consumption is reduced because it requires less horsepower due to the electrically-driven hydraulic pump. The specific system used on the XT6 is quicker than other XT power steering systems, with just 3.2 turns lock-to-lock.

POWER STEERING SYSTEMS ON EARLY SUBARUS PART 3: The Legacy RS used in rallying used the early Subaru power steering system.

Cybrid Steering Components

The Cybrid Power Steering System consists of four major components:

• The Motor and Pump assembly mounted on the front bulkhead (firewall).
• A Steering Sensor located inside the vehicle at the base of the steering column.
• A Signal Controller located in the left rear quarter panel.
• The Power Controller mounted on the front bulkhead (firewall) to the left of the Motor/Pump assembly.

Motor/Pump Assembly

The Motor/Pump assembly is similar to a starter motor, since it has an armature, fields, and brushes which are serviceable. The electric motor drives a pump which is very similar in design to an engine driven pump. This combination replaces the familiar belt driven P/S pump assembly. The Cybrid System requires special hydraulic fluid to retain stable viscosity during cold temperatures.

Heater

The Pump incorporates an electric heater to warm the hydraulic fluid in extremely cold operating conditions, improving the steering performance. A thermistor type switch located on a bracket above the Motor/Pump assembly, senses the underhood (ambient) temperature and sends an input to the Signal Controller.

The Heater operates for approximately five minutes after engine start-up. The Signal Controller grounds the heater relay, which passes battery voltage to the heater. The heater relay is located near the motor/ pump assembly.

Note: The Heater only works when the thermometer signals an extreme cold condition.

Power Steering Systems On Early Subarus Part 2

Power Steering Systems On Early Subarus Part 2:

Power Steering Rack System

Subaru’s power steering system contains a pump, hydraulic line, and a gearbox (rack). The hydraulic pump is a vane-type pump driven by the engine. It provides pressurized fluid for the system.

Power Steering Systems On Early Subarus Part 2: Subaru’s power steering system contains a pump, hydraulic line, and a gearbox (rack). The hydraulic pump is a vane-type pump driven by the engine. It provides pressurized fluid for the system.

Oil Pump Operation

The pump has two internal valves: a flow control valve and a relief valve. The flow control valve regulates the volume of power steering fluid delivered to the rack. During high engine rpm, the pressure in the pump overcomes the flow control valve spring. The control valve slides back to close off an oil passage to the rack and to open an oil return port to the pump inlet. This reduces the power assist to the rack during high speeds, improving the steering wheel feel and response.

Steering Systems on early Subarus Part 1

Steering Systems on early Subarus Part 1:

Rack And Pinion Steering Mechanism

Subaru steering systems utilize a rack and pinion steering mechanism. As the pinion gear rotates, the rack moves left or right. Rack and pinion steering gives the driver precise control over the wheels. The simple, compact design is easy to service.

Steering Systems on early Subarus Part 1: The Subaru SVX used Subaru’s early power steering system.

CGR – VGR Ratios

Two manual steering racks are used in Subaru vehicles: a constant gear ratio (CGR) rack and a variable gear ratio (VGR) rack. The teeth on the CGR rack are equally spaced so the turning effort is equal throughout the turning range. The teeth on the VGR rack are spaced closer together on the ends of the rack than in the middle. The turning effort decreases as the turning angle increases so sharp-radius turns are easier to make.

Legacy and SVX Steering Racks

Several different power steering racks have been installed in Subaru vehicles. The racks used in the L-series, XT, Legacy and SVX vehicles are similar. All have a one-piece gearbox and lack the external air vent distribution tube found on the rack in pre-’85 and carryover vehicles. However, the XT rack differs from the L-series rack in several ways.

The XT rack is made of aluminum and has a different control valve. Different types of hydraulic seals are used in the two racks, and each has its own unique special service tool. The power steering rack in the pre-’85 model year vehicles and the Brat has a two-piece gearbox and an air vent distribution tube. It also has seals, service procedures and special service tools that differ from the other racks.

Rigid Steering Column

Three types of steering columns are used in Subaru vehicles: a rigid steering column, a tilt steering column and the XT and SVX tilt and telescoping steering column. The rigid steering column is found on L-series DL models, the Legacy standard model, and Justy vehicles. The rigid steering shaft does not tilt or pop-up, but is collapsible (a safety feature). The shaft is connected to the gearbox by universal joints.

Overboost and Underboost Subaru common causes:

Overboost and Underboost Subaru common causes:

The common causes for overboost or underboost: This is a basic guide on the possible causes and some solutions to those causes of a overboost or a underboost situation in a turbocharged subaru.

Overboost and Underboost Subaru common causes: Turbo Subarus: Common Overboost and Underboost issues with Turbo Subarus.

Overboost:

1.) Decat + High flow induction –  Cure: Reduction of the solenoid duty cycle or alteration of restrictor size will help return boost output to its normal level.

2.) Split, poor fitting, or disconnected pipes – Cure: Replace or refit pipes, the pipes that will cause this issue are between the wastegate actuator, solenoid, and the turbo. Including up to the restrictor on the return pipe of the 3 port solenoid.

3.) Manual Boost Controller – Electronic Boost Controller set too high – Cure: Don’t be so greedy and back the boost duty/adjuster off to a safe level.

4.) Restrictor Pill not fitted / size incorrect – Cure:  Ensure restrictor pill is fitted (3 port) if so on a 3 port reduce the restrictor size and on the 2 port increase the restrictor size to reduce the boost to a safe level.

5.) Clogged 3-port solenoid: It is possible that the flow of air through the 3-port solenoid could be restricted between the turbo outlet port and the wastegate actuator port if the solenoid is very dirty (usually oil vapor from the intake system), this allows the wastegate to remain clamped shut longer than it should be causing a potential overboost situation. Cure: Clean with carb or clutch/brake cleaner.

6.)Loss of solenoid funcation: Although this is not bverboost it shows itself with very simmilar symptoms, its an interesting scenario. It is possible for the solenoid to fail or even stick shut while under boost. This will result in a rapid reduction of boost pressure to wastegate pressure approx 0.5 BAR. So if you were running at full boost 1.0 BAR for example and the solenoid was to fail shut it would feel just like overboost as the wastegate rapidly opens due to the solenoid blocking off the spill from the wastegate. Cure: Either clean the solenoid with carb or clutch+brake cleaner or replace the solenoid.