Tag Archives: Impreza

Group N STi Transmission Mount Install:

Group N STi Transmission Mount Install:

How to install an STi Group N Transmission Mount for manual transmission only. There is a significant difference between the STi Group N transmission mount and the stock one. The STi Group N mount is not only harder, but has more material to it. The stock mount is soft enough to compress with your hand, whereas standing on the STi Group N mount barely deflects the material.
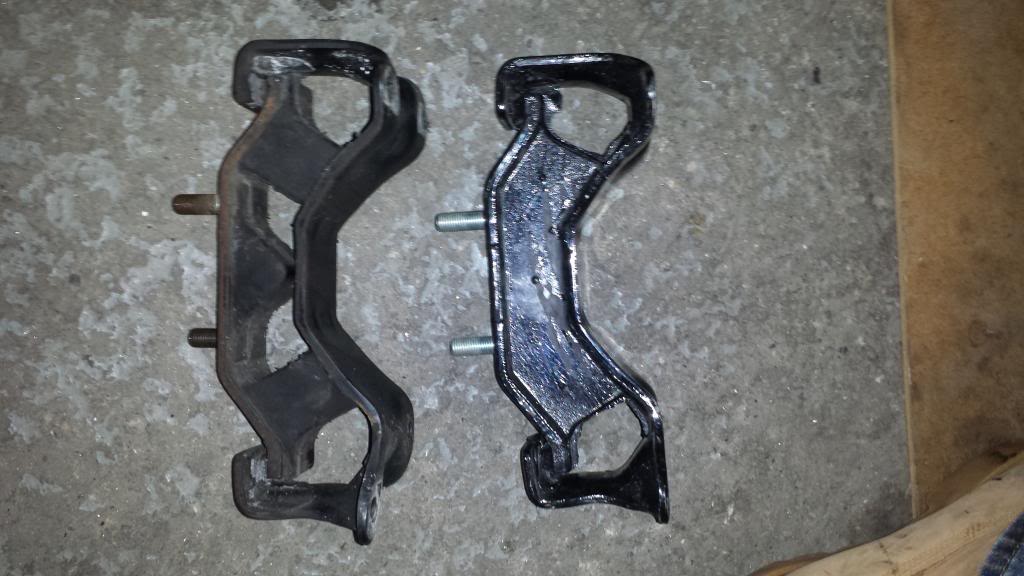
Group N: Stock transmission mount on the left. STi Group N transmission mount on the right.


1.) To start off, look for the long crossmember holding up the transmission- it will be at the end closest to the engine. The ends of this crossmember are right near the rear mount for the front A arm, and are held in with a large 17mm bolt, one on the driver side and one on the passenger side. Remove them both completely. Fair warning- these bolts were tight from the factory. I placed a 3 foot length of pipe over my socket wrench for leverage after I had a casualty- I broke one of the 4″ long socket extensions.

2.)  remove the 2 14mm nuts that hold the bottom of the transmission mount to the crossmember that runs the length of the transmission- these were also tight but came out without breaking any of my tools.

3.) At the rear of the transmission, you will find the third and final crossmember holding the transmission in its place. There are four 14mm bolts in this crossmember there are two on the driver side.

Transmission oil change for Subaru WRX/STi:

Transmission oil change for Subaru WRX/STi:

This is a guide on how to change your transmission oil in your turbo Subaru. Transmission oil is usually changed at 30,000 mile intervals, though more frequent changes are suggested if you take part in track days.

Transmission oil:

Subaru 75W90 Extra-S Gear & Transmission Fluid – 1 Quart Bottle

Subaru 803916080 Manual Transmission Drain Plug Washer

Tools needed:

21mm Socket wrench or other tool of your choice
(I used a socket set with the large spark plug fitting and hollow
extension for extra leverage, dad’s tent is now missing one pole.)
– New sump washer
– Funnel
– 2 foot length of garden hose or similar sized tubing.
– Gear oil* – 3.9 quarts for wrx/sti gearbox/front diff. (Extra 800ml for rear diff)
– Oilpan or large container capable of holding 4+ quarts.

1.) First things first, jack the car up, or drive it onto wheel stands. Make sure the hand brake is on. T
Do not go under the car unless you’re sure it’s secure on it’s stands.

2.) Ensure the car is cool enough to work on, wait at least an hour after driving. Now you’ll need to find the transmission dipstick, which is located between
the turbo and intercooler. Pull it out.

3.) Now you can crawl under the car with your socket, dropsheet & oil pan. Looking from the middle of the car towards the front, you’ll be able to
see the drive shafts, transmission & diff, transmission plug, the engine oil sump plug.

4.) The front transmission oil plug is the one you want, loosen it and then slowly unwind it by hand until the end of the thread, then get yourself and the cat out of the way before you both get covered in oil. If all goes to plan, you’ll get most of the spent oil into your container.

Headlight Amber Signal Removal/Clearing WRX/STi:

Headlight Amber Signal Removal/Clearing WRX/STi:

Here is a guide for Subaru headlights to remove the amber turn signal and clear the headlight. This guide also covers on how to reseal your headlight.

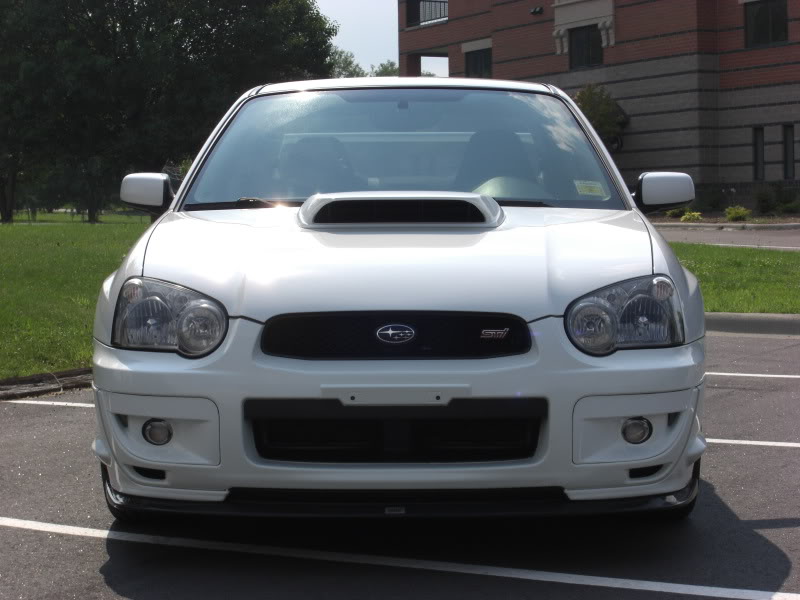
A blobeye STi with modified headlights that's had it's amber turn signals removed.
A blobeye STi with modified headlights that’s had it’s amber turn signals removed.

1.) Before we start to remove the headlight assembly itself, we have to remove the grill; so pop the hood and unhitch the 4 small, and 2 large clips. Small top ones can be unclipped by using a finger (if yours is narrow enough), or a small flat-head screwdriver.
*If in doubt, you can refer to manual*

2.) Now the grill is out of the way, we can remove the 3 10mm bolts holding the assembly in place.

3.) Remove the 2 plastic rivets on each side by the headlights. It makes it a lot easier to get the headlight out as you can now shift/move/bent the bumper a bit to get that tad more clearance.

4.) Now to pull the headlight out of the clips its being held in there. Yes, even more stuff holding them in! Obviously Subaru didn’t want them coming out easily. I’ve found disconnecting the low beam, pulling the inner-most corner of the assembly out first, then maneuvering the outer edge out the easiest way. Followed by maneuvering the headlight so you can then disconnect the high beam and park/indicator plugs.

5.) OK, so you’ve managed to remove one headlight.You can now take this inside, but whatever you do, when you put it down, lay it on something soft, like a (clean) towel or carpet, that won’t scratch the lens. Now to go about removing all the globes and associated wiring.

6.) Low beam. Turn the Bulb stem anti-clockwise so the slots line up with the recesses, then pull out.

7.) Indicator & Parking. Again, same as low beam, twist anti-clockwise, and pull out.

8.) High beam. First remove the water/dust-proof cover by the same method as above. Pull off the negative/ground (black) carefully by using a pair of pliers, should slide right off. Then push-slide the retaining clip in so that you can get the high beam bulb out. The plug-ends (grey and black socket things) can be removed from the back by either holding them (note, not holding the wires) and pulling firmly, or using those pliers you had before.

9.) Preheat the oven to 200 degrees Fahrenheit.

This is what you should be looking at:

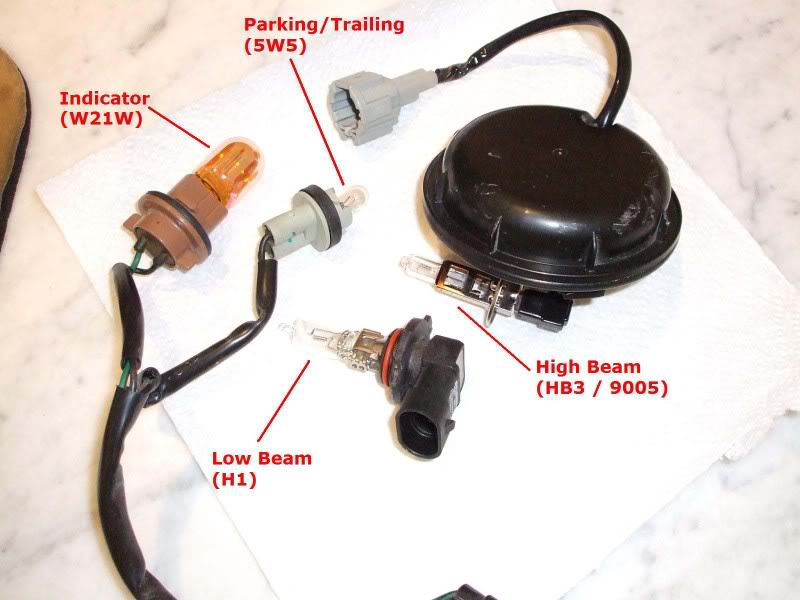
Headlight: Indicator/Parking/Low Beam/High Beam breakdown.

Hood damper Installation for Subaru WRX/STi

Hood damper Installation for Subaru WRX/STi:

This is a Tein hood damper installation guide for your Subaru Impreza WRX/STi.

Tein BHD01-S28 Hood Damper for Subaru Impreza

Tools Required: 10mm Socket
12mm Socket
Razor

1. Inspect contents of the kit!

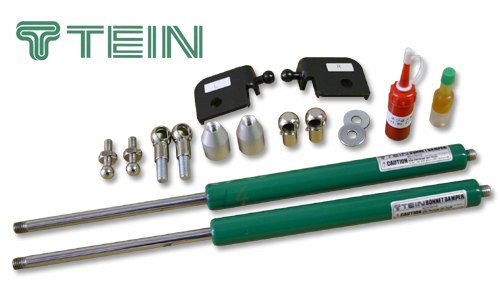
Tein hood dampers: Note the Red bottle is the thread locker, clear bottle is grease!

Note the Red bottle is the thread locker, clear bottle is grease!

2. Assemble the dampers by attaching the aluminum extensions to the long ball joint and damper body
Apply thread locker to all threads.
The small ball joint goes on the other end!

3. Next, remove the center fender bolt using a 10mm socket and ratchet, install the joint ball post and washer into this bolt hole, use the tread locker. Torque to 7.5ftlbs.

4. Use a razor to make a clean cut to the factory rubber molding from the fender to the beginning of the engine bay.

5. Take an assembled Tein Hood Damper and remove the locking pin from the Ball Joint (female end), using a little grease cover the male end and place female end over the male end, re-insert locking pin.

Note, the left hand side can be rotated as pictured above to insert the locking pin and then rotated back to the hood.

Rear Differential Bushings install Subaru WRX/STi

Rear Differential Bushings install Subaru WRX/STi:

This rear differential bushing install process took all of about an hour and a half. What you will need is:

Rear Diff Bushings:

Whiteline KDT905 Rear Differential Support Bushing

Whiteline W92835 Rear Differential Mount Bushing


I used a 3/8″ drive set
17mm Medium Depth socket
17mm Open ended Wrench
Swivel For socket (optional) i didnt need this
Torque Wrench (specs for all of these nuts and bolts are 51.6ft lbs)
Couple of screwdrivers or Pry bars ( i prefer Prybars)
C-clamp
Hammer (optional)
Transmission lift (to hold up the rear diff when the bolts are out, you will also need this to lower the diff down to get the outside bolts over the rear axles)

1.)
Get the vehicle in the air some how, this is easiest if you have access to a garage with a lift. Which i did that only costs about $2.00 an hour. Once its on the lift go ahead and locate the area with the bolts and make sure you unplug the rear diff sensor and ground.

2.)
Unbolt the two outer nuts, you will notice that the bolt goes in from the axle side. Make sure to put them back the same way.

3.)

Now that the outside bolts are out, what you need to do it take the nuts that you have taken off from the outside and thread them over the two inner bolts that hold on the rear diff. What this does is make it able for you to take out the bolt that is directly screwed into the diff. Make sure you thread it all the way, and once they are tight, using your open ended wrench start to back off the inner nut, and it might turn a little bit without the whole thing moving but thats ok, a few turns and the whole thing will break free. ( be carefull for the rear diff sensor)

4.)
Once you get the two studs holding the rear differential in place you should be able to let down your transmission stand a little bit to move the axles out of the way and pull the studs out of the outside two bushings.

Clutch replacement for a Subaru WRX/STi:

How to replace a Clutch for a GD Subaru:

This procedure was performed on a MY04 STi with some modifications which may or may not be relevant for the purposes of this How-To. This procedure is only ONE way of removing the transmission and is not meant to be the be-all method. This is a DIY on your driveway process only. If you have access to a lift, this would be the preferred and safest method.

Perform this procedure AT YOUR OWN RISK.

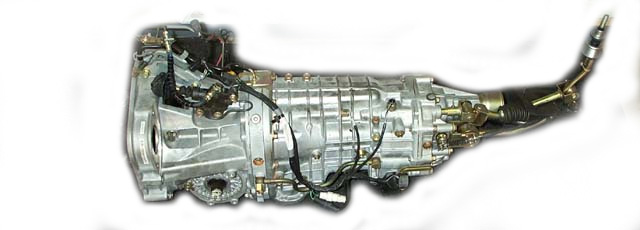
Clutch: STi Transmission
Clutch: This procedure allows you to remove the transmission from a Subaru STI for the purpose of gaining access to the clutch and flywheel system for inspection and or replacement

This procedure allows you to remove the transmission from a Subaru STI for the purpose of gaining access to the clutch and flywheel system for inspection and or replacement.

This procedure allows you to remove the transmission without the benefit of a lift and is meant as a DIY for the weekend warrior. This is by no means a simple or easy procedure and it requires a good deal of strength. IT IS RECOMMENDED YOU HAVE A FRIEND THERE TO HELP. You will need a second pair of hands at times.

Flywheel: Flywheels for Subaru WRX/STi’s FAQ

Flywheel FAQ:

How does a lightweight flywheel improve performance? A transmission can be thought of as a fulcrum and lever in a car. First gear has a really long lever; second gear has a shorter lever, etc. The lever represents the mechanical advantage that gears give your vehicle. When your car is moving, you have two factors that are present during acceleration, one is driveline losses, which are constant and the variable, which is vehicle weight and the mechanical advantage supplied by each gear.

Flywheel: SPEC flywheels are CNC manufactured at an unheard-of .001 tolerance, in an industry where the standard is .010. This precision manufacturing process ensures perfect balance and a perfectly flat bedding surface for the clutch disc, both of which also contribute to the ultimate in safety for competitive environments. All SPEC flywheels carry SFI certification.

While changing to a lighter flywheel will give the user little to no changes on a dyno, the apparent changes are quite dramatic due to the greater mechanical advantage. Consider these made up figures for consideration: Drive line losses, 45 pounds and vehicle mass (weight) at the driveline (remember your gear’s mechanical advantage reduces your actual car weight). We know that within reason, vehicle mass is a constant.

Now imagine if you reduced the driveline loss from 45 to 35 with the use of a lightweight flywheel. Since the engine has less drivetrain losses to compensate for, this means the “gained” horsepower can be applied to moving the vehicle mass. Using mathematics, one can realize that the higher you go up in gears, the less effect that a lightened flywheel will have to the overall equation.

Are there any downsides to a lightweight flywheel? While the performance characteristics of a lightweight flywheel seem to be the perfect solution, there are compromises:
a. Low end performance is affected. This usually means that higher revs are necessary for smooth starts due to the reduced rotational mass. For drag racers, this can be a BIG issue.
b. Possible missfire check engine light.
c. Possible chatter, like missfire this affects some users and not others.

Uppipe WRX upgrade FAQ

Aftermarket Uppipe FAQ for WRX/STi

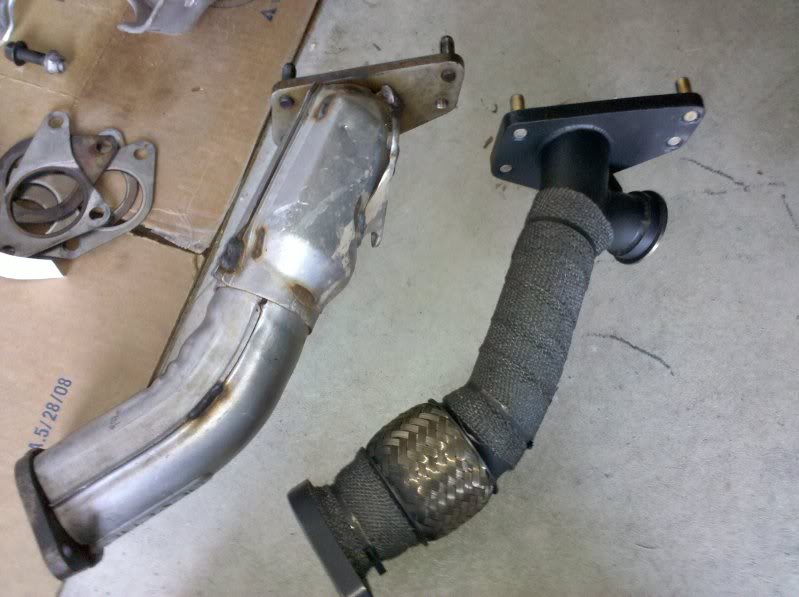
Uppipe: The primary purpose of an aftermarket uppipe is to remove the catalytic converter housed within the stock unit. This serves two purposes: to increase horsepower and decrease turbo spool time.

uppipeaftermarket
Uppipe: The primary purpose of an aftermarket uppipe is to remove the catalytic converter housed within the stock unit.

HP gain is around 10HP. This figure is highly debated as different manufacturers use different dynos with different cars with different levels of mods. Dyno Proof Example. The general consensus for turbo spool time decrease is boost will occur around 500 RPM sooner.

Is an aftermarket uppipe a performance or reliability mod? With regard to swapping over from a catted uppipe to a catless uppipe, it’s both. Need some evidence of the reliability? View this link.

Which manufacturer is best? This topic is highly debated. There have been no reported consistent “bad” uppipes on the market. Obviously, there may have been bad pipes sold, but not enough to report as “bad” overall.

What uppipe metal material is best? Uppipes are made from mild steel, stainless steel (304 & 321), cast iron, and inconel. There is no irrefutable evidence that one material is better than the other. Obviously, corrosion levels are higher with mild steel (coated or otherwise) and cast iron. Corrosion on cast iron, due to it’s thickness and material qualities, is more resistant to corrosion damage than mild steel. In terms of heat retention, the best material is inconel.

Which uppipe construction method is best? Uppipes are either solid or flex. There is no irrefutable evidence that one design is better than the other. The thought process is that a flex pipe will reduce the chances of leaking. Practical application has shown that correct installation plays a bigger role than the uppipe construction.

What is the cheapest uppipe? Gut your stock uppipe. Instructions. Gutting your stock uppipe can have the same benefits as using a more expensive aftermarket uppipe. Dyno Proof.

Which uppipe has the best gains? There is no irrefutable evidence that any uppipe has better gains than another. The consensus, if there is one, is they are all within 1-2 HP, gain wise, of each other.

Where do I buy an uppipe?