Tag Archives: suspension

Subframe Lockbolt install for Subaru WRX/STi

Subframe Lockbolt install for Subaru WRX/STi:

This is a step by step guide on installing a subframe lockbolt kit into the rear subframe of your 02-07 Subaru Impreza WRX/STi.

Subframe Lockbolt install for Subaru WRX/STi: Where these two red arrows point to are where the lockout bolts will be installed.

The rear subframe is isolated by rubber bushings which allow some movement relative the WRX/STi chassis. This movement can be the source of a rubbery feeling during launch and hard cornering. Enough rear subframe movement may alter the rear toe settings and affect handling during advanced driving. Depending on which lockbolt brand you use the adapter portion may not sit flush to the subframe surface, this is part of the design and is OK.

The lockbolt is not designed to stop vertical movement of the rear subframe. It is meant to limit movement in the horizontal plane. PB Blaster will soften the factory undercoating spray thus making a mess. WD-40 is not as aggressive so less black mess is made.

ALK (Anti-Lift Kit) install on 02-07 Subaru WRX/STi:

ALK (Anti-Lift Kit)install on 02-07 Subaru WRX/STi:

This is a step by step guide on how to install a Anti-Lift Kit (ALK) onto a 02-07 WRX/STi. These ALK (Anti-Lift Kits) are designed to be used with the STi’s aluminum control arms.

1.) First unpackage your Anti-Lift Kit (ALK) it’ll look something like this.

Anti-Lift Kit (ALK): This is all the components you'll get with this kit.
Anti-Lift Kit (ALK): This is all the components you’ll get with this kit.

2.)  Get your tools ready and mount the car up properly on jack stands to prevent the car falling down on you. Get as much clearance as you can as you’ll need a lot of room to work with.

Anti-Lift Kit (ALK): Get the front of your STi up on jack stands.

3.) Make sure you have a decent breaker bar. I’ve destroyed a breaker bar doing this before. Do not use a 3/8 inch drive. Use a 1/2 inch drive so you don’t break a breaker bar and a socket.

Sway bar (front) and endlinks install on GD STi:

Front sway bar and endlinks install on 02-07 STi:

This is a step by step guide in installing a front sway bar with aftermarket endlinks on a 04-07 Subaru STi.

1.) Get the car in the air and be sure to secure the car. I used jack stands in the cutouts on the side of the car’s lower frame. It may be easier to use ramps since you will need to tighten the sway bar mounting bolts when the suspension is “loaded,” that is when the full weight of the car is on the wheels/tires.

2.) Remove the front lower cover (splash guard). There are five bolts that require a 12 mm socket, three in the front and two toward the rear. There are two pop fasteners on each side as well. These can be removed by using a small flat bladed screwdriver to pop up the center round plastic piece about a quarter of an inch then pulling/wriggling out the entire fastener.

3.) Remove the jack plate. There are four bolts in the center area to remove and two nuts on each side.

Front sway bar and endlinks: Remove splash guard and skid plate.

4.) The sub-frame is an odd looking, approximately C shaped, bracket under the front part of the car. The opening of the C is toward the rear of the car. It helps to remove this to make it easier to get to the bolts that hold the sway bar onto the frame.

The sub-frame has five bolts on each leg of the C and two toward the front of the car. The two rearmost bolts require a 14mm socket, the other three on each side require a 17mm socket and the two on the front require a 12mm socket. Start by removing a plastic cover on each side that is held in place by two pop fasteners.

Front sway bar and endlinks install on 02-07 STi: The sub-frame is an odd looking, approximately C shaped, bracket under the front part of the car. The opening of the C is toward the rear of the car. It helps to remove this to make it easier to get to the bolts that hold the sway bar onto the frame.

5.) Remove another pop fastener on each side of the sub-frame.

Strut Tower Brace front install WRX/STi

Strut tower front brace install WRX/STi:

This strut tower brace guide should work on both 04 and 05’s just fine (mine is an 05). I’m not sure about the 06s’ since they relocated the AC line and it looks like Whiteline makes the only strut bar that will work on an 06. A little bit of modification with the 06+ model cars might be necessary. These are also specific to the JDM Spec-C Titanium Strut Bar but should work as a general guide for any strut bar on an STi.

1.) Remove alarm horn bar from passenger strut tower bolts which are 12mm. Disconnect the horn and put it aside for now. We’ll screw the horn into the side of the strut tower once we’ve installed the strut bar.

Strut tower brace: Removing the alarm horn bracket. Some models did not come with the alarm horn option so you do not need to do this.

2.)Lower the AC line bracket down a screw. This is the AC Bracket you need to unscrew (use a philips head screw driver or 10mm ratchet). You’ll need to remove the bolt that connects the AC line to the bracket and also the bracket where it connects to the firewall. Remount the bracket down a screw by mounting the upper hole where the bottom screw hole on the firewall is. The bracket is the copper colored metal piece.

Strut Tower Brace: Remove the copper bracket off of it's mount on the firewall.
Strut Tower Brace: Remove the copper bracket off of it’s mount on the firewall.

3.) Install Strut Bar.

First remove the bolts holding the struts to the strut walls. Bolts are 12mm. They should come off pretty easily since they are only torqued down to 14.5ft-lbs.

I found it was easiest to unscrew the strut bar into 3 pieces, the 2 parts that connect to the strut tower and then the actual bar itself (bolts/screws are 12mm). I put the round strut tower parts on first and loosely bolted them down. Then I placed the strut bar on top and loosely screwed down the strut bar to the strut tower connection pieces.

Strut tower brace: Passenger side strut bar end installed.
Strut Tower Brace: Driver's side strut bar end installed.
Strut Tower Brace: Driver’s side strut bar end installed.

Rear Differential Bushings install Subaru WRX/STi

Rear Differential Bushings install Subaru WRX/STi:

This rear differential bushing install process took all of about an hour and a half. What you will need is:

Rear Diff Bushings:

Whiteline KDT905 Rear Differential Support Bushing

Whiteline W92835 Rear Differential Mount Bushing


I used a 3/8″ drive set
17mm Medium Depth socket
17mm Open ended Wrench
Swivel For socket (optional) i didnt need this
Torque Wrench (specs for all of these nuts and bolts are 51.6ft lbs)
Couple of screwdrivers or Pry bars ( i prefer Prybars)
C-clamp
Hammer (optional)
Transmission lift (to hold up the rear diff when the bolts are out, you will also need this to lower the diff down to get the outside bolts over the rear axles)

1.)
Get the vehicle in the air some how, this is easiest if you have access to a garage with a lift. Which i did that only costs about $2.00 an hour. Once its on the lift go ahead and locate the area with the bolts and make sure you unplug the rear diff sensor and ground.

2.)
Unbolt the two outer nuts, you will notice that the bolt goes in from the axle side. Make sure to put them back the same way.

3.)

Now that the outside bolts are out, what you need to do it take the nuts that you have taken off from the outside and thread them over the two inner bolts that hold on the rear diff. What this does is make it able for you to take out the bolt that is directly screwed into the diff. Make sure you thread it all the way, and once they are tight, using your open ended wrench start to back off the inner nut, and it might turn a little bit without the whole thing moving but thats ok, a few turns and the whole thing will break free. ( be carefull for the rear diff sensor)

4.)
Once you get the two studs holding the rear differential in place you should be able to let down your transmission stand a little bit to move the axles out of the way and pull the studs out of the outside two bushings.

Spring Installation guide for Subaru WRX STi:

Spring Installation guide for Subaru WRX STi:


1.) Remove the rear seat.

Tools: 12mm socket. Socket extension helps.

There are two brackets at the front of the rear seat. Remove the bolts holding them in and pull out the lower seat cushion. There are three brackets holding the seat back in. Once the bolts are out you can lift the cushion off. There are brackets at the top that support the seat; make sure those clip in properly when you put it back in. Also pay attention to how the cushion fits through the seat belt.

2.) It is easiest to bust loose the 17mm strut top nuts while the car is on the ground. So that’s what we are doing here…

Once the seat is out you can get to the rear strut dust covers. You’ll want a couple of tools to get to these nuts since the access is pretty tight. A 12mm open gear wrench (pictured) is nice. Also, standard 12mm sockets in various depths will be helpful. Unless you have air tools that can fit on these, there is a lot of wrenching involved since you can only get a few degrees per turn on some of them. Strut cover removed. Note the “out” inscription, and make sure it faces “out” when you put it back on. Top of the strut showing the nut that needs to be loosened. You should be able to get on there with a 17mm deep socket and loosen it a few turns. Just bust it loose, do not remove it at this point!

This next part isn’t critical now, but you will need the info later.

In order to make sure the strut isn’t spinning in the shaft, you need to insert a 6mm hex/allen wrench
into the strut top, and hold that still while you turn the 17mm nut. This is the contraption I use.

Now to the front.

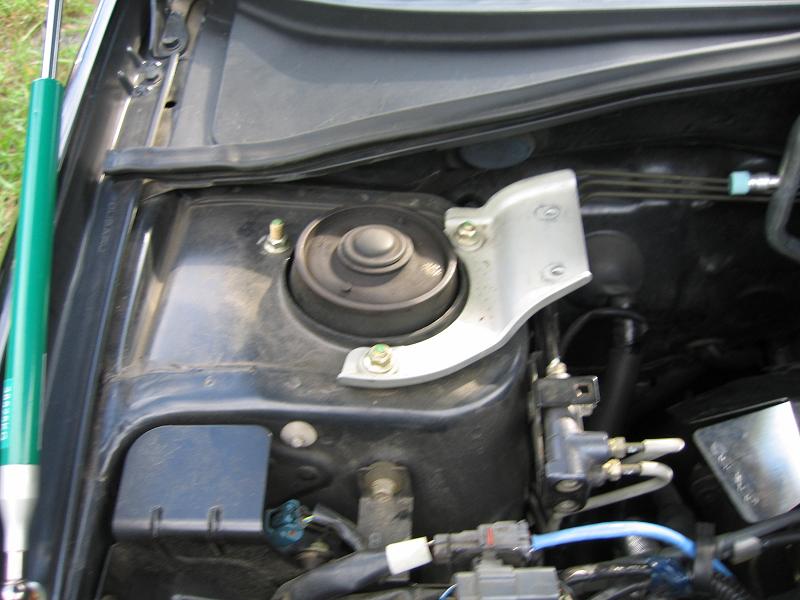
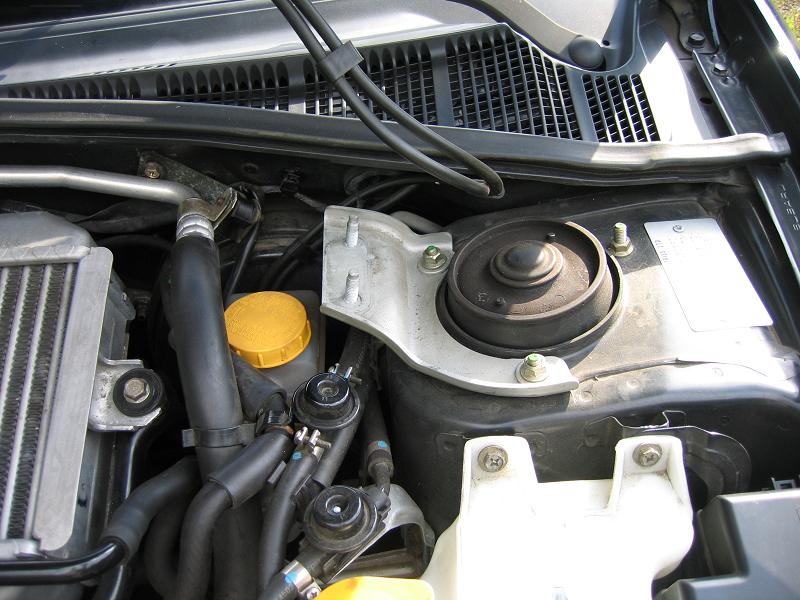
Remove the little rubber dust covers in the center of the top mounts. Again, bust the top nut loose. On the front passenger side there may be a bracket that holds an alarm chirper. It doesn’t really matter if you take the 12mm nuts off now or later, I am just including it at this point in the process. If you do loosen them now, again, make sure to keep them on at least a little bit so the struts don’t fall off later.