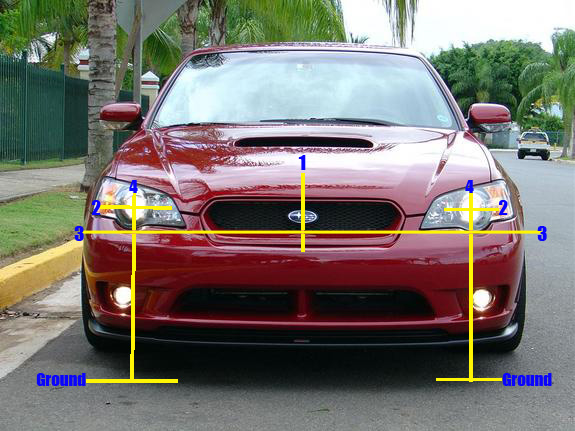
Subaru models equipped with aerodynamic headlights require no special fixtures for headlight alignment. Each headlight is equipped with a built-in headlight aiming mechanism. The following sequence demonstrates the correct technique for adjusting the headlights on a Subaru Legacy equipped with aerodynamic headlights.
Headlight aiming basics for Subarus: Some basic headlight adjusting techniques for Subaru cars.
1.) Turn off the headlight before adjusting headlight aiming. If the light is necessary to check aiming, do not turn on the headlights for more than two minutes.
2.) Inspect the area around the headlight for any damage. If the vehicle has been involved in an accident, it may not be possible to properly adjust the headlights until the damage has been professionally repaired.
3.)The vehicle must be parked on level ground and all four tires must be properly inflated.
Here is a guide for Subaru headlights to remove the amber turn signal and clear the headlight. This guide also covers on how to reseal your headlight.
A blobeye STi with modified headlights that’s had it’s amber turn signals removed.
1.) Before we start to remove the headlight assembly itself, we have to remove the grill; so pop the hood and unhitch the 4 small, and 2 large clips. Small top ones can be unclipped by using a finger (if yours is narrow enough), or a small flat-head screwdriver.
*If in doubt, you can refer to manual*
2.) Now the grill is out of the way, we can remove the 3 10mm bolts holding the assembly in place.
3.) Remove the 2 plastic rivets on each side by the headlights. It makes it a lot easier to get the headlight out as you can now shift/move/bent the bumper a bit to get that tad more clearance.
4.) Now to pull the headlight out of the clips its being held in there. Yes, even more stuff holding them in! Obviously Subaru didn’t want them coming out easily. I’ve found disconnecting the low beam, pulling the inner-most corner of the assembly out first, then maneuvering the outer edge out the easiest way. Followed by maneuvering the headlight so you can then disconnect the high beam and park/indicator plugs.
5.) OK, so you’ve managed to remove one headlight.You can now take this inside, but whatever you do, when you put it down, lay it on something soft, like a (clean) towel or carpet, that won’t scratch the lens. Now to go about removing all the globes and associated wiring.
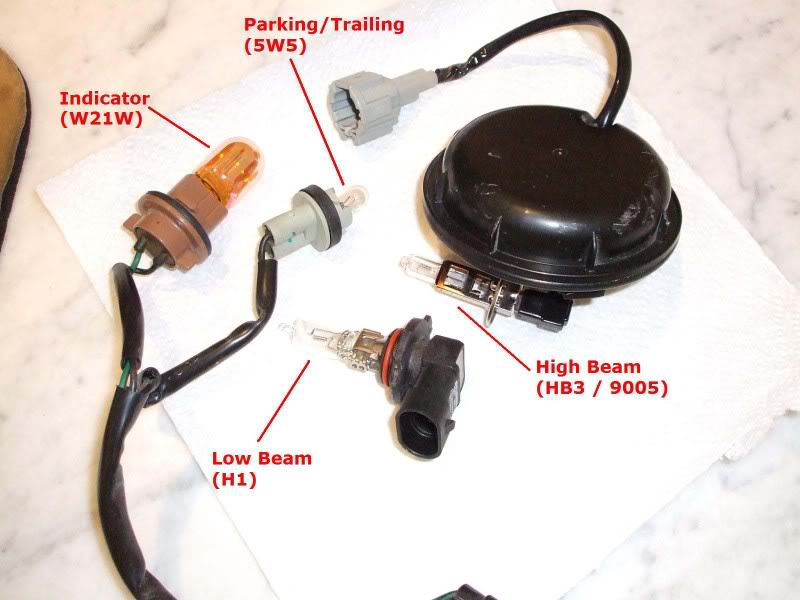
6.) Low beam. Turn the Bulb stem anti-clockwise so the slots line up with the recesses, then pull out.
7.) Indicator & Parking. Again, same as low beam, twist anti-clockwise, and pull out.
8.) High beam. First remove the water/dust-proof cover by the same method as above. Pull off the negative/ground (black) carefully by using a pair of pliers, should slide right off. Then push-slide the retaining clip in so that you can get the high beam bulb out. The plug-ends (grey and black socket things) can be removed from the back by either holding them (note, not holding the wires) and pulling firmly, or using those pliers you had before.
We use cookies on our website to give you the most relevant experience by remembering your preferences and repeat visits. By clicking “Accept”, you consent to the use of ALL the cookies.
This website uses cookies to improve your experience while you navigate through the website. Out of these, the cookies that are categorized as necessary are stored on your browser as they are essential for the working of basic functionalities of the website. We also use third-party cookies that help us analyze and understand how you use this website. These cookies will be stored in your browser only with your consent. You also have the option to opt-out of these cookies. But opting out of some of these cookies may affect your browsing experience.
Necessary cookies are absolutely essential for the website to function properly. These cookies ensure basic functionalities and security features of the website, anonymously.
Cookie
Duration
Description
cookielawinfo-checkbox-analytics
11 months
This cookie is set by GDPR Cookie Consent plugin. The cookie is used to store the user consent for the cookies in the category "Analytics".
cookielawinfo-checkbox-functional
11 months
The cookie is set by GDPR cookie consent to record the user consent for the cookies in the category "Functional".
cookielawinfo-checkbox-necessary
11 months
This cookie is set by GDPR Cookie Consent plugin. The cookies is used to store the user consent for the cookies in the category "Necessary".
cookielawinfo-checkbox-others
11 months
This cookie is set by GDPR Cookie Consent plugin. The cookie is used to store the user consent for the cookies in the category "Other.
cookielawinfo-checkbox-performance
11 months
This cookie is set by GDPR Cookie Consent plugin. The cookie is used to store the user consent for the cookies in the category "Performance".
viewed_cookie_policy
11 months
The cookie is set by the GDPR Cookie Consent plugin and is used to store whether or not user has consented to the use of cookies. It does not store any personal data.
Functional cookies help to perform certain functionalities like sharing the content of the website on social media platforms, collect feedbacks, and other third-party features.
Performance cookies are used to understand and analyze the key performance indexes of the website which helps in delivering a better user experience for the visitors.
Analytical cookies are used to understand how visitors interact with the website. These cookies help provide information on metrics the number of visitors, bounce rate, traffic source, etc.
Advertisement cookies are used to provide visitors with relevant ads and marketing campaigns. These cookies track visitors across websites and collect information to provide customized ads.