Category Archives: Turbo

Fuel Pump Walbro 255lph for 2008 STi/WRX/LGT Install:

Walbro Fuel Pump for 2008 -11 STi/WRX/LGT Install:

Install guide for those looking to upgrade the factory WRX, STi, or LGT fuel pump. I recently found the stock pump to be inadequate when running high boost and E85. When ordering the pump, you DO NOT need the filter kit, it WILL NOT fit in the housing. Make sure to run the car down under the 1/4 tank mark before beginning. There will be gas spillage so make sure you have plenty of fresh air and towels around to clean up.

1.) Pop the gas cap off to relieve fuel pressure from the tank. Remove your lower rear seat by pulling upwards on each side and the middle. There are 3 snap in spots. Place your seat somewhere clean and out of the way. Once you do this you can see the fuel pump access cover and harness. Unplug this harness.

2.) Remove the 4 screws holding the access cover in place and place them somewhere safe away from the access cover.

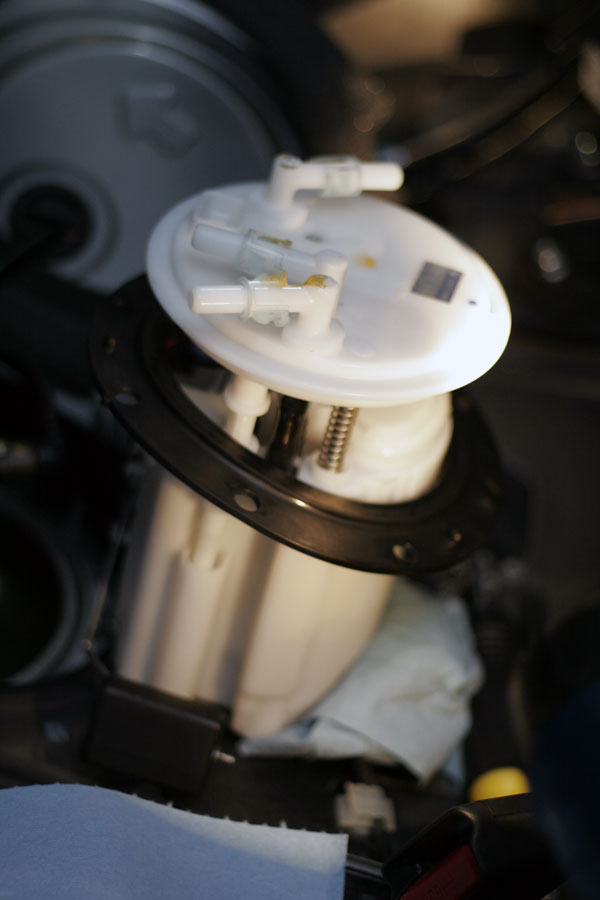
3.) Now you can see the fuel pump access point. There are 3 fuel lines, 8 8mm nuts, and the electrical connector. Disconnect the electrical connector now and stuff it out of the way. Grab some of your handy shop towels and place them under the fuel lines in case of spillage. Once you have removed the fuel lines it should look like this:

Fuel Pump: There are 3 fuel lines, 8 8mm nuts, and the electrical connector. Disconnect the electrical connector now and stuff it out of the way. Grab some of your handy shop towels and place them under the fuel lines in case of spillage.

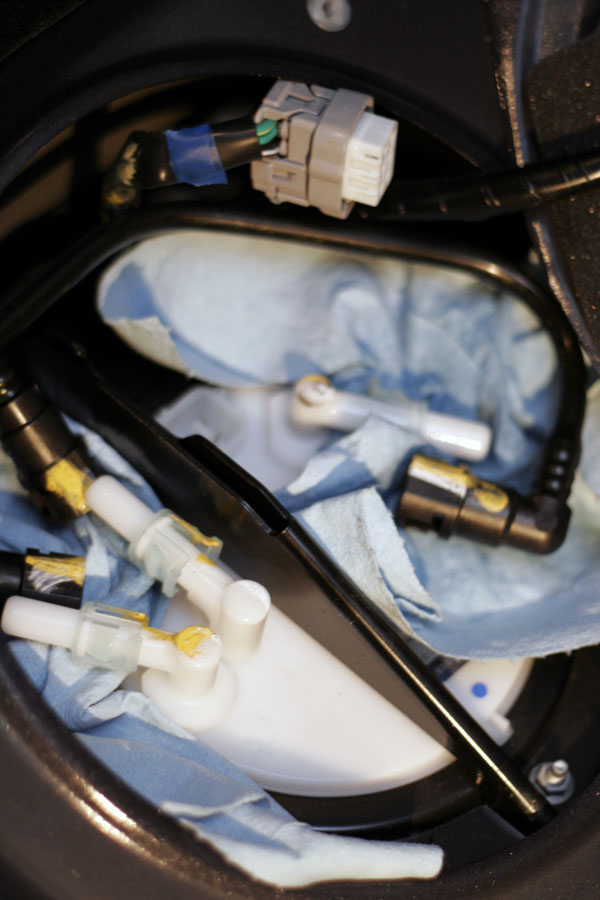
4.) Remove all 8 of the 8mm nuts and place them somewhere safe. Gently remove the metal bracket surrounding the entire assembly to gain access to the housing and place it somewhere safe. Slowly remove the fuel pump assembly by contorting it, be careful not to damage the float or sensor. Once the housing is removed it may spill, make sure you have plenty of towels laid down in your car. If all went well it should look like this:

Fuel Pump: Gently remove the metal bracket surrounding the entire assembly to gain access to the housing and place it somewhere safe. Slowly remove the fuel pump assembly by contorting it, be careful not to damage the float or sensor.

Group N STi Transmission Mount Install:

Group N STi Transmission Mount Install:

How to install an STi Group N Transmission Mount for manual transmission only. There is a significant difference between the STi Group N transmission mount and the stock one. The STi Group N mount is not only harder, but has more material to it. The stock mount is soft enough to compress with your hand, whereas standing on the STi Group N mount barely deflects the material.

Group N: Stock transmission mount on the left. STi Group N transmission mount on the right.


1.) To start off, look for the long crossmember holding up the transmission- it will be at the end closest to the engine. The ends of this crossmember are right near the rear mount for the front A arm, and are held in with a large 17mm bolt, one on the driver side and one on the passenger side. Remove them both completely. Fair warning- these bolts were tight from the factory. I placed a 3 foot length of pipe over my socket wrench for leverage after I had a casualty- I broke one of the 4″ long socket extensions.

2.)  remove the 2 14mm nuts that hold the bottom of the transmission mount to the crossmember that runs the length of the transmission- these were also tight but came out without breaking any of my tools.

3.) At the rear of the transmission, you will find the third and final crossmember holding the transmission in its place. There are four 14mm bolts in this crossmember there are two on the driver side.

Turboback Exhaust Install on 02-07 Subaru WRX:

Turboback Exhaust Install on 02-07 Subaru WRX:

Bone stock the WRX is one of the best performing entry level sports cars you can find, but there’s always room for improvement. Replacing the stock 2.25″ turboback exhaust and it’s 2 catalytic converters with a 3″ turboback exhaust, featuring one high flow cat, should allow the turbo to spool up easier and quicker for more low end grunt.

1.) Remove the heatshield. You’ll be amazed at the amount of bolts used to hold on this simple piece of metal. There are 5 on the left side (viewing from the front of the car), one on the back, and two on the right side. After you have all the bolts removed you’re going to need some keen geometry skills to get the heat shield out of the engine bay but once you do, the downpipe to turbo connection is easily available. Once the downpipe is exposed look for the bottom heatshield. It connects to the downpipe by one bolt.

2.) Loosen the downpipe. There are only 5 bolts holding the downpipe to the turbo. They are surprisingly easy to get to. Now would also be a good time to remove the O2 sensor from the Downpipe.

3.) Disconnect the remaining hangers. It’s a good idea to use photos of the exhaust out of the car in order to point out where the hangers are in relation to the whole system. Install the new downpipe by lining up the turbo/downpipe bolts then securing the hangers. There are 2 hangers for the downpipe shown here. The front one bolts into the transmission. The second rests on a J bracket and is screwed in.

O2 Sensor replacement on 02-07 Subaru WRX/STi:

O2 Sensor replacement on 02-07 Subaru WRX/STi:

This is a guide to replace your front 02 sensor in your 02-07 Subaru WRX/STi. This guide will go step by step through the process.

Denso 234-9120 Oxygen Sensor (Air and Fuel Ratio Sensor)

O2 sensor location in the exhaust manifold.

1.) The first thing you need to do is place the jack under your car. I chose to use the pinch weld under the passenger’s door area. Next you will want to remove the wheel from the car so you will have better access to the O2 sensor. I did this by using a 19mm socket with an extension.

2.) Upon removing the wheel, you should notice a small plastic flap with a few plastic retaining screws holding it in place. I have circled them in red in the picture below.

3.) You are going to want to remove these using flat head and phillips head screw drivers. Take care in making sure you do your best to not strip them out. If you do, you will end up having to either pry them out or pull them out with a set of pliers. If you need to replace any of these, you can usually find them at any autoparts store.

4.) Once you have all of the plastic screws pulled out, remove the plastic cover.

5.) If you pull the remaining plastic cover to the right, you will be able to see the O2 sensor. You can opt to remove the larger of the plastic fender well shields, but I did not see much point in doing so as it would not really yield much more room for access.

6.) With the O2 sensor exposed, you will want to spray it with some lubricant and my preferred lubricant is PB Blaster. With that now soaking in a bit, you are now going to want to go and pop your hood to gain access to the plug end of the sensor.

7.) Looking at your engine bay, you will want to move to the left side (passenger side). Underneath this cover are two connections, the top one is for your front O2 sensor. Go ahead and disconnect that plug.

Transmission oil change for Subaru WRX/STi:

Transmission oil change for Subaru WRX/STi:

This is a guide on how to change your transmission oil in your turbo Subaru. Transmission oil is usually changed at 30,000 mile intervals, though more frequent changes are suggested if you take part in track days.

Transmission oil:

Subaru 75W90 Extra-S Gear & Transmission Fluid – 1 Quart Bottle

Subaru 803916080 Manual Transmission Drain Plug Washer

Tools needed:

21mm Socket wrench or other tool of your choice
(I used a socket set with the large spark plug fitting and hollow
extension for extra leverage, dad’s tent is now missing one pole.)
– New sump washer
– Funnel
– 2 foot length of garden hose or similar sized tubing.
– Gear oil* – 3.9 quarts for wrx/sti gearbox/front diff. (Extra 800ml for rear diff)
– Oilpan or large container capable of holding 4+ quarts.

1.) First things first, jack the car up, or drive it onto wheel stands. Make sure the hand brake is on. T
Do not go under the car unless you’re sure it’s secure on it’s stands.

2.) Ensure the car is cool enough to work on, wait at least an hour after driving. Now you’ll need to find the transmission dipstick, which is located between
the turbo and intercooler. Pull it out.

3.) Now you can crawl under the car with your socket, dropsheet & oil pan. Looking from the middle of the car towards the front, you’ll be able to
see the drive shafts, transmission & diff, transmission plug, the engine oil sump plug.

4.) The front transmission oil plug is the one you want, loosen it and then slowly unwind it by hand until the end of the thread, then get yourself and the cat out of the way before you both get covered in oil. If all goes to plan, you’ll get most of the spent oil into your container.

Boost Gauge Install on Subaru STi/WRX 08-13:

Boost Gauge Install on Subaru STi/WRX 08-13:

This is a guide on installing a boost gauge in a 2010 STi.

Boost Gauge: A installed boost gauge in a GR STi.

Boost Gauge: INTERIOR WIRING AND GAUGE INSTALLATION

1.) Pull off the lower dash cover. It just has clips holding it on.

2.) These are the only two screws that hold the lower dash to rest of the dash. Remove these and the rest of the lower dash can be pulled off.

3.) Lower dash pulled away from the upper, left of the steering wheel.

4.) Lower dash pulled away from the upper, right side of the steering wheel.

5.) There are 4 clips holding the instrument hood to the dash. The entire hood pulls off as one whole unit, but the hard part is getting a good grip. To get better finger placement, I pulled the top of the inner part of the hood away, which revealed a little lip that I could use to pull the hood off. Caution: Do not pull heavily on the inner piece because it is bolted to the rest of the hood at the bottom and could break if you pull on it too hard. Just pull on the top part of the instrument hood itself. Also be careful not to lose the 4 yellow clips that hold the hood to the dash. They come out easily and can get lost.

6.) There are two screws for the instrument cluster. One is circled in the pic and the other is to its left.

7.) Pop the plug off the cluster on the right side.

8.) I ran the wires for the boost gauge through the upper middle hole above the gauge cluster.

9.) Tap into the purple wire on the dimmer switch for headlight power. This wire is only powered when the headlights or parking lights are turned on.

10.) Close-up of where I spliced into the purple wire. For the boost gauge, the ORANGE wire splices into this purple wire. The wire is black in my picture because I used black wire to extend the wires coming out of the back of the gauge.

11.) For ACC power, use the brown and white striped wire on the top connector above the fuse box. This wire is powered when the key is in the “ACC” position only. With the boost gauge, you connect BOTH the RED and WHITE wires to this wire.

The green and white striped wire on the same connector is on all the time, meaning it is powered even when the car is off. I found that out the hard way. (Do not use that wire.)

Banjo Bolt (Union) removal/install on a Subaru WRX STi

Banjo Bolt (Union) removal and install on a Subaru WRX STi:

This is Banjo Bolt step by step guide on the removal and installation of a Banjo bolt and new copper washers for a Subaru WRX/STi or any other turbocharged Subaru.The Banjo bolt is the one with a filter screen that others have indicated should be cleaned or replaced periodically. Subaru calls it a “Union screw (with protrusion).”
Tools needed:
12 mm socket – for intercooler bracket bolt
14 mm deep-well socket – for up-pipe bracket nut and bolt
10 mm socket or wrench – for stock turbo heat shield bolt
17 mm ratcheting wrench – for Banjo bolt
10 inch or longer extension – to reach up-pipe bracket bolts

Parts needed:
Union screw/Banjo Bolt (If replacing which I highly suggest you do.) – Subaru part # 14445AA090

Subaru 14445AA090 Oil Filter Bolt

OR

Genuine Subaru Turbo Banjo Bolt with Screen – 14445AA090a
Copper washers (2) – Subaru part # 803912040
Subaru 803912040 Banjo Washer


Removal and re-install takes about one hour.

Start by removing any heat shields that are in the way. I have the SPT heat shield that comes off by removing the 12 mm intercooler support bolt.
(See pic “Engine bay area”). I also have the stock turbo heat shield installed. I didn’t take it off, but there will be a little more room to work if you do. A 10 mm socket is needed to remove the stock heat shield bolts.

The next page will describe the removal and re-installation process of the Banjo Bolt and copper washers.

Deatschwerks injectors install on Subaru STi w/ a FMIC

Deatschwerks injectors install on a Subaru STi w/ a FMIC:

We put together this DIY since there are some more specifics when working with the  Deatschwerks injectors on a 2006 STI with a FMIC. YMMV and as with all DIY’s, you do this at your own risk. I will not be responsible for any damage you incur doing this yourself. (but seriously, it really wasn’t ‘that’ hard.)

DeatschWerks Injectors: Install

Tools you need:
– 1/4″ Ratchet
– 1/4″ 6″ extension
– 1/4″ U-Joint/Wobble adapter
– 10mm Socket
– 12mm Socket
– 12mm open/box wrench
– 12mm ratcheting box wrench
T-25 Torx Bit or driver
– side/wire cutters (for removing zip-ties)
– long nose pliers (for opening hose clamps)
– wood handled rubber mallet (round handle)

Optional (nice to haves)
– Magnetic Tray (to keep from losing bolts/screws/etc)
– “Antenna” Magnet (to get ‘dropped’ bolts/screws/etc)
– rags for cleaning up spilled anti-freeze

Provided by Deatschwerks injectors:

02J-00-0740-4 Set of 4 740cc Side Feed Injectors for Subaru STI EJ25 04-06, Legacy GT EJ25 04-06, Impreza 2.5RS 97-98

DeatschWerks Top Feed 1000cc Injectors for WRX/STi/LGT

DeatschWerks  (02J-00-1100-4) 1100cc/min Fuel Injector, (Set of 4)

1. Let the car sit overnight or relieve the fuel pressure by unplugging the fuel pump (green plug in upper right area of passenger footwell). (NOTE: I just let my car sit overnight)

Deatschwerks injectors:

2. Start on the driver’s side (it’s easier).

a) Remove negative battery terminal.

b) Remove the two 12mm bolts holding in the plastic bracket to the intake manifold and clip the two zip ties keeping the harness in the plastic bracket.

c) Now remove the plastic bracket (it will take a patient/creative rotation to get it out from the hoses/harnesses) and you’ll be able to clearly access the torx screws holding down the little bracket that holds down the injectors.

1.You may also want to unplug the blue connector and the Crankcase breather hose (regular clamp, not the crimped one) to provide maximum access to the injectors.

d) Unplug the injector, remove the torx screw (Proper size Torx Bit: T-25), swing the bracket up and out of the way, and pull the injector out. You will need a small screwdriver with a sharper tip to pop the injector up. Just be careful not to damage the injector seat or the injector housing / Rubber O-ring

3. Now, get one of your newly purchased Deatschwerks injectors. Open the tube of Super Grease (should be provided) and generously lube the lower O-Ring, and moderately-sparingly lube the upper O-Ring. ONLY LUBE the O-RINGs, try not to get lube on the injector screen or filters

4. Gently insert the Deatschwerks injector. You will want it to sit on the upper O-Ring, flush to the injector port. Then use the bottom of rubber mallet wooden handle to push the Deatschwerks injector in until it seats. There will be a noticeable but gentle “pop” not a sound but a “feel” once the Deatschwerks injector seats. If there is a fair amount of gas left in the injector port, it may even just slip in … no “pop” feeling.

5. Once you have the deatschwerks injectors seated, just reverse the steps in #2