Tag Archives: Subaru

Headlight Amber Signal Removal/Clearing WRX/STi:

Headlight Amber Signal Removal/Clearing WRX/STi:

Here is a guide for Subaru headlights to remove the amber turn signal and clear the headlight. This guide also covers on how to reseal your headlight.

A blobeye STi with modified headlights that's had it's amber turn signals removed.
A blobeye STi with modified headlights that’s had it’s amber turn signals removed.

1.) Before we start to remove the headlight assembly itself, we have to remove the grill; so pop the hood and unhitch the 4 small, and 2 large clips. Small top ones can be unclipped by using a finger (if yours is narrow enough), or a small flat-head screwdriver.
*If in doubt, you can refer to manual*

2.) Now the grill is out of the way, we can remove the 3 10mm bolts holding the assembly in place.

3.) Remove the 2 plastic rivets on each side by the headlights. It makes it a lot easier to get the headlight out as you can now shift/move/bent the bumper a bit to get that tad more clearance.

4.) Now to pull the headlight out of the clips its being held in there. Yes, even more stuff holding them in! Obviously Subaru didn’t want them coming out easily. I’ve found disconnecting the low beam, pulling the inner-most corner of the assembly out first, then maneuvering the outer edge out the easiest way. Followed by maneuvering the headlight so you can then disconnect the high beam and park/indicator plugs.

5.) OK, so you’ve managed to remove one headlight.You can now take this inside, but whatever you do, when you put it down, lay it on something soft, like a (clean) towel or carpet, that won’t scratch the lens. Now to go about removing all the globes and associated wiring.

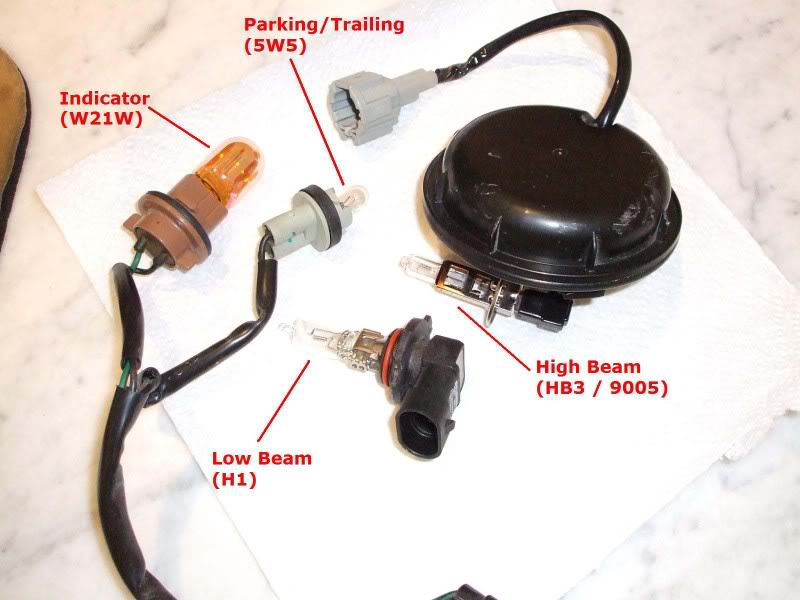
6.) Low beam. Turn the Bulb stem anti-clockwise so the slots line up with the recesses, then pull out.

7.) Indicator & Parking. Again, same as low beam, twist anti-clockwise, and pull out.

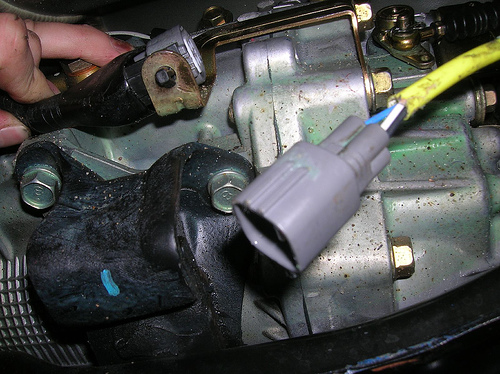
8.) High beam. First remove the water/dust-proof cover by the same method as above. Pull off the negative/ground (black) carefully by using a pair of pliers, should slide right off. Then push-slide the retaining clip in so that you can get the high beam bulb out. The plug-ends (grey and black socket things) can be removed from the back by either holding them (note, not holding the wires) and pulling firmly, or using those pliers you had before.

9.) Preheat the oven to 200 degrees Fahrenheit.

This is what you should be looking at:

Headlight: Indicator/Parking/Low Beam/High Beam breakdown.

Boost Gauge Install on Subaru STi/WRX 08-13:

Boost Gauge Install on Subaru STi/WRX 08-13:

This is a guide on installing a boost gauge in a 2010 STi.

Boost Gauge: A installed boost gauge in a GR STi.

Boost Gauge: INTERIOR WIRING AND GAUGE INSTALLATION

1.) Pull off the lower dash cover. It just has clips holding it on.

2.) These are the only two screws that hold the lower dash to rest of the dash. Remove these and the rest of the lower dash can be pulled off.

3.) Lower dash pulled away from the upper, left of the steering wheel.

4.) Lower dash pulled away from the upper, right side of the steering wheel.

5.) There are 4 clips holding the instrument hood to the dash. The entire hood pulls off as one whole unit, but the hard part is getting a good grip. To get better finger placement, I pulled the top of the inner part of the hood away, which revealed a little lip that I could use to pull the hood off. Caution: Do not pull heavily on the inner piece because it is bolted to the rest of the hood at the bottom and could break if you pull on it too hard. Just pull on the top part of the instrument hood itself. Also be careful not to lose the 4 yellow clips that hold the hood to the dash. They come out easily and can get lost.

6.) There are two screws for the instrument cluster. One is circled in the pic and the other is to its left.

7.) Pop the plug off the cluster on the right side.

8.) I ran the wires for the boost gauge through the upper middle hole above the gauge cluster.

9.) Tap into the purple wire on the dimmer switch for headlight power. This wire is only powered when the headlights or parking lights are turned on.

10.) Close-up of where I spliced into the purple wire. For the boost gauge, the ORANGE wire splices into this purple wire. The wire is black in my picture because I used black wire to extend the wires coming out of the back of the gauge.

11.) For ACC power, use the brown and white striped wire on the top connector above the fuse box. This wire is powered when the key is in the “ACC” position only. With the boost gauge, you connect BOTH the RED and WHITE wires to this wire.

The green and white striped wire on the same connector is on all the time, meaning it is powered even when the car is off. I found that out the hard way. (Do not use that wire.)

Hood damper Installation for Subaru WRX/STi

Hood damper Installation for Subaru WRX/STi:

This is a Tein hood damper installation guide for your Subaru Impreza WRX/STi.

Tein BHD01-S28 Hood Damper for Subaru Impreza

Tools Required: 10mm Socket
12mm Socket
Razor

1. Inspect contents of the kit!

Tein hood dampers: Note the Red bottle is the thread locker, clear bottle is grease!

Note the Red bottle is the thread locker, clear bottle is grease!

2. Assemble the dampers by attaching the aluminum extensions to the long ball joint and damper body
Apply thread locker to all threads.
The small ball joint goes on the other end!

3. Next, remove the center fender bolt using a 10mm socket and ratchet, install the joint ball post and washer into this bolt hole, use the tread locker. Torque to 7.5ftlbs.

4. Use a razor to make a clean cut to the factory rubber molding from the fender to the beginning of the engine bay.

5. Take an assembled Tein Hood Damper and remove the locking pin from the Ball Joint (female end), using a little grease cover the male end and place female end over the male end, re-insert locking pin.

Note, the left hand side can be rotated as pictured above to insert the locking pin and then rotated back to the hood.

Rear Differential Bushings install Subaru WRX/STi

Rear Differential Bushings install Subaru WRX/STi:

This rear differential bushing install process took all of about an hour and a half. What you will need is:

Rear Diff Bushings:

Whiteline KDT905 Rear Differential Support Bushing

Whiteline W92835 Rear Differential Mount Bushing


I used a 3/8″ drive set
17mm Medium Depth socket
17mm Open ended Wrench
Swivel For socket (optional) i didnt need this
Torque Wrench (specs for all of these nuts and bolts are 51.6ft lbs)
Couple of screwdrivers or Pry bars ( i prefer Prybars)
C-clamp
Hammer (optional)
Transmission lift (to hold up the rear diff when the bolts are out, you will also need this to lower the diff down to get the outside bolts over the rear axles)

1.)
Get the vehicle in the air some how, this is easiest if you have access to a garage with a lift. Which i did that only costs about $2.00 an hour. Once its on the lift go ahead and locate the area with the bolts and make sure you unplug the rear diff sensor and ground.

2.)
Unbolt the two outer nuts, you will notice that the bolt goes in from the axle side. Make sure to put them back the same way.

3.)

Now that the outside bolts are out, what you need to do it take the nuts that you have taken off from the outside and thread them over the two inner bolts that hold on the rear diff. What this does is make it able for you to take out the bolt that is directly screwed into the diff. Make sure you thread it all the way, and once they are tight, using your open ended wrench start to back off the inner nut, and it might turn a little bit without the whole thing moving but thats ok, a few turns and the whole thing will break free. ( be carefull for the rear diff sensor)

4.)
Once you get the two studs holding the rear differential in place you should be able to let down your transmission stand a little bit to move the axles out of the way and pull the studs out of the outside two bushings.

Lips: V-Limited Lip Subaru WRX STi Install guide:

V-Limited Lip Subaru WRX/STi Install guide:

Today we have for you an installation guide for the STi V-Limited Lip. It is being installed on a 2006 STi, but the procedure will be very similar for a V-Limited Lip installation on any other compatible Subarus.

Give your car that extra bit of JDM styling you’re looking for while adding performance at the same time! Constructed of 100% ABS plastic (the same material as your factory bumper), the V-Limited Lip is securely attached underneath the front bumper by a series of small bolts.
This is one of very few front lips available on the market that actually has a performance aspect too it. The design of the lip allows for an increase in front down force, improving your car’s handling at higher speeds. Don’t be fooled by imitations lips that are made of a hybrid material or fiberglass. These “replica” lips are flimsy and very prone to breakage. Treat yourself to the real thing and order your V-Limited Lip today! Don’t forget to protect your new V-Limited Lip with a rubber lip protector.

1. For this install you will need to get the front end of the car in the air. It doesn’t need to be that high, just enough to get under the front of the car. A jack stand under each of the two front lift points should do, ramps will also work if you have them.

2. First, you will need to mount the lip under the bumper so that it will stay steady while you drill the holes. Remove the plastic clips circled in the picture (three more on other end of bumper). Attach the lip to the bumper, but do not reattach the plastic cover’s flaps to the bumper as they were before.

Banjo Bolt (Union) removal/install on a Subaru WRX STi

Banjo Bolt (Union) removal and install on a Subaru WRX STi:

This is Banjo Bolt step by step guide on the removal and installation of a Banjo bolt and new copper washers for a Subaru WRX/STi or any other turbocharged Subaru.The Banjo bolt is the one with a filter screen that others have indicated should be cleaned or replaced periodically. Subaru calls it a “Union screw (with protrusion).”
Tools needed:
12 mm socket – for intercooler bracket bolt
14 mm deep-well socket – for up-pipe bracket nut and bolt
10 mm socket or wrench – for stock turbo heat shield bolt
17 mm ratcheting wrench – for Banjo bolt
10 inch or longer extension – to reach up-pipe bracket bolts

Parts needed:
Union screw/Banjo Bolt (If replacing which I highly suggest you do.) – Subaru part # 14445AA090

Subaru 14445AA090 Oil Filter Bolt

OR

Genuine Subaru Turbo Banjo Bolt with Screen – 14445AA090a
Copper washers (2) – Subaru part # 803912040
Subaru 803912040 Banjo Washer


Removal and re-install takes about one hour.

Start by removing any heat shields that are in the way. I have the SPT heat shield that comes off by removing the 12 mm intercooler support bolt.
(See pic “Engine bay area”). I also have the stock turbo heat shield installed. I didn’t take it off, but there will be a little more room to work if you do. A 10 mm socket is needed to remove the stock heat shield bolts.

The next page will describe the removal and re-installation process of the Banjo Bolt and copper washers.

Deatschwerks injectors install on Subaru STi w/ a FMIC

Deatschwerks injectors install on a Subaru STi w/ a FMIC:

We put together this DIY since there are some more specifics when working with the  Deatschwerks injectors on a 2006 STI with a FMIC. YMMV and as with all DIY’s, you do this at your own risk. I will not be responsible for any damage you incur doing this yourself. (but seriously, it really wasn’t ‘that’ hard.)

DeatschWerks Injectors: Install

Tools you need:
– 1/4″ Ratchet
– 1/4″ 6″ extension
– 1/4″ U-Joint/Wobble adapter
– 10mm Socket
– 12mm Socket
– 12mm open/box wrench
– 12mm ratcheting box wrench
T-25 Torx Bit or driver
– side/wire cutters (for removing zip-ties)
– long nose pliers (for opening hose clamps)
– wood handled rubber mallet (round handle)

Optional (nice to haves)
– Magnetic Tray (to keep from losing bolts/screws/etc)
– “Antenna” Magnet (to get ‘dropped’ bolts/screws/etc)
– rags for cleaning up spilled anti-freeze

Provided by Deatschwerks injectors:

02J-00-0740-4 Set of 4 740cc Side Feed Injectors for Subaru STI EJ25 04-06, Legacy GT EJ25 04-06, Impreza 2.5RS 97-98

DeatschWerks Top Feed 1000cc Injectors for WRX/STi/LGT

DeatschWerks  (02J-00-1100-4) 1100cc/min Fuel Injector, (Set of 4)

1. Let the car sit overnight or relieve the fuel pressure by unplugging the fuel pump (green plug in upper right area of passenger footwell). (NOTE: I just let my car sit overnight)

Deatschwerks injectors:

2. Start on the driver’s side (it’s easier).

a) Remove negative battery terminal.

b) Remove the two 12mm bolts holding in the plastic bracket to the intake manifold and clip the two zip ties keeping the harness in the plastic bracket.

c) Now remove the plastic bracket (it will take a patient/creative rotation to get it out from the hoses/harnesses) and you’ll be able to clearly access the torx screws holding down the little bracket that holds down the injectors.

1.You may also want to unplug the blue connector and the Crankcase breather hose (regular clamp, not the crimped one) to provide maximum access to the injectors.

d) Unplug the injector, remove the torx screw (Proper size Torx Bit: T-25), swing the bracket up and out of the way, and pull the injector out. You will need a small screwdriver with a sharper tip to pop the injector up. Just be careful not to damage the injector seat or the injector housing / Rubber O-ring

3. Now, get one of your newly purchased Deatschwerks injectors. Open the tube of Super Grease (should be provided) and generously lube the lower O-Ring, and moderately-sparingly lube the upper O-Ring. ONLY LUBE the O-RINGs, try not to get lube on the injector screen or filters

4. Gently insert the Deatschwerks injector. You will want it to sit on the upper O-Ring, flush to the injector port. Then use the bottom of rubber mallet wooden handle to push the Deatschwerks injector in until it seats. There will be a noticeable but gentle “pop” not a sound but a “feel” once the Deatschwerks injector seats. If there is a fair amount of gas left in the injector port, it may even just slip in … no “pop” feeling.

5. Once you have the deatschwerks injectors seated, just reverse the steps in #2

Short Shifter Install on 04-07/08-11+ Subaru STi:

Short Shifter Install on 04-07 Subaru STi:

A step by step guide on installing a short shifter for a 04-07 Subaru STi and 08-11+ Subaru STi/Legacy.

OEM Short shifter: Installed and ready to go.

Tools needed:
10, 12, 14, 17mm wrenches
Jack Stands
Jack
Needle nose pliers

Short Shifters used:

Subaru OEM Short Shifter 04-07 STi:

Genuine Subaru STI Short Throw Shifter – 6MT

Subaru OEM Short Shifter 08-11 STi, WRX, Legacy:

Genuine Subaru C1010AG001 STI Short Throw Shifter


Step 1: Once the car is up on jack stands / a lift, you want to support the transmission and remove the rear cross member. You will need to remove it later anyway, it also makes it much easier to work without it in the way. I used a bottle jack and block of wood to support the tranny, but im sure a transmission jack would work much better if you have one.
This picture shows the cross member removed.

Short shifter: This picture shows the cross member removed.

Step 2: Once the cross member is unbolted you will need to unplug the 02 sensor, and unclip its harness from the cross member. It is held by two plastic clips that can be pushed out of the holes in the member without much trouble.

Short Shifter: O2 sensor is held by two plastic clips that can be pushed out of the holes in the member without much trouble.

Step 3: Remove the bolt from the lower rod, I believe it is a 14mm. The nut on the other side is attached to the bracket, so you don’t need a wrench on it. I found that ratcheting wrenches work best for most of these bolts.
The bolt that needs to be removed is the one going through the rubber bushing shown in the upper right of this picture.

Short Shifter: The bolt that needs to be removed is the one going through the rubber bushing shown in the upper right of this picture.

Step 4: Now you can disconnect the reverse lockout cable. It is held in with a pin that can be pulled out with a pair of pliers. I stuck an Allen wrench through the cam as shown in the Cobb short shifter install when I removed it just in case. There is a washer on the lockout cable that may be stuck in the grease, you will want to take it off and set it aside so it doesn’t get lost. The lockout cable can be seen on the left side of the picture above. You can now move the lower rod down, and move the lockout cable out of the way.