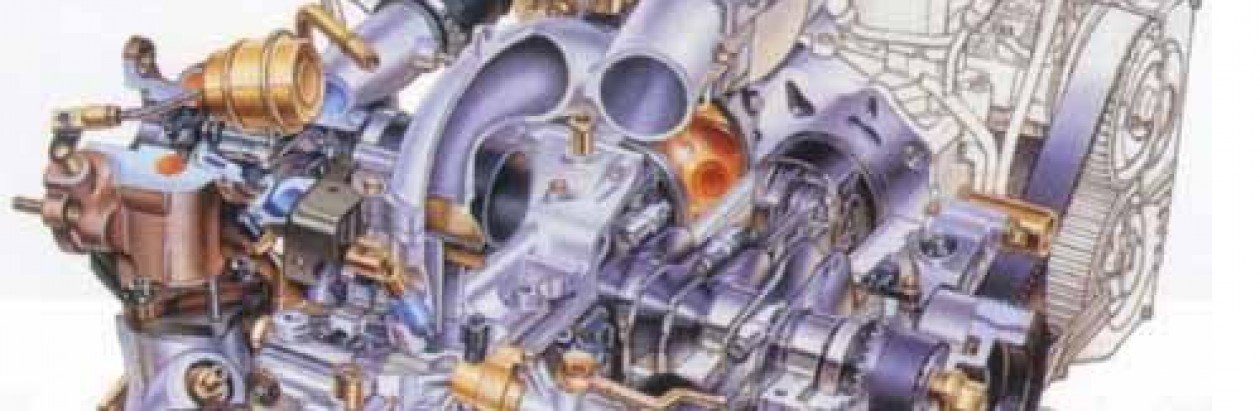
The 2008 Subaru Impreza WRX STI has a heritage of power and control. Previous models have been the foundations for countless racing victories and championships. The new WRX STI promises the same with it’s 305- horsepower, turbocharged, intercooled Boxer engine and a six-speed manual transmission.
SI-Drive: he new WRX STI promises the same with it’s 305- horsepower, turbocharged, intercooled Boxer engine and a six-speed manual transmission.
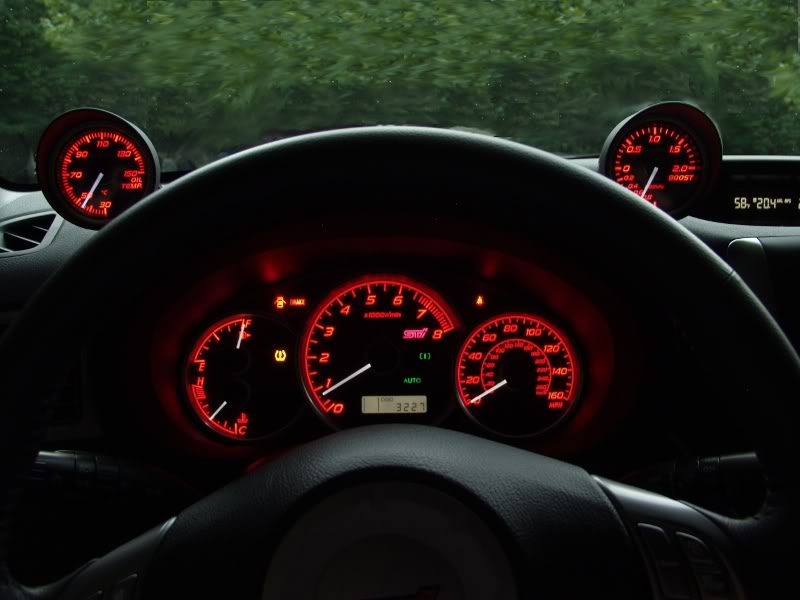
Power and control incorporate enhanced technology. As suggested by new switchgear on the dashboard and center console and my markings within the instrument cluster’s center-mounted tachometer, a driver has some things to learn before wringing out the most from the car.
Today’s electronics now allow the driver to tinker with engine response characteristics, the manner in which All-Wheel-Drive system fights for traction, and the degree to which braking and engine management help maintain vehicle stability. These capabilities are made possible by standard Vehicle Dynamics Control (VDC), Driver Controlled Center Differential (DCCD), and Subaru Intelligent Drive (SI-Drive).
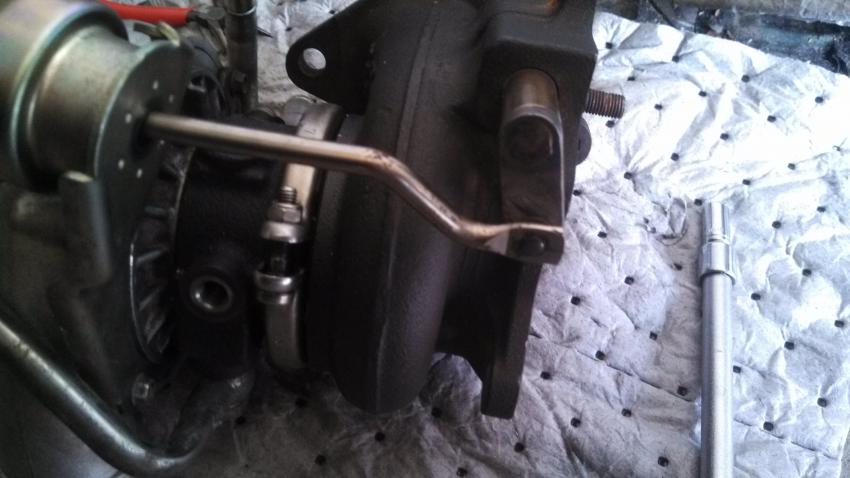
Boost creep is a situation where your wastegate port is not large enough to allow the exhaust gas to bypass the turbo. What happens is the exhaust gas will choke the wastegate port preventing further gas flow through the port. Then, the exhaust gas has to take the path of least resistance which is through the turbine of the turbo. This will spool the turbo ‘uncontrolled’ beyond your normal controlled max boost level.
Wastegate and Boost Creep FAQ: A stock Subaru turbo.
The turbo will be spooling past wastegate spring rate pressure even though the wastegate is fully open thus it is uncontrolled. The best way to check for boost creep is to connect the turbo outlet port directly to the wastegate actuator port and go for a drive. In 4th gear you should normally get a stable boost level of about 0.5 BAR, if you have boost creep the boost will hit 0.5 BAR and will continue to rise with rpm until you either back off or hit overboost fuel cut.
Boost creep should only be present on a turbo that has very little restriction. For example a fully de-catted and high flow induction. It’s been found that the fast spooling IHI VF35 is very prone to boost creep. The cure is to remove the turbo and enlarge the wastegate port. Then, fit a stronger actuator 0.75 BAR the reason for this is because you have made the wastegate port larger. The effective size of the wastegate plate acting against the exhaust gas flow is larger which allows the exhaust gas excert more force on the wastegate plate.
This in effect weakens the effectiveness of the actuator. Before the increase in size of your wastegate port the actuator would open at 0.5 BAR, after the increase the actuator would open earlier at 0.3–0.4 BAR. After these changes are made to the turbo either a boost controller or a remap (to adjust solenoid duty cycle) should be sought to control the boost to a safe level.
Boost Gauge: INTERIOR WIRING AND GAUGE INSTALLATION
1.) Pull off the lower dash cover. It just has clips holding it on.
2.) These are the only two screws that hold the lower dash to rest of the dash. Remove these and the rest of the lower dash can be pulled off.
3.) Lower dash pulled away from the upper, left of the steering wheel.
4.) Lower dash pulled away from the upper, right side of the steering wheel.
5.) There are 4 clips holding the instrument hood to the dash. The entire hood pulls off as one whole unit, but the hard part is getting a good grip. To get better finger placement, I pulled the top of the inner part of the hood away, which revealed a little lip that I could use to pull the hood off. Caution: Do not pull heavily on the inner piece because it is bolted to the rest of the hood at the bottom and could break if you pull on it too hard. Just pull on the top part of the instrument hood itself. Also be careful not to lose the 4 yellow clips that hold the hood to the dash. They come out easily and can get lost.
6.) There are two screws for the instrument cluster. One is circled in the pic and the other is to its left.
7.) Pop the plug off the cluster on the right side.
8.) I ran the wires for the boost gauge through the upper middle hole above the gauge cluster.
9.) Tap into the purple wire on the dimmer switch for headlight power. This wire is only powered when the headlights or parking lights are turned on.
10.) Close-up of where I spliced into the purple wire. For the boost gauge, the ORANGE wire splices into this purple wire. The wire is black in my picture because I used black wire to extend the wires coming out of the back of the gauge.
11.) For ACC power, use the brown and white striped wire on the top connector above the fuse box. This wire is powered when the key is in the “ACC” position only. With the boost gauge, you connect BOTH the RED and WHITE wires to this wire.
The green and white striped wire on the same connector is on all the time, meaning it is powered even when the car is off. I found that out the hard way. (Do not use that wire.)
We use cookies on our website to give you the most relevant experience by remembering your preferences and repeat visits. By clicking “Accept”, you consent to the use of ALL the cookies.
This website uses cookies to improve your experience while you navigate through the website. Out of these, the cookies that are categorized as necessary are stored on your browser as they are essential for the working of basic functionalities of the website. We also use third-party cookies that help us analyze and understand how you use this website. These cookies will be stored in your browser only with your consent. You also have the option to opt-out of these cookies. But opting out of some of these cookies may affect your browsing experience.
Necessary cookies are absolutely essential for the website to function properly. These cookies ensure basic functionalities and security features of the website, anonymously.
Cookie
Duration
Description
cookielawinfo-checkbox-analytics
11 months
This cookie is set by GDPR Cookie Consent plugin. The cookie is used to store the user consent for the cookies in the category "Analytics".
cookielawinfo-checkbox-functional
11 months
The cookie is set by GDPR cookie consent to record the user consent for the cookies in the category "Functional".
cookielawinfo-checkbox-necessary
11 months
This cookie is set by GDPR Cookie Consent plugin. The cookies is used to store the user consent for the cookies in the category "Necessary".
cookielawinfo-checkbox-others
11 months
This cookie is set by GDPR Cookie Consent plugin. The cookie is used to store the user consent for the cookies in the category "Other.
cookielawinfo-checkbox-performance
11 months
This cookie is set by GDPR Cookie Consent plugin. The cookie is used to store the user consent for the cookies in the category "Performance".
viewed_cookie_policy
11 months
The cookie is set by the GDPR Cookie Consent plugin and is used to store whether or not user has consented to the use of cookies. It does not store any personal data.
Functional cookies help to perform certain functionalities like sharing the content of the website on social media platforms, collect feedbacks, and other third-party features.
Performance cookies are used to understand and analyze the key performance indexes of the website which helps in delivering a better user experience for the visitors.
Analytical cookies are used to understand how visitors interact with the website. These cookies help provide information on metrics the number of visitors, bounce rate, traffic source, etc.
Advertisement cookies are used to provide visitors with relevant ads and marketing campaigns. These cookies track visitors across websites and collect information to provide customized ads.