This is a step by step guide on installing steering rack bushings (whiteline) on a 08+ WRX/STi. This needs to be done the right way and all the bolts NEED to be torqued with a torque wrench to factory spec for the car to be in a safe operating state.
1.) Remove the under tray. There are 2 12mm bolts towards the front, 1 12mm bolt on the rear, 2 clips on the rear. and 2 plastic pop-out clips on the sides near each wheel well.
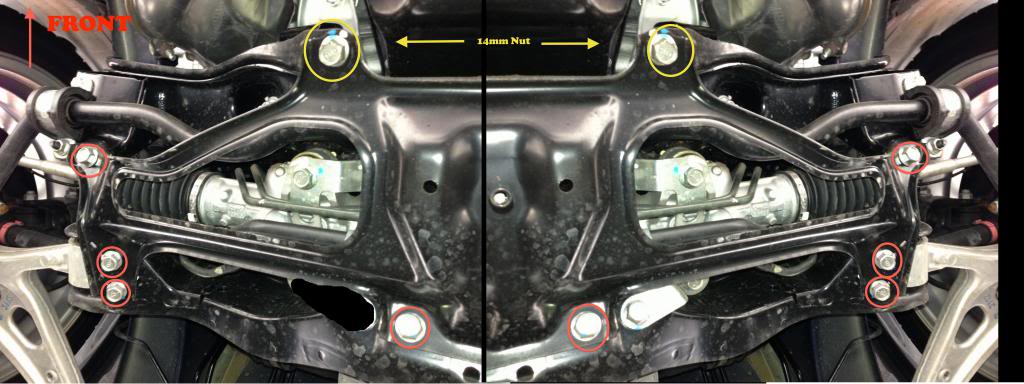
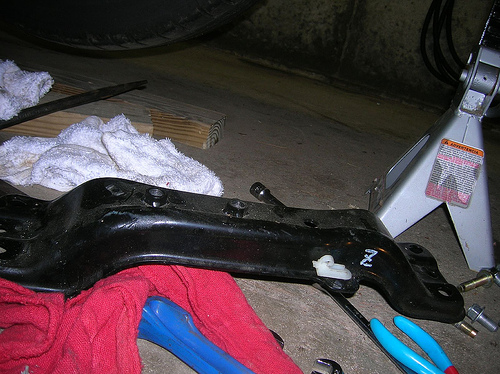
2.) After removing the under tray you will need to remove 10 14mm bolts holding the cross member support brace (otherwise known as the jack plate) in place. The bolts that are to be removed are circled in red and yellow.
Note: The bolts circled in yellow are secured by nuts on the topside so you will need the 14mm wench as well. These bolts are torqued down pretty tight if they have never been removed before.
Steering Rack Bushings Install on a 08+ STi: The bolts circled in yellow are secured by nuts on the topside so you will need the 14mm wench as well.
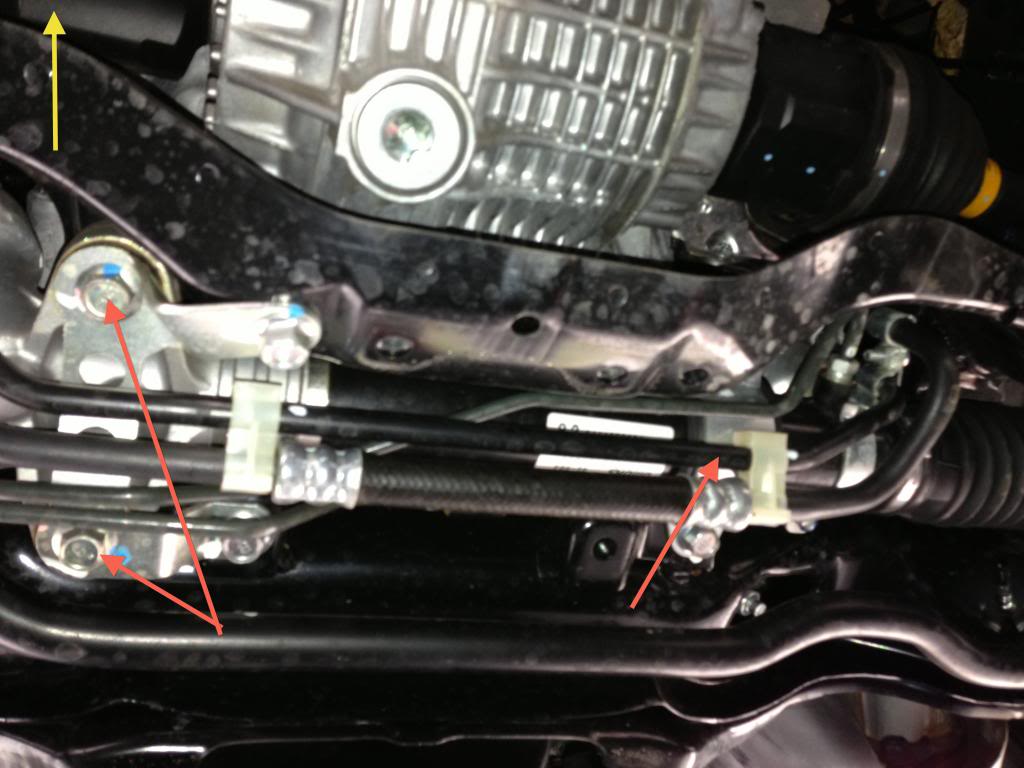
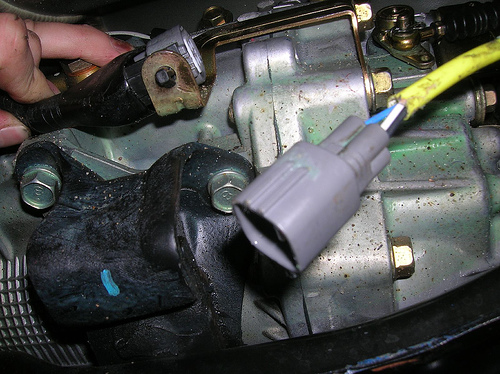
3.) Once the cross member support is removed the steering rack will be exposed as pictured below. Note the location of the 3 bushings denoted by the red arrows.
Steering Rack Bushings Install on a 08+ STi: Note the location of the 3 bushings denoted by the red arrows.
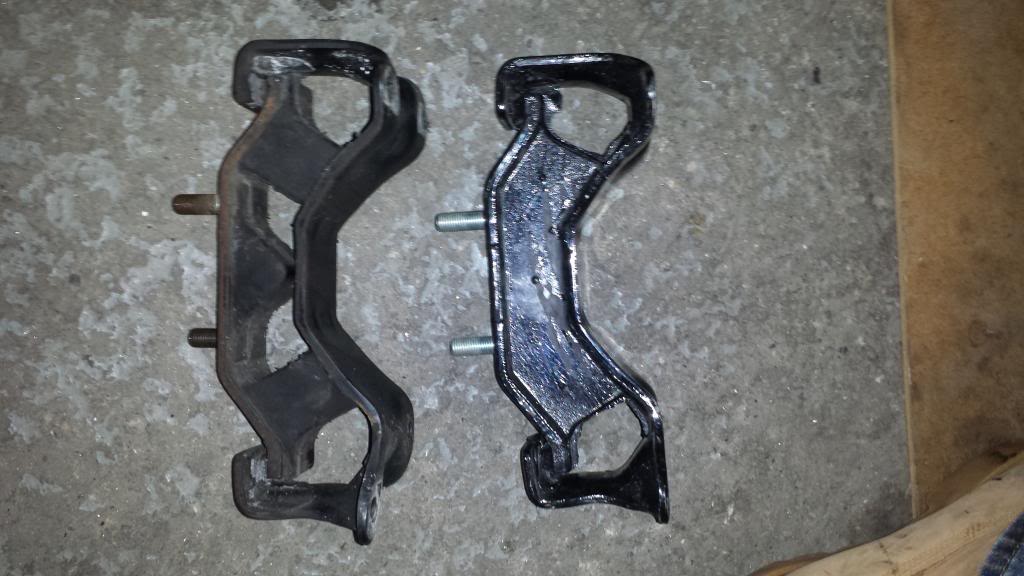
How to install an STi Group N Transmission Mount for manual transmission only. There is a significant difference between the STi Group N transmission mount and the stock one. The STi Group N mount is not only harder, but has more material to it. The stock mount is soft enough to compress with your hand, whereas standing on the STi Group N mount barely deflects the material.
1.) To start off, look for the long crossmember holding up the transmission- it will be at the end closest to the engine. The ends of this crossmember are right near the rear mount for the front A arm, and are held in with a large 17mm bolt, one on the driver side and one on the passenger side. Remove them both completely. Fair warning- these bolts were tight from the factory. I placed a 3 foot length of pipe over my socket wrench for leverage after I had a casualty- I broke one of the 4″ long socket extensions.
2.) remove the 2 14mm nuts that hold the bottom of the transmission mount to the crossmember that runs the length of the transmission- these were also tight but came out without breaking any of my tools.
3.) At the rear of the transmission, you will find the third and final crossmember holding the transmission in its place. There are four 14mm bolts in this crossmember there are two on the driver side.
Step 1: Once the car is up on jack stands / a lift, you want to support the transmission and remove the rear cross member. You will need to remove it later anyway, it also makes it much easier to work without it in the way. I used a bottle jack and block of wood to support the tranny, but im sure a transmission jack would work much better if you have one.
This picture shows the cross member removed.
Short shifter: This picture shows the cross member removed.
Step 2: Once the cross member is unbolted you will need to unplug the 02 sensor, and unclip its harness from the cross member. It is held by two plastic clips that can be pushed out of the holes in the member without much trouble.
Short Shifter: O2 sensor is held by two plastic clips that can be pushed out of the holes in the member without much trouble.
Step 3: Remove the bolt from the lower rod, I believe it is a 14mm. The nut on the other side is attached to the bracket, so you don’t need a wrench on it. I found that ratcheting wrenches work best for most of these bolts.
The bolt that needs to be removed is the one going through the rubber bushing shown in the upper right of this picture.
Short Shifter: The bolt that needs to be removed is the one going through the rubber bushing shown in the upper right of this picture.
Step 4: Now you can disconnect the reverse lockout cable. It is held in with a pin that can be pulled out with a pair of pliers. I stuck an Allen wrench through the cam as shown in the Cobb short shifter install when I removed it just in case. There is a washer on the lockout cable that may be stuck in the grease, you will want to take it off and set it aside so it doesn’t get lost. The lockout cable can be seen on the left side of the picture above. You can now move the lower rod down, and move the lockout cable out of the way.
We use cookies on our website to give you the most relevant experience by remembering your preferences and repeat visits. By clicking “Accept”, you consent to the use of ALL the cookies.
This website uses cookies to improve your experience while you navigate through the website. Out of these, the cookies that are categorized as necessary are stored on your browser as they are essential for the working of basic functionalities of the website. We also use third-party cookies that help us analyze and understand how you use this website. These cookies will be stored in your browser only with your consent. You also have the option to opt-out of these cookies. But opting out of some of these cookies may affect your browsing experience.
Necessary cookies are absolutely essential for the website to function properly. These cookies ensure basic functionalities and security features of the website, anonymously.
Cookie
Duration
Description
cookielawinfo-checkbox-analytics
11 months
This cookie is set by GDPR Cookie Consent plugin. The cookie is used to store the user consent for the cookies in the category "Analytics".
cookielawinfo-checkbox-functional
11 months
The cookie is set by GDPR cookie consent to record the user consent for the cookies in the category "Functional".
cookielawinfo-checkbox-necessary
11 months
This cookie is set by GDPR Cookie Consent plugin. The cookies is used to store the user consent for the cookies in the category "Necessary".
cookielawinfo-checkbox-others
11 months
This cookie is set by GDPR Cookie Consent plugin. The cookie is used to store the user consent for the cookies in the category "Other.
cookielawinfo-checkbox-performance
11 months
This cookie is set by GDPR Cookie Consent plugin. The cookie is used to store the user consent for the cookies in the category "Performance".
viewed_cookie_policy
11 months
The cookie is set by the GDPR Cookie Consent plugin and is used to store whether or not user has consented to the use of cookies. It does not store any personal data.
Functional cookies help to perform certain functionalities like sharing the content of the website on social media platforms, collect feedbacks, and other third-party features.
Performance cookies are used to understand and analyze the key performance indexes of the website which helps in delivering a better user experience for the visitors.
Analytical cookies are used to understand how visitors interact with the website. These cookies help provide information on metrics the number of visitors, bounce rate, traffic source, etc.
Advertisement cookies are used to provide visitors with relevant ads and marketing campaigns. These cookies track visitors across websites and collect information to provide customized ads.