Category Archives: USDM

Spark Plug replacement on a Subaru Impreza STi/WRX

The following procedure explains removing and replacing spark plugs on a Subaru Impreza STi. The original instructions below specifically refer to fitting Denso Iridium spark plugs that are one step colder however these procedures are generic for OEM plugs also. Please click the thumbnail pictures below for a full size version.

The author indicates this took around 1 hour to complete the first time, perhaps half that next time. Right, off you go you are being timed!

Procedure

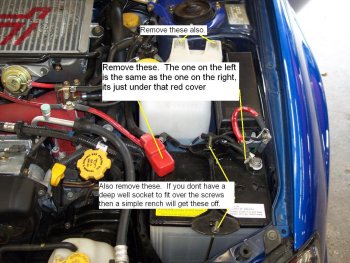
Remove the battery and windshield washer fluid reservoir (Step 1)

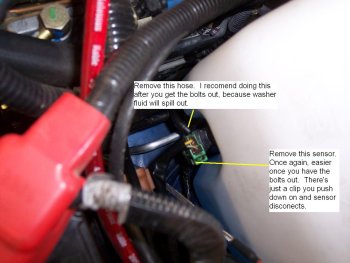
This is simple, just four bolts holding the battery and two bolts (<< seen in step one), a hose and a clip (<< seen in step 1.1) holding the washer reservoir in.

Spark plug step 1.) Battery Removal.
Spark Plug removal step 1.) Windshield washer reservoir.

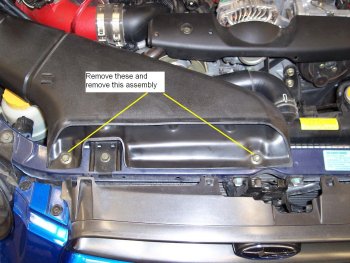
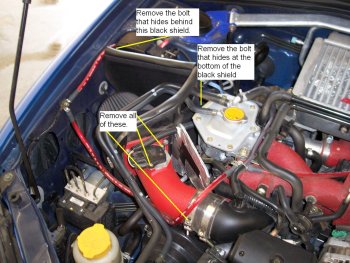
Removing intake and assembly (Step 2)

Note: the author can break this down further as he doesn’t have the stock intake, instead the K&N typhoon is shown. The stock intake is very easy just a couple of bolts, clamps etc. (<< steps 2 and 2.1)

Spark plug step 2.) Remove intake duct.
Spark plug step 2.) K&N Removal

Coolant use and Cooling System for Subaru WRX/STi

What type of coolant should I run in my car? You can never go wrong by using Genuine Subaru Coolant available through your local dealer.

Subaru Genuine Coolant. To the left Super Coolant and to the right long life coolant.

Is the Subaru coolant pre-mixed or not? They have both kinds, but BE SURE to read the labels carefully as they are nearly identical in appearance except the wording on the package!

Is there a required coolant additive? Yes. Subaru Cooling System Conditioner has recently been required to be added with every coolant replacement to prevent coolant system leaks. This recommendation applies to every Subaru model for every model year.

Subaru Cooling System Conditioner has recently been required to be added with every coolant replacement to prevent coolant system leaks. This recommendation applies to every Subaru model for every model year.

Spark Plug info for your Subaru WRX/STi:

Spark Plug info for your Subaru WRX/STi:

Refer to your owners manual for recommendations. Alternately, you can visit an auto parts store or online retailer for recommendations on suitable spark plugs designed for your vehicle. Major manufacturers are:
a. NGK
b. Bosch
c. Denso
d. Autolite
e. Champion

STi spark plug location

Who are the specialty spark plug manufacturers? These manufacturers make specialty plugs that have unique compositions or designs that claim increases over traditional plugs. They are listed for advanced users or those with interest.
a. Torquemaster
b. Beru (specifically the Silverstones found here)
c. SplitFire
d. PREP spark plugs
e. E3 spark plugs
f. Pulstar plugs

What types are there? There are really three main types:
a. conventional nickel alloy (commonly referred to as “copper”)
b. platinum
c. iridium

Which type should I use? That depends on how often you are interested in changing the spark plugs. Conventional spark plugs generally last one year. Platinum or iridium can last, depending on manufacturer specifications, up to seven years.

What’s some good background spark plug information?

Materials: The three main types of spark plug materials are nickel alloy, iridium, and platinum. Copper can be used in the core all plugs.

All ground electrodes are made of nickel. The use of Platinum and Iridium, which are stronger, allow for much finer CENTER electrodes (the ground electrode is still Nickel). These finer electrodes do not quench the flame core as much as a conventional style plug. This increases ignitability, therefore increasing HP. It’s not a huge gain, but cylinder pressures are measurably higher.

Platinum or iridium can be used as a thin pad which is laser welded on the ground electrode (the “J” strap), this serves to increase the life of the plug.

Pulley Subaru WRX/STi Rundown

The primary purpose of an aftermarket pulley is to reduce the size and/or mass of the stock unit. They serve two purposes: to reduce horsepower loss and increase throttle response. Notice the use of “reduce horsepower loss”. Pulleys DO NOT add horsepower, rather they free up horsepower due to the reduction of rotational mass.


Grimmspeed Lightweight Crank Pulley Black – Subaru All EJ Engines

A lightweight aftermarket perrin pulley.

HP gain is 5-10HP. These HP figures are a range as there have been very few before/after dyno runs with lightened or under driven pulleys.

What is a lightened pulley? Generally, it is an exact copy of the OEM pulley only CNC machined out of aircraft grade aluminum and powder coated for corrosion protection and aesthetic appeal.

What is an under driven pulley? This is a pulley that mimics the function of the OEM unit, but is smaller in diameter. This will reduce the duty cycle of the pulley and proportionally the parasitic drag on the engine.

Are under driven pulleys bad? It depends on the amount they are under driven. Some under driven pulleys can lead to reduced A/C output, lighting problems, stereo problems, and other voltage issues. Some are lightly under driven and some more so.

Isn’t replacing the stock harmonic damper (pulley) bad? Subarus do not come with a harmonic damper or balancer like some other vehicles do. For other manufacturers’ vehicles, this is a legitimate concern. Proof:

“Thank you for your patience as I checked with our Technical Services Department regarding your message below. They advised that the crank pulley is a pulley and nothing else. It is not used as a harmonic damper/balancer.

Thanks for the opportunity to be of assistance. If you need any future assistance, please feel free to contact us again.”

Best wishes,

John J. Mergen
Customer Service Department
Subaru of America, Inc.

Engine Management For Subaru WRX/STi


Why do I need engine management?


Consider your stock engine management for just a moment. Your stock engine control unit (ECU) is a very complex piece of circuitry that calculates hundreds of variables every second. All of these variables rely on inputs within a + or – range. When you modify your vehicle, these values change. As long as the changes are within the values the ECU expects to receive, your engine runs fine. Once the values are exceeded, the ECU is programmed to compensate to return the values to normal levels.

A typical way of engine management is to use a Cobb Accessport.

This is a layman’s explanation of how your stock ECU can actually work against you when modifying your vehicle. This also explains why modifications can feel great once they are bolted on but the butt dyno results seem to fade over time. This is due to ECU compensation.

What is the first step in finding what engine management I need? Finding a tuner. The Tuner FAQ will help with the general rules of finding a good tuner. Remember, it’s always better to have a custom tune vs. a plug and play or “staged” map. Always defer to the tuner’s advice as to what to choose as ultimately he will be the one to provide custom support. Discuss your goals and budget and your tuner should set you on the right path. If you are a “plug and play” kind of person, review the options below and decide for yourself along with input from locals in your regional forum and the car parts review forum.

What will engine management do for me? Generally speaking, engine management optimizes several engine functions to create more horsepower and efficiency. The stock ECU is designed to ensure your car runs fine and monitors the engine’s output parameters. Utilizing an aftermarket engine management solution takes this to the next level.

Header Aftermarket Turbo Subaru FAQ

Header Aftermarket Turbo Subaru FAQ

The primary purpose of an aftermarket header on a turbocharged Subaru is to remove or replace the stock exhaust manifold with a better flowing unit.

An Agency Power Stainless Steel Header for a EJ257.

HP gain is 15HP and 20TQ. This figure is highly debated as different manufacturers use different dynos with different cars with different levels of mods. It also varies because some headers incorporate an uppipe into their design. This makes it nearly impossible to compare the gains of a header without an uppipe vs. a header with an uppipe.

Which manufacturer is best? This topic is highly debated. There have been no reported consistent “bad” headers on the market. Obviously, there may have been bad pipes sold, but not enough to report as “bad” overall.

Where can I find headers?

Subaru WRX STI Header Prosport Unequal Length Stainless Steel Header

Perrin Subaru STi /WRX Header Equal Length Big Tube

AP WRX/ STI Stainless Steel Unequal Length Header w/o Uppipe

Invidia HS05SW1HDR Racing Header for Subaru WRX STI/Legacy GT

Agency Power (AP-GDA-175) Unequal Length Header, Stainless Steel

Perrin PSP-EXT-050 04-08 STi /LGT/FXT/06-08 WRX (06+ WRX requires modification to oil cooler) Header (02-05 WRX Requires STi Oil Pan)

TOMEI 193082 Headers

What differences are there with headers? The main difference is exhaust piping length. Headers are made to be unequal length or equal length. Unequal means the piping on the driver’s side of the engine will be longer than the passenger’s side. Equal means the piping length is equidistant from the engine outlet to the header outlet for all piping.

Trunk swaps for STi and WRXs

Remove the glow in the dark release handle. Once this is done you can get to the lock. Simply twist the orange thing around, and pop the metal rod. Take a screw driver (you also might need a hammer as well) and pry that black clip off. Its really tight on there so you will need to use some force (this clip is exactly like the clip securing the brake lines).

Remove latch from trunk (optional as it may not be needed)
Remove the 2 bolts, twist yellow thing around and pop out that metal rod. You will also need to pop out the cable from that glow in the dark handle.

Remove trunk
Remove the 4 12mm bolts that secure the trunk to the trunk arms. Beware that the STi trunk weighs a TON (something like 50+ lbs). You will also have to unplug the 3rd brake light and clip all the wire retainers off the STi trunk arm to get the trunk off.

Steering wheel Subaru GD/GR STi steering wheel removal

Subaru Impreza GD STi steering wheel


When removing the airbag from the steering wheel, be sure to turn the ignition switch to OFF, disconnect the ground cable from battery, and wait for more than 60 seconds prior to starting work. The airbag system is fitted with a backup power source. If the airbag system is serviced within 60 seconds after the ground cable is disconnected, it may inflate.

When storing a removed airbag module, do not place any objects on it or pile airbag modules on top of each other. If the airbag inflates for some reason when it is placed with its pad side facing downward or under any object, a serious accident may result. Do not drop the airbag modulator parts.


REMOVAL

1) Disconnect the ground cable from battery.

  • Use a 10mm socket to do so
  • Please remember that if you have Cobb AccessPort, your real time map will be need to be reflashed after disconnecting the battery

2) Set the tires to straight-ahead position.

  • Do your best to park as straight as possible. We suggest straightening the wheel and driving forward approximately 15ft. Try having a friend help you with this.

3) Remove the airbag.

  • In order to remove the airbag, you will need a T30 TORX bit.
  • You will find the two bolts on the left and right-hand side of the steering wheel, approximately at 9 and 3 o’clock (refer to figure 1.0 in the “Reference Images” section of this installation guide).
  • These are lightly torque (~5 to 7.2 ft.lbs) and will not come out of the steering wheel.
  • Once these are loosened, you may gently remove the airbag.
  • You will immediately notice the airbag harness. There may be one or two plugs and one ground plug connected to the airbag. The ground is removed with another gentle pull. The main connectors, located on the center of the rear of the airbag, will have either one yellow or one yellow and one pick lock tabs. Use a small flat head to gently pry this upward. Place this yellow lock tab in a safe place (refer to figure 1.2 or 1.3 for applicable model year).
  • Your airbag is now ready to be removed! Please take great care in storing your airbag!