This is a step by step guide on installing steering rack bushings (whiteline) on a 08+ WRX/STi. This needs to be done the right way and all the bolts NEED to be torqued with a torque wrench to factory spec for the car to be in a safe operating state.
1.) Remove the under tray. There are 2 12mm bolts towards the front, 1 12mm bolt on the rear, 2 clips on the rear. and 2 plastic pop-out clips on the sides near each wheel well.
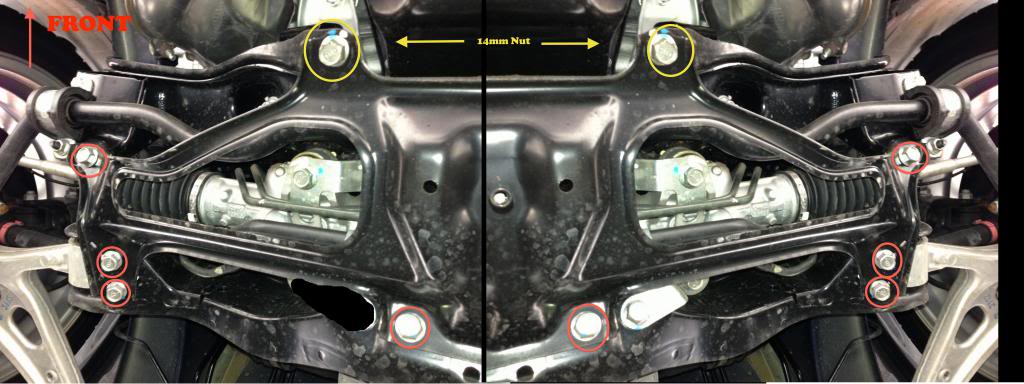
2.) After removing the under tray you will need to remove 10 14mm bolts holding the cross member support brace (otherwise known as the jack plate) in place. The bolts that are to be removed are circled in red and yellow.
Note: The bolts circled in yellow are secured by nuts on the topside so you will need the 14mm wench as well. These bolts are torqued down pretty tight if they have never been removed before.
Steering Rack Bushings Install on a 08+ STi: The bolts circled in yellow are secured by nuts on the topside so you will need the 14mm wench as well.
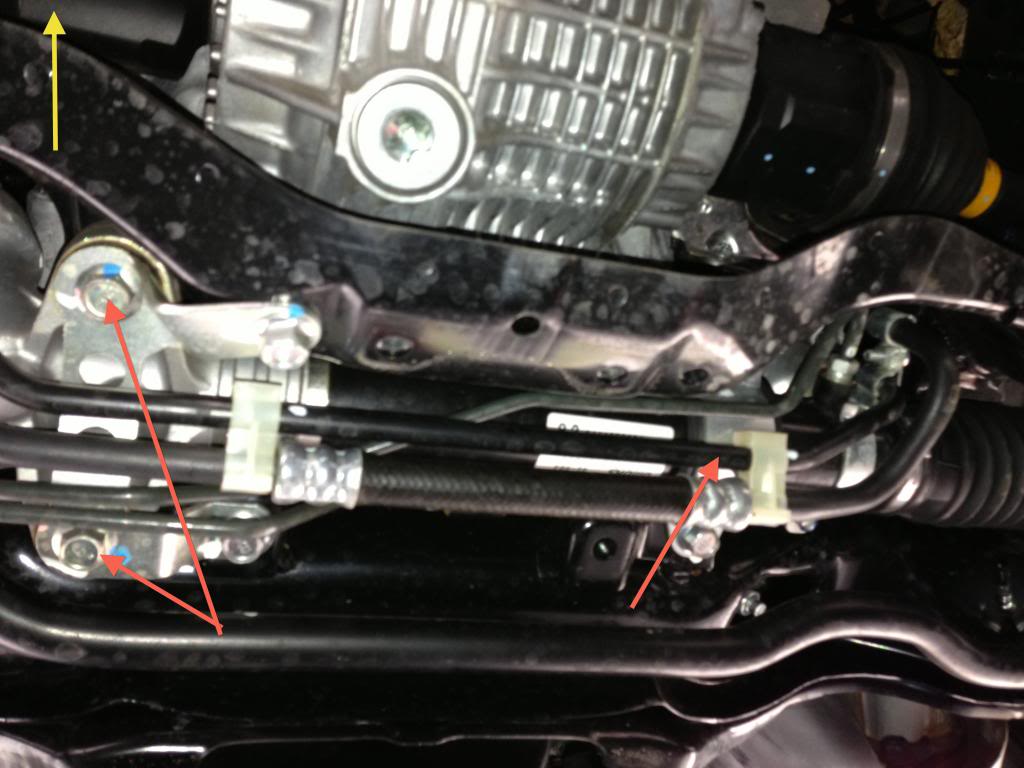
3.) Once the cross member support is removed the steering rack will be exposed as pictured below. Note the location of the 3 bushings denoted by the red arrows.
Steering Rack Bushings Install on a 08+ STi: Note the location of the 3 bushings denoted by the red arrows.
This is a step by step guide on how to install a rear strut brace in a 2008+ Subaru WRX/STi. Installing a rear strut brace on a 2008+ WRX/STi is more much more involved than installing a front brace. The chassis is significantly different than the new-age 02-07 Subaru Impreza. The need to cut clearances into the floor for the left and right brackets increases the difficulty for this install.
1.) Only work on one strut tower at a time. Only loosen one set of nuts at a time, and do not put the car up on lifts, jacks, or anything else that lifts the tires off the ground. All of these precautions are to minimize changes to the alignment while working on the installation.
2.) Loosen the left and right hinges on the rear strut brace using the 17mm socket and the 8mm allen head wrench. You want to be able to move the brace around as you attach each side bracket to the car’s strut towers.
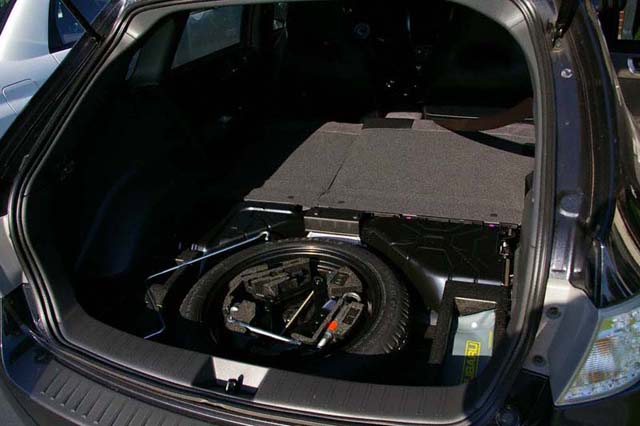
3.) Remove the hatch floor and set it aside.
Rear strut brace install on Subaru WRX/STi 08+: Remove the rear floor.
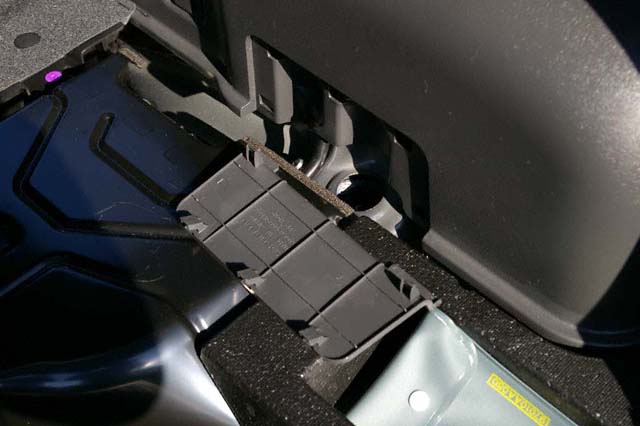
4.) Remove the left and right panels from the wheel covering so that you’ll have access to the tops of the strut towers. Working your finger tips under the edge of the panel and carefully working my way around the edges while pulling away from the wheel cover worked best without requiring any special tools. It also helped avoid scratching the plastic.
Rear strut brace install on Subaru WRX/STi 08+: Remove these panels both both sides with your hands. If you can’t do that gently use a screwdriver to remove.
Walbro Fuel Pump for 2008 -11 STi/WRX/LGT Install:
Install guide for those looking to upgrade the factory WRX, STi, or LGT fuel pump. I recently found the stock pump to be inadequate when running high boost and E85. When ordering the pump, you DO NOT need the filter kit, it WILL NOT fit in the housing. Make sure to run the car down under the 1/4 tank mark before beginning. There will be gas spillage so make sure you have plenty of fresh air and towels around to clean up.
1.) Pop the gas cap off to relieve fuel pressure from the tank. Remove your lower rear seat by pulling upwards on each side and the middle. There are 3 snap in spots. Place your seat somewhere clean and out of the way. Once you do this you can see the fuel pump access cover and harness. Unplug this harness.
2.) Remove the 4 screws holding the access cover in place and place them somewhere safe away from the access cover.
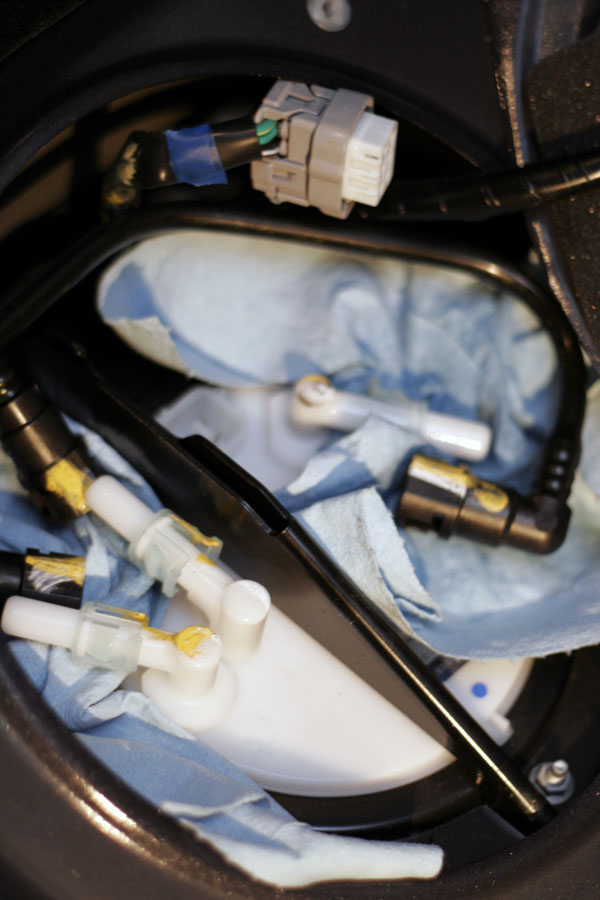
3.) Now you can see the fuel pump access point. There are 3 fuel lines, 8 8mm nuts, and the electrical connector. Disconnect the electrical connector now and stuff it out of the way. Grab some of your handy shop towels and place them under the fuel lines in case of spillage. Once you have removed the fuel lines it should look like this:
Fuel Pump: There are 3 fuel lines, 8 8mm nuts, and the electrical connector. Disconnect the electrical connector now and stuff it out of the way. Grab some of your handy shop towels and place them under the fuel lines in case of spillage.
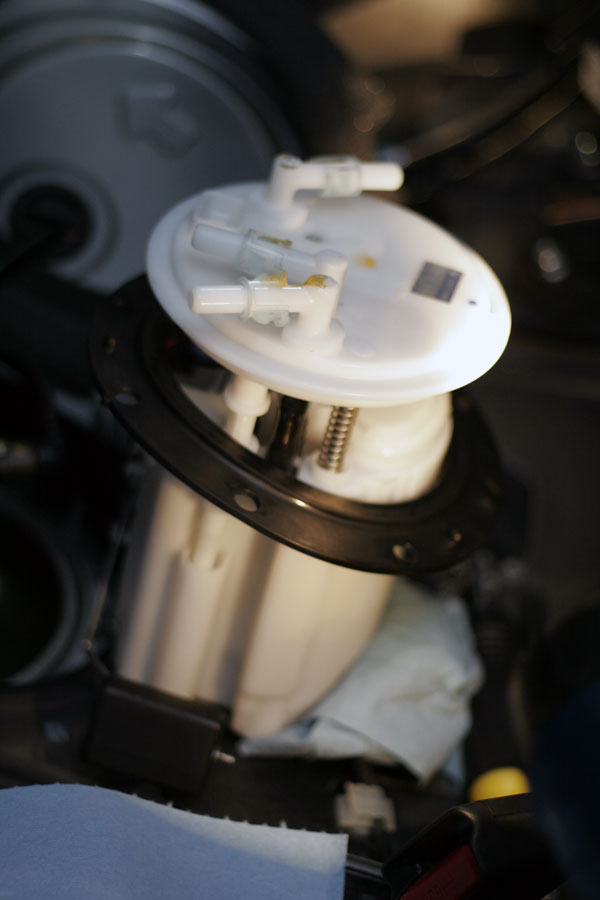
4.) Remove all 8 of the 8mm nuts and place them somewhere safe. Gently remove the metal bracket surrounding the entire assembly to gain access to the housing and place it somewhere safe. Slowly remove the fuel pump assembly by contorting it, be careful not to damage the float or sensor. Once the housing is removed it may spill, make sure you have plenty of towels laid down in your car. If all went well it should look like this:
Fuel Pump: Gently remove the metal bracket surrounding the entire assembly to gain access to the housing and place it somewhere safe. Slowly remove the fuel pump assembly by contorting it, be careful not to damage the float or sensor.
We use cookies on our website to give you the most relevant experience by remembering your preferences and repeat visits. By clicking “Accept”, you consent to the use of ALL the cookies.
This website uses cookies to improve your experience while you navigate through the website. Out of these, the cookies that are categorized as necessary are stored on your browser as they are essential for the working of basic functionalities of the website. We also use third-party cookies that help us analyze and understand how you use this website. These cookies will be stored in your browser only with your consent. You also have the option to opt-out of these cookies. But opting out of some of these cookies may affect your browsing experience.
Necessary cookies are absolutely essential for the website to function properly. These cookies ensure basic functionalities and security features of the website, anonymously.
Cookie
Duration
Description
cookielawinfo-checkbox-analytics
11 months
This cookie is set by GDPR Cookie Consent plugin. The cookie is used to store the user consent for the cookies in the category "Analytics".
cookielawinfo-checkbox-functional
11 months
The cookie is set by GDPR cookie consent to record the user consent for the cookies in the category "Functional".
cookielawinfo-checkbox-necessary
11 months
This cookie is set by GDPR Cookie Consent plugin. The cookies is used to store the user consent for the cookies in the category "Necessary".
cookielawinfo-checkbox-others
11 months
This cookie is set by GDPR Cookie Consent plugin. The cookie is used to store the user consent for the cookies in the category "Other.
cookielawinfo-checkbox-performance
11 months
This cookie is set by GDPR Cookie Consent plugin. The cookie is used to store the user consent for the cookies in the category "Performance".
viewed_cookie_policy
11 months
The cookie is set by the GDPR Cookie Consent plugin and is used to store whether or not user has consented to the use of cookies. It does not store any personal data.
Functional cookies help to perform certain functionalities like sharing the content of the website on social media platforms, collect feedbacks, and other third-party features.
Performance cookies are used to understand and analyze the key performance indexes of the website which helps in delivering a better user experience for the visitors.
Analytical cookies are used to understand how visitors interact with the website. These cookies help provide information on metrics the number of visitors, bounce rate, traffic source, etc.
Advertisement cookies are used to provide visitors with relevant ads and marketing campaigns. These cookies track visitors across websites and collect information to provide customized ads.