Subaru WRX and STi Exhaust general info

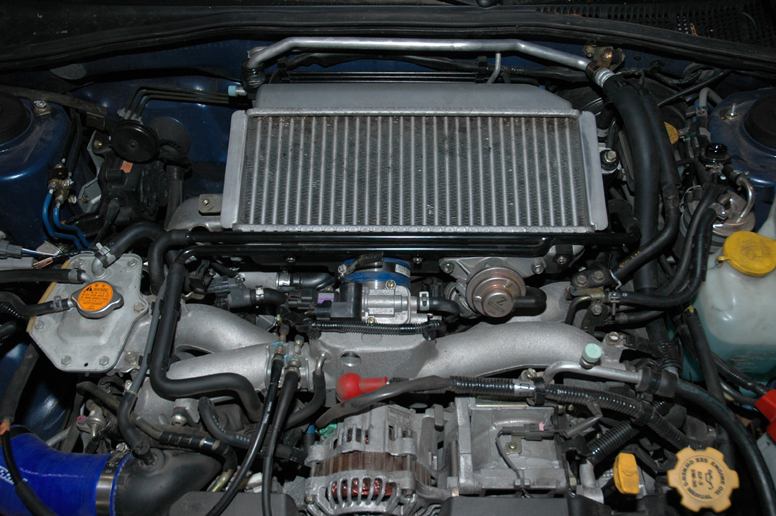
Subaru WRX and STi Exhaust general info:

The primary purpose of an aftermarket exhaust is to remove or replace the stock catalytic converter(s) with a better flowing unit. It also increases the exhaust diameter for better flow. The term “aftermarket exhaust” can be broken down into the three main types:

1. Turbo back exhaust (TBE) covers items 1-4 as described below.
2. Cat back exhaust (CBE) covers items 3&4 as described below.
3. Axle back exhaust (ABE) covers item 4 as described below.

The stock WRX Subaru exhaust consists of:

1. Downpipe (with cat) | 2. Midpipe (with cat) | 3. Rear Exhaust Pipe | 4. Axle Back Muffler

The stock WRX Subaru exhaust consists of: 1. Downpipe (with cat) | 2. Midpipe (with cat) | 3. Rear Exhaust Pipe | 4. Axle Back Muffler

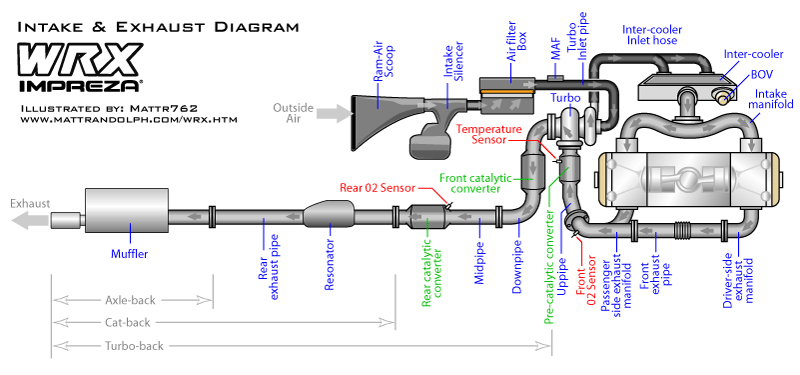
Keep in mind that the above information is catered to the 2002-2005 WRX and is likewise applicable to all years of the STi, though there are slight variations. For example, the STi (all years) has a catless uppipe and the 2006+ WRX has a one piece downpipe/midpipe.

HP gain is dependent on the type of exhaust chosen. TBE gains are 20-30HP. CBE gains are 5-15HP. ABE gains are 5-10HP. These figures are highly debated as different manufacturers use different dynos with different cars with different levels of mods. It also varies because exhausts use different amounts of catalytic converters or are catless.

What about overall fitment between the WRX and STi or different model years? All OEM or aftermarket exhausts designed for 02-07 WRX/STi will fit either the 02+ WRX sedan/wagon or 04+ STi. Occasionally, you will have a slight fitment issue with some models (moreso if your car has the optional rear differential cover) that usually get be fixed via hanger adjustment, longer exhaust hangers etc. 06+ models have fitment issues with some exhausts (mainly the muffler portion) due to the new rear diffuser.

I have an 06+ WRX, is the downpipe the same? No. The 2006+ WRX has a unique exhaust in that it’s downpipe is both the downpipe and midpipe sections of the “older” exhaust. This means you must use a “long” downpipe to bolt up to the rest of your exhaust system. A full TBE will fit fine, but when replacing just the downpipe, you must use a long downpipe. Check with your Vendor for other possible fitment issues prior to ordering.

STi intercooler install on a Subaru WRX

You can easily install the upgraded STI top-mount intercooler in your garage using basic tools.

1. Disconnect your battery and make sure you have all the necessary tools. You need a flat bladed screwdriver, a 10mm wrench, and a 12mm wrench. Consider the picture before you in the engine compartment. The parts you’re looking for are centered on top of the engine. You need the new intercooler, an STI Y-pipe and inlet elbow and a new gasket for the bypass or blow-off valve. You also need the STi air conditioning line bracket for the firewall.

This is the stock WRX engine with the stock intercooler on top.

2. Two 12mm bolts that hold the intercooler to its mounting bracket on either side of the cooler. On the passenger side, note that there’s an open hole in the bracket—this hole is there to accommodate the STI intercooler. Three 10mm bolts hold a metal tube to the front of the intercooler, and two 12mm bolts that attach the bypass valve. Underneath the intercooler on the passenger side, there’s a hose clamp that holds the Y-pipe to the turbo, and there’s another hose clamp in front that holds the intercooler to the throttle body.

Note the extra bolt-hole Subaru thoughtfully placed in just the right spot for an STI intercooler.
You need to undo all these bolts along the front of the intercooler.

3. Loosen the hose clamps first (and hopefully the one under the intercooler is oriented to make this easy) and then undo all the bolts. The intercooler should lift out and take the Y-pipe with it. Leave the bypass valve on the intake manifold—you don’t need to totally disconnect it. You might need to wiggle it loose, but don’t pull too hard.

Carefully lift out the intercooler and the hoses should come free if you’ve loosened the clamps.

Trunk swaps for STi and WRXs

Remove the glow in the dark release handle. Once this is done you can get to the lock. Simply twist the orange thing around, and pop the metal rod. Take a screw driver (you also might need a hammer as well) and pry that black clip off. Its really tight on there so you will need to use some force (this clip is exactly like the clip securing the brake lines).

Remove latch from trunk (optional as it may not be needed)
Remove the 2 bolts, twist yellow thing around and pop out that metal rod. You will also need to pop out the cable from that glow in the dark handle.

Remove trunk
Remove the 4 12mm bolts that secure the trunk to the trunk arms. Beware that the STi trunk weighs a TON (something like 50+ lbs). You will also have to unplug the 3rd brake light and clip all the wire retainers off the STi trunk arm to get the trunk off.

VF39 STi turbocharger onto your WRX/Forester

VF39 STi turbocharger onto your WRX/Forester:

Swapping a STi VF39 turbocharger onto your WRX/XT is really easy. Find out here the step by step process on swapping a VF39 onto your Subaru WRX/XT.

You can buy a brand new VF39 Turbocharger here:

Subaru 14411aa5729L Turbocharger

A lot of people seem to be getting hung up on the oil return lines and coolant lines. The coolant lines and banjo bolts from the TD04 ARE interchangeable if your vf39 doesn’t have them (mine didn’t). The oil return line is not and must be modified in order to fit the vf39, (mine had it). Or get a new one from the dealer. I will explain in the pictures when I get to these items.

First remove the intercooler, pretty self explanatory there are 2 bolts that it mounts to, 2 on the BPV and the hoses. Done Deal. Next the heat shield. You should be somewhere around here:

VF39 STi turbocharger onto your WRX/Forester: Start removing the head shield and downpipe.


Remove the downpipe:

VF39 STi turbocharger onto your WRX/Forester: Start removing the downpipe.

Then remove the bolt for the oil inlet (top of the turbo), and start removing the coolant lines (2 lines coming off the side of the turbo 1 goes up 1 goes down). Be careful as you will lose coolant during this step be prepared to either catch it under the car or plug the line:

VF39 STi turbocharger onto your WRX/Forester: Remove coolant lines and oil lines.

Then remove the 3 bolts that hold the turbo to the uppipe. Loosen from the intake remove vacuum lines and anything else attached to the turbo and you should be ready to take it off. The hose that the oil return line fits into is directly under the turbo and you should probably just lift straight out. Try to leave the hose where it is and lift the line out.

Now that the turbo is off you can start swapping out the parts you need from the td04. The coolant lines from the TD04 will fit the VF39 however they are attached and too close together to fit directly on the VF39 see pic:

VF39 STi turbocharger onto your WRX/Forester: changing out oil lines.

Steering wheel Subaru GD/GR STi steering wheel removal

GD STi steering wheel
Subaru Impreza GD STi steering wheel


When removing the airbag from the steering wheel, be sure to turn the ignition switch to OFF, disconnect the ground cable from battery, and wait for more than 60 seconds prior to starting work. The airbag system is fitted with a backup power source. If the airbag system is serviced within 60 seconds after the ground cable is disconnected, it may inflate.

When storing a removed airbag module, do not place any objects on it or pile airbag modules on top of each other. If the airbag inflates for some reason when it is placed with its pad side facing downward or under any object, a serious accident may result. Do not drop the airbag modulator parts.


REMOVAL

1) Disconnect the ground cable from battery.

  • Use a 10mm socket to do so
  • Please remember that if you have Cobb AccessPort, your real time map will be need to be reflashed after disconnecting the battery

2) Set the tires to straight-ahead position.

  • Do your best to park as straight as possible. We suggest straightening the wheel and driving forward approximately 15ft. Try having a friend help you with this.

3) Remove the airbag.

  • In order to remove the airbag, you will need a T30 TORX bit.
  • You will find the two bolts on the left and right-hand side of the steering wheel, approximately at 9 and 3 o’clock (refer to figure 1.0 in the “Reference Images” section of this installation guide).
  • These are lightly torque (~5 to 7.2 ft.lbs) and will not come out of the steering wheel.
  • Once these are loosened, you may gently remove the airbag.
  • You will immediately notice the airbag harness. There may be one or two plugs and one ground plug connected to the airbag. The ground is removed with another gentle pull. The main connectors, located on the center of the rear of the airbag, will have either one yellow or one yellow and one pick lock tabs. Use a small flat head to gently pry this upward. Place this yellow lock tab in a safe place (refer to figure 1.2 or 1.3 for applicable model year).
  • Your airbag is now ready to be removed! Please take great care in storing your airbag!

WRX/STi rear wheel stud replacement

WRX/STi rear wheel stud replacement:

Careful cleaning of the threads/lugnuts and using hand tools (AKA NOT an impact gun!) will help prolong the life of your studs. When the day comes though, here’s how to replace the studs in the rear with stock length studs. If you want to replace them with longer length studs (ARP, etc.) you will have to pull the hub entirely and buy new wheel bearings.


Subaru 28365FE001 Wheel Stud

ARP 1007716 Wheel Stud Kit for Subaru


Things you will need:
Stock length wheel studs (As Required): NAPA has these for ~$3 a piece. Part # 641-3209
M8x1.25 bolts (2): Home Depot Racing
M8 washers (~6): Home Depot Racing
19mm Socket: Lugnuts
14mm Socket: Caliper bolts
12mm Wrench: ABS Sensor bolt
7mm Allen Key: M8x1.25 bolts
5mm Allen Key: ABS Ring bolts
Hammer: of the BFH variety, for beating on studs that have misbehaved
Telescoping Magnet Tool: Optional, but will make life much easier.

New wheel stud in the freezer.

Sticking the new studs in the freezer will cause them to shrink slightly and really help you when it comes time to seat them in the hub. Throw them in the freezer before heading out to Home Depot Racing or leave ’em in overnight, just make sure those puppies are ice cold. Leave them in the freezer until you are actually ready to use them.

Remove the two bolts holding the caliper in place using your 14mm socket, and ziptie it out of the way. I have mine attached to the swaybar in this picture.

2nd Generation Subaru Impreza WRX STi United Kingdom varients

Impreza WR1
Impreza WR1

A limited edition of 1000 Japanese MY04 WRX STI‘s with DCCD were exported to celebrate victory in the 2003 WRC drivers’ championship. 500 were sold in Europe, Australia and South Africa as the Petter Solberg edition; the other 500 were further modified by Prodrive and sold in the UK as the WR1. They had 316 bhp (236 kW) and 309.8 ft·lbf (420.0 N·m), an incredible 0-60 mph time of only 4.25 seconds and a top speed of 155 mph (249 km/h) (electronically limited). They were equipped with Prodrive WRX STI springs, Pirelli PZero Nero tires, mesh grilles, special Ice Blue metallic paint and Prodrive PFF7 Pewter wheels. The new ECU and exhaust were not EU-homologated, so they were fitted after registering the car. The retail price was £29,995.

The 2008 Cusco Subaru Impreza WRX STi Super GT

Cusco's Impreza in GT300
2008 Subaru Impreza WRX STi Super GT

The Cusco team have been campaigning a heavily modified STi with a rear drive conversion as required by regulations since the late nineties and having no two-door model available at present, the Super GT committee gave a special permit for them to race with a four-door model instead of a two-door one. The rear drive conversion rule was lifted in 2006, and since then they returned to all-wheel drive with a transaxle gearbox.

GT300
The Cusco Subaru Impreza in 2008.

In 2008, Cusco’s Impreza won the first GT300 race in Sepang. It marked the first AWD car victory in Super GT/JGTC history. Even though they were having very impressive results(with 1 win and 2 podiums) that season, Cuscho announced that they would not participate in the 2009 season as they want \ The performance of Cusco was outstanding even though they were using a 4-door car, it later lead the Super GT committee to officially allow all 4-door model cars to participate the series. The Toyota Corolla Axio followed suit in 2009.

Cusco's Impreza
In 2008, Cusco’s Impreza won the first GT300 race in Sepang. It marked the first AWD car victory in Super GT/JGTC history.