All posts by Subaru Idiot

Nice Price or Crack Pipe? 1987 Turbo GL-10 Wagon

Nice Price or Crack Pipe? 1987 Turbo GL-10 Wagon:

FOR SALE: A very rare 1987 Subaru GL-10 4WD TURBO Wagon w/5 Speed Manual & Digital Dashboard.

FOR SALE: A very rare 1987 Subaru GL-10 4WD TURBO Wagon w/5 Speed Manual & Digital Dashboard.

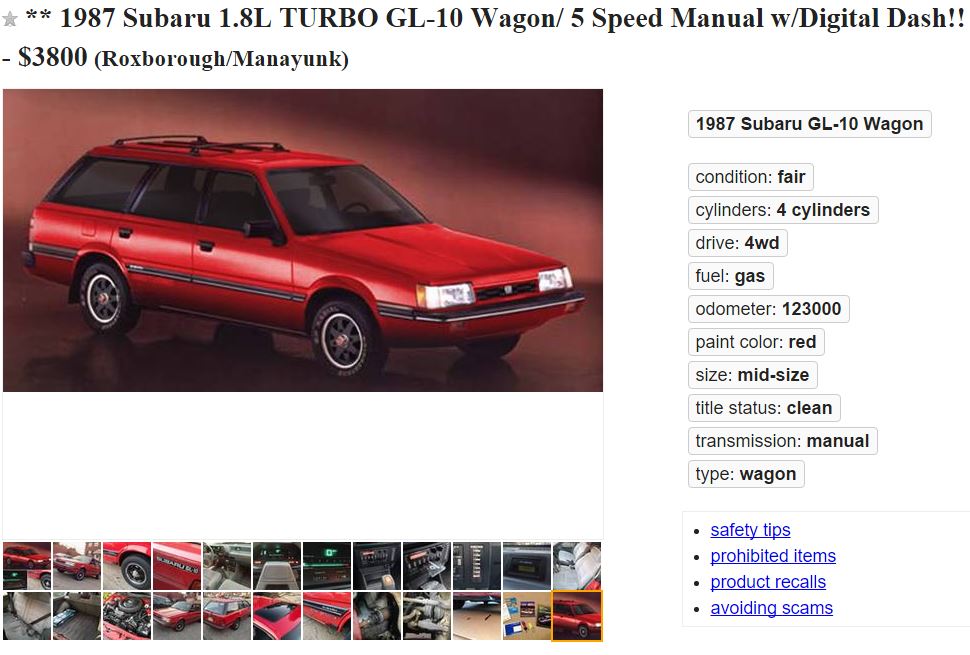
I only purchased this car about a month ago. It came from the Allentown PA area and had one original owner (me being the second). It needs some work and I do not have the time to fix it up before winter as I originally hoped. With another Subaru project car already in the garage, sadly this one must go. I am hoping to pass this on to another Subaru enthusiast who has the time to make it perfect again.

The car runs and drives great, shifts smooth and even has a little TURBO light on the dash when you give it some extra gas. All of the digital gauges, warning lights, power windows/mirrors, am/fm/tape player, and other electronics work perfectly. The AC blows cold and the HEAT is hot. The interior is clean and maybe a 7 or 8 out of 10… for its age. I noticed that the frame has had some previous rust repairs and will need some additional work around the frame rails.

The engine is clean and runs great, but pretty much leaks from everywhere. The front axle boots are busted and will need to be replaced (new axles are included in sale). I have the original owners manual and “added security” paperwork, the 1987 Subaru sales catalog, the original keys as well as some extras, and a Haynes Repair Manual. The car will be detailed with a full tank of gas at time of sale!

I am only asking $3800 or best offer. I have the title in hand! If interested in seeing the car or have an questions, please contact me by email. Thank you!

Fully loaded with every 80’s Subaru option including:
* 4WD
* 5-Speed Manual
* Turbo charged
* AM/FM Stereo w/Tape Deck
* Adjustable Steering Wheel
* Air conditioning
* Cloth Upholstery
* Cruise control
* Digital Clock
* Front Bucket Seats
* Interior Hood Release
* Interval Wipers
* Power Mirrors
* Power locks
* Power windows
* Rear Defroster
* Rear Window Wiper
* Steering Wheel Controls
* Sunroof
* Tachometer
* Tilt Steering Column
* Trip Odometer
* Vanity Mirror(s)

[poll id=”2″]

1987 Turbo GL-10 Wagon for sale

Valve Adjustment DOHC Engine Part 2

Valve Adjustment Tool and
Adjustment Procedures:

As we mentioned, it takes a special tool to work within the limited clearance area between the cylinder heads and the frame rails. The ST 498187 is a three part tool. One part wraps around the cam lobes, a second touches the outer edges of two shim buckets, and a third eccentric bolt exerts the necessary pressure to push a pair of shim buckets away from the cam lobe to make shim removal and replacement possible.

The tool installed in the three steps:

• Wrap the first half of the tool (part A) around the lobes.
• Attach the second half (part B) to part A by sliding its pins through the slotted holes in part A.
• Install the eccentric bolt (part C) into the hole in part A.

Valve Adjustment Tool and Adjustment Procedures: As we mentioned, it takes a special tool to work within the limited clearance area between the cylinder heads and the frame rails.

The eccentric bolt forces parts A and B away from one another. Because part A can’t move (it’s wedged against the cam lobes), the only thing that can move is part B. Part B moves by forcing the shim buckets downward, away from the camshaft.

Valve Adjustment DOHC Engine

Valve Adjustment DOHC 2.5 Liter Engine:

The first versions of the 2.5 liter twin cam engines employed non-hydraulic valve actuation. Like the timing belt, the clearance between the engine valves and the shim and bucket valve actuators does not require inspection and/or adjustment until 105,000 miles have elapsed. However, various circumstances may require an adjustment before that milestone is reached.

 Valve Adjustment: Unlike some overhead cam engines that require you to rotate the cam until each cam lobe is facing 180 degrees away from the adjustment shim, Subaru has very specific procedures for adjusting four valves at a time (a pair of intakes and a pair of exhausts).
Valve Adjustment: Unlike some overhead cam engines that require you to rotate the cam until each cam lobe is facing 180 degrees away from the adjustment shim, Subaru has very specific procedures for adjusting four valves at a time (a pair of intakes and a pair of exhausts).

Clearance is tight and there is little room to work between the cylinder heads and the left and right frame rails. A special tool (ST 49818700) is available for depressing the valves and removing the adjusting shims. Without this tool, the job is impossible to accomplish with the engine in the car. Once again, we had the benefit of working on an engine that had already been removed from the car. Before you can adjust the valves, the engine must be cold. Consult the service manual to determine the parts that will need to be moved or removed to make some room to work.

Unlike some overhead cam engines that require you to rotate the cam until each cam lobe is facing 180 degrees away from the adjustment shim, Subaru has very specific procedures for adjusting four valves at a time (a pair of intakes and a pair of exhausts). The pairs of intakes and exhausts are never for the same cylinder, which makes things rather interesting. This system requires you to turn the crankshaft a total of four times to complete the adjustment procedure.

Limited Spoiler 07 STi install:

Limited Spoiler 07 STi install:

This is a step by step guide in installing the Limited Spoiler from a 07 STi.

Here is the limited spoiler, already painted to match the lid:

The part number is actually E7210FE900 and the kit cost $221 shipped at the time of purchase, but prices may have changed.

Limited Spoiler 07 STi install: Here is the spoiler already painted and ready to install.

1.)From the factory this fitting is already installed in the center of the spoiler, if you bought it unpainted, remove this BEFORE you get your spoiler painted. It just makes it easier. I simply cut the nipple off so that nothing is protruding from the bottom of the spoiler. You can also use the nipple and cut a hole in your trunk.

Limited Spoiler 07 STi install: Limited Spoiler 07 STi install: If you bought it unpainted, remove this BEFORE you get your spoiler painted.
Limited Spoiler 07 STi install: If you bought it unpainted, remove this BEFORE you get your spoiler painted.

2.) The 3M tape you want to use looks like this, I picked it up at the local auto parts/auto body shop. You can see the part number in the picture. It costs around $15 and you will have enough for two or more installations.

The 3M tape you want to use looks like this, I picked it up at the local auto parts/auto body shop. You can see the part number in the picture.

You can buy the 3M Tape here:


3M(TM) Automotive Acrylic Plus Attachment Tape 06384, Black, 1/2 In X 5 Yds, 45 mil [PRICE is per ROLL]

SVX POWER STEERING SYSTEMS PART 4

SVX Power Steering Systems on Early Subarus Part 4:

There are two model-specific systems available on SVX vehicles:

SVX Power Steering Systems on Early Subarus Part 4: The engine speed sensitive, or conventional belt driven hydraulic pump and pinion type steering system is standard equipment on the SVX.

• The engine speed sensitive, or conventional belt driven hydraulic pump and pinion type steering system is standard equipment on the SVX.

• An SVX equipped with the SVX Touring Package uses an optional vehicle speed-sensitive system. This system provides normal power assist at low vehicle speeds for reduced driver steering effort, and reduced steering assist at increased vehicle speeds for increased road feel and improved engine operating efficiency. Both systems have many similarities with the Legacy system.

SVX Power Steering Pump

Both systems share many similarities to existing Subaru steering systems. Both use a belt driven power steering pump, although the pump housings are different in appearance.

Rack

A conventional power assisted rack with the standard Subaru lines and hoses is used by the standard system.

Oil Cooler

An oil cooler pipe has been added to both SVX systems. It is located in front of the radiator on the return side of the system.

Rubber Coupler

A steering shaft rubber coupler is used by both SVX systems to reduce road noise and vibration.

SVX Power Steering Pressure Switch

A power steering pressure switch is located on the outlet side of the pump. The switch monitors increased engine load during idle speed steering. The switch provides an input to the MPFI ECU, which prevents stalling by raising the engine idle speed. There is not an additional trouble code for the MPFI ECU.

POWER STEERING SYSTEMS ON EARLY SUBARUS PART 3

POWER STEERING SYSTEMS ON EARLY SUBARUS PART 3

Cybrid Power Steering

The Cybrid Power Steering System was standard equipment on the XT6. It’s a computer controlled,
electric motor-driven hydraulic steering system, using a power-assisted rack and pinion assembly similar to the XT. This system provides improved steering feel and more precise power assist over a wider operating range. Fuel consumption is reduced because it requires less horsepower due to the electrically-driven hydraulic pump. The specific system used on the XT6 is quicker than other XT power steering systems, with just 3.2 turns lock-to-lock.

POWER STEERING SYSTEMS ON EARLY SUBARUS PART 3: The Legacy RS used in rallying used the early Subaru power steering system.

Cybrid Steering Components

The Cybrid Power Steering System consists of four major components:

• The Motor and Pump assembly mounted on the front bulkhead (firewall).
• A Steering Sensor located inside the vehicle at the base of the steering column.
• A Signal Controller located in the left rear quarter panel.
• The Power Controller mounted on the front bulkhead (firewall) to the left of the Motor/Pump assembly.

Motor/Pump Assembly

The Motor/Pump assembly is similar to a starter motor, since it has an armature, fields, and brushes which are serviceable. The electric motor drives a pump which is very similar in design to an engine driven pump. This combination replaces the familiar belt driven P/S pump assembly. The Cybrid System requires special hydraulic fluid to retain stable viscosity during cold temperatures.

Heater

The Pump incorporates an electric heater to warm the hydraulic fluid in extremely cold operating conditions, improving the steering performance. A thermistor type switch located on a bracket above the Motor/Pump assembly, senses the underhood (ambient) temperature and sends an input to the Signal Controller.

The Heater operates for approximately five minutes after engine start-up. The Signal Controller grounds the heater relay, which passes battery voltage to the heater. The heater relay is located near the motor/ pump assembly.

Note: The Heater only works when the thermometer signals an extreme cold condition.

Steering Rack Bushings Install on a 08+ STi

Steering Rack Bushings Install on a 08+ STi

This is a step by step guide on installing steering rack bushings (whiteline) on a 08+ WRX/STi. This needs to be done the right way and all the bolts NEED to be torqued with a torque wrench to factory spec for the car to be in a safe operating state.

1.) Remove the under tray. There are 2 12mm bolts towards the front, 1 12mm bolt on the rear, 2 clips on the rear. and 2 plastic pop-out clips on the sides near each wheel well.

2.) After removing the under tray you will need to remove 10 14mm bolts holding the cross member support brace (otherwise known as the jack plate) in place. The bolts that are to be removed are circled in red and yellow.

Note: The bolts circled in yellow are secured by nuts on the topside so you will need the 14mm wench as well. These bolts are torqued down pretty tight if they have never been removed before.

Steering Rack Bushings Install on a 08+ STi: The bolts circled in yellow are secured by nuts on the topside so you will need the 14mm wench as well.

3.) Once the cross member support is removed the steering rack will be exposed as pictured below. Note the location of the 3 bushings denoted by the red arrows.

Steering Rack Bushings Install on a 08+ STi: Note the location of the 3 bushings denoted by the red arrows.

Nice Price or Crackpipe? Subaru Convertible Addition

Custom convertible Subaru Impreza
6 speed
Convertible
Rear view camera
Leather interior
Fully loaded
Located in Amesbury, MA
Call, text or email for details or to set up time for test drive
$32,500

This car is in excellent condition, it’s super fast and fun to drive! My husband LOVES this car unfortunately for him with the arrival of our new baby he’s going to be driving a minivan! #FamilyLife

A Subaru Impreza convertible. Nothing quite says I've ruined my car more than this.
A Subaru Impreza convertible. Nothing quite says I’ve ruined my car more than this.

Someone needs to get this car out of it’s misery. Also do not ever get in a crash with this thing, because bad things will happen.

Link